Sourdough Peanut Butter Ball Recipe

Made Interesting With Organic Pumpkin and Whole Wheat and Rice Flour
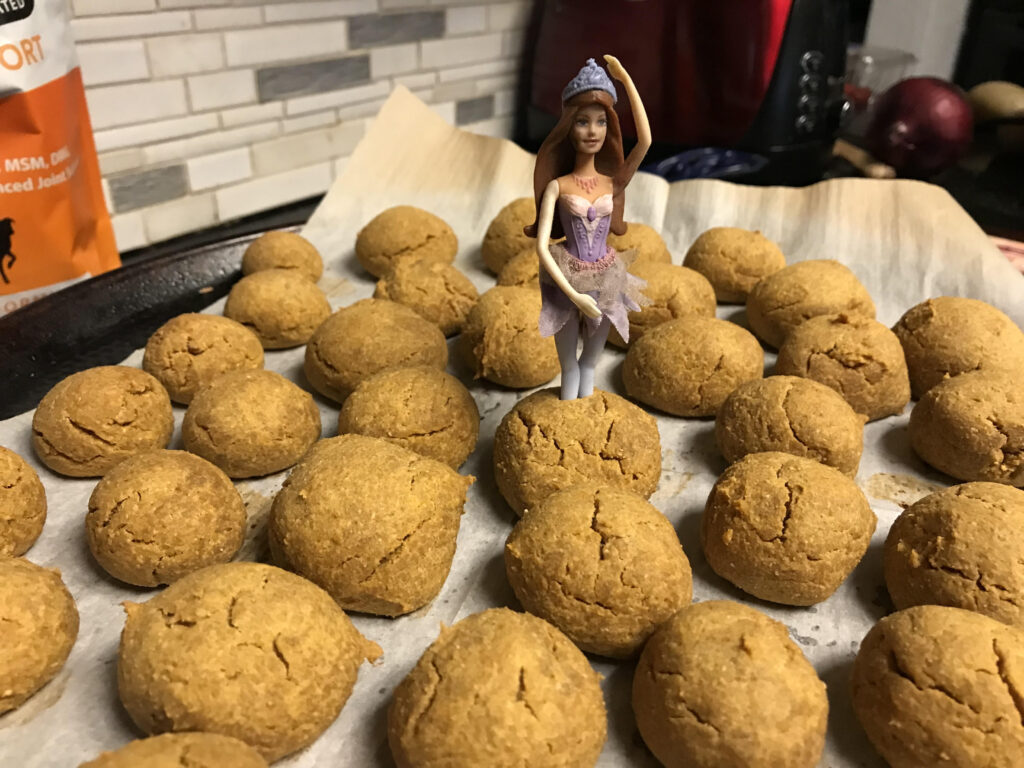
Photo of Kelly R. Smith   by Kelly R. Smith; © 2022

Sourdough peanut butter balls, complete with ballerina
index sitemap advanced

Ads we feature have been independently selected and reviewed. If you make a purchase using the links included, we may earn a commission, which helps support the site. Thank you for your support.

I’ve been enjoying the world of sourdough baking lately. I enjoy the classics but what I really love is coming up with my own creations, quite often to the dismay of my wife — She-Who-Must-Be-Obeyed. Come on; I jest. Earlier this month I unleashed my Sourdough Focaccia recipe. Yesterday I came up with this sourdough peanut butter ball concoction.

It all started as a brain-storming session for a dog treat variation. I already make my own chicken jerky for dog treats. One similarity betwixt that one and this is that they are both suitable for both human and canine consumption. Win-win!!

Our vet had recommended adding canned pumpkin to our homemade dog food both the nutrition value and to maintain peak “regularity” if you get my drift. And the peanut butter? Loads of nutrition and protein. Not to mention flavor! Approved by all our rescue dogs.

If you make these balls 1″ to a quarter inch larger, like I do, this one batch will yield about 60 servings. Yes, you and the kids will love these, but so will your dog. But, tell me again, how much are you paying per paltry ounce for dog treats? (Forehead-slapping moment.)


Sourdough Ball Ingredients

Use organic ingredients when possible.

  • 1 cup sourdough starter
  • 1/2 cup organic steel cut oats
  • 3/4 cup canned organic pumpkin
  • 1/2 cup peanut butter
  • 1/3 cup coconut flour
  • Approximately 2 cups whole wheat flour
  • 2 large eggs

Preparation

  1. Mix sourdough starter and oats in a large mixing bowl. This allows the oats to absorb liquid from the sourdough starter.
  2. cover the bowl with a damp washcloth and let the mixture rest for at least 3 hours. You could do this before going to work and do the baking this afternoon.
  3. Stir or whisk in the pumpkin, peanut butter, eggs, and coconut flour.
  4. Start mixing and stirring in the whole wheat bit by bit. You know the drill; it’s like preparing bread dough. When it gets hard to stir, cease and desist. Time to move on.
  5. Preheat the oven to 350℉.
  6. Get out your pizza pan and a medium-sized sheet pan.
  7. Roll ball of dough in the palms of your hands and place them on the parchment paper, one by one. Each ball that I make is 1″ to a quarter inch larger, but you make it to suit you. They don’t rise much so they can be neighborly and sit close.
  8. Bake for 20 minutes.
  9. Remove (after passing the toothpick test) and set aside to cool.
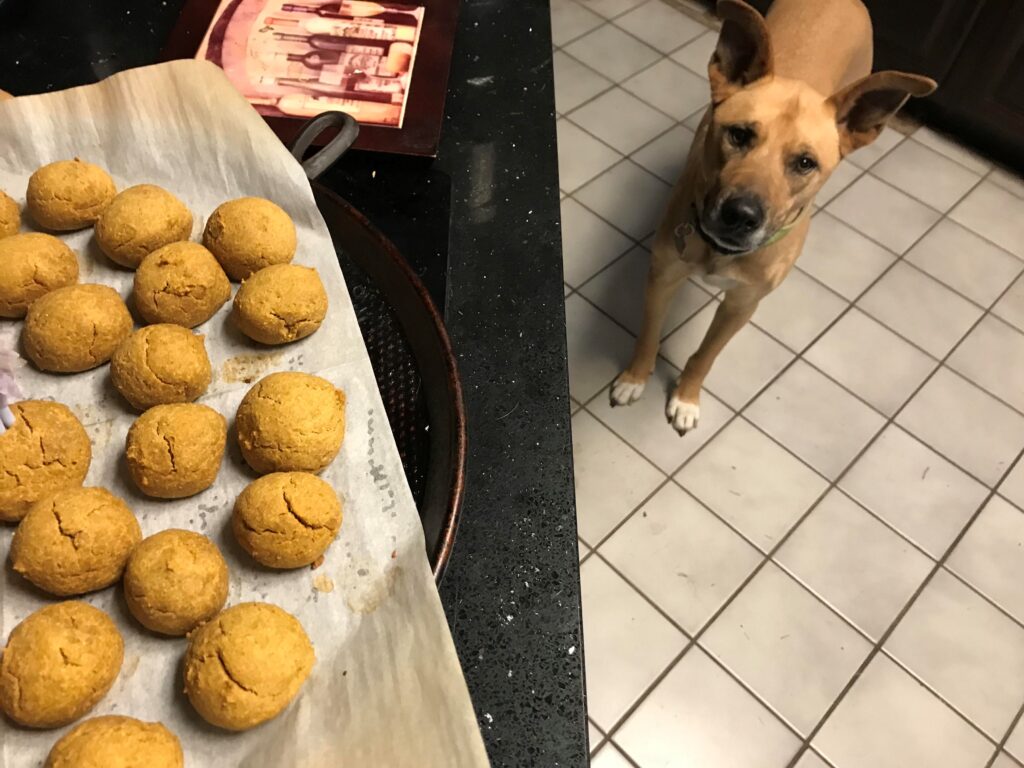
Frankie dog waiting for a homemade treat.
Frankie doesn’t see much sense in the cooling-down phase

More Recipes and Related Content to Explore


Looking for more great content? Visit our main page or partner sites:

Considered Opinions Forum

I Can Fix Up My Home

The Green Frugal

Running Across Texas


As Featured On Ezine Articles

I offer article and blog-writing services. Interested? Contact me for a quote!


Did you find this article helpful? Millions of readers rely on information on this blog and our main site to stay informed and find meaningful solutions. Please chip in as little as $3 to keep this site free for all.


Visit Kelly’s profile on Pinterest.

About the Author:

Photo of Kelly R. SmithKelly R. Smith is an Air Force veteran and was a commercial carpenter for 20 years before returning to night school at the University of Houston where he earned a Bachelor’s Degree in Computer Science. After working at NASA for a few years, he went on to develop software for the transportation, financial, and energy-trading industries. He has been writing, in one capacity or another, since he could hold a pencil. As a freelance writer now, he specializes in producing articles and blog content for a variety of clients. His personal blog is at Considered Opinions Blog where he muses on many different topics.

Sourdough Focaccia Recipe

This Spiced Italian Comfort Food is Excellent as an Appetizer, Side Dish, or Main Course

Photo of Kelly R. Smith   by Kelly R. Smith; © 2022

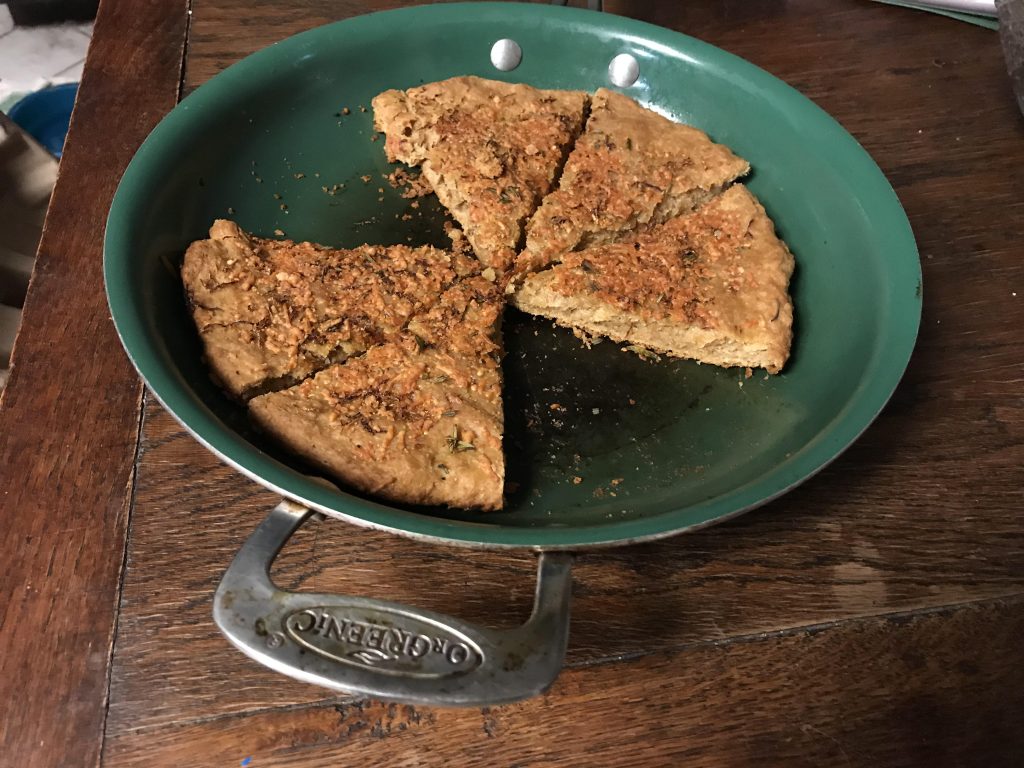
Sourdough focaccia in a skillet
index sitemap advanced

Ads we feature have been independently selected and reviewed. If you make a purchase using the links included, we may earn a commission, which helps support the site. Thank you for your support.

Sourdough focaccia is one of those wonderful Italian dishes that is enjoyed by itself as an appetizer or as a meal unto itself. In our home, we do either, depending on our mood, just like my guacamole recipe. With this recipe, it emerges with a delicious, chewy tang and a mouth-watering golden crust. It all starts with your beloved starter. Don’t have one yet? Here are three ways to get your sourdough starter going.

Is focaccia the same as pizza crust? No! However, it is thought to be a precursor of pizza when it was a flatbread known to Romans as panis focacius, to which toppings were then added. Modern pizza evolved from similar flatbread dishes in Naples, Italy, in the 18th or early 19th century.


Sourdough Focaccia Ingredient List

  • 1 cup sourdough starter
  • 1 cup warm water
  • 1 tablespooln honey
  • 1 teaspoon pink Himalayan salt
  • 3 tablespoons extra-virgin olive oil
  • 3/4 cup diced onion
  • Approximately 5 cups of flour


Preparation

  1. Mix the starter, honey, and water in a large mixing bowl. A cast iron skillet is perfect. It will look like a big blob, and that’s okay! Us your hands to pull the edges out to gently stretch them. Your dough should be about 1 1/2 inches tall. Don’t stretch any more. Let it rise in a warm spot. Cover it with another piece of cookware, upside down, so it has room to rise for 2-3 hours hours until it is puffy and very bubbly.
  2. Preheat oven to 425 degrees F.
  3. Drizzle the top of the dough with olive oil Press your fingertips using your whole hand into the risen dough. Your fingertips should go all the way down through the dough until you feel the pan.
  4. Put your pan in the oven on middle rack. Bake for 15 minutes. Remove it for a moment and brush the top with melted butter, garlic, and oregano. Turn your oven down to 400 degrees F. Bake it for another 10 or so minutes until the crust is golden brown and bounces back a wee bit when you press down on it. Let it cool for 15 minutes, cut. and enjoy.


Looking for more great content? Visit our main page or partner sites:

Considered Opinions Forum

I Can Fix Up My Home

The Green Frugal

Running Across Texas


As Featured On Ezine Articles

I offer article and blog-writing services. Interested? Contact me for a quote!


Did you find this article helpful? Millions of readers rely on information on this blog and our main site to stay informed and find meaningful solutions. Please chip in as little as $3 to keep this site free for all.


Visit Kelly’s profile on Pinterest.

About the Author:

Photo of Kelly R. SmithKelly R. Smith is an Air Force veteran and was a commercial carpenter for 20 years before returning to night school at the University of Houston where he earned a Bachelor’s Degree in Computer Science. After working at NASA for a few years, he went on to develop software for the transportation, financial, and energy-trading industries. He has been writing, in one capacity or another, since he could hold a pencil. As a freelance writer now, he specializes in producing articles and blog content for a variety of clients. His personal blog is at Considered Opinions Blog where he muses on many different topics.

How to Make a Sourdough starter

If You Love That Tangy Sourdough Taste And Love To Bake, Here is How to Get Started

Photo of Kelly R. Smith   by Kelly R. Smith; © 2022

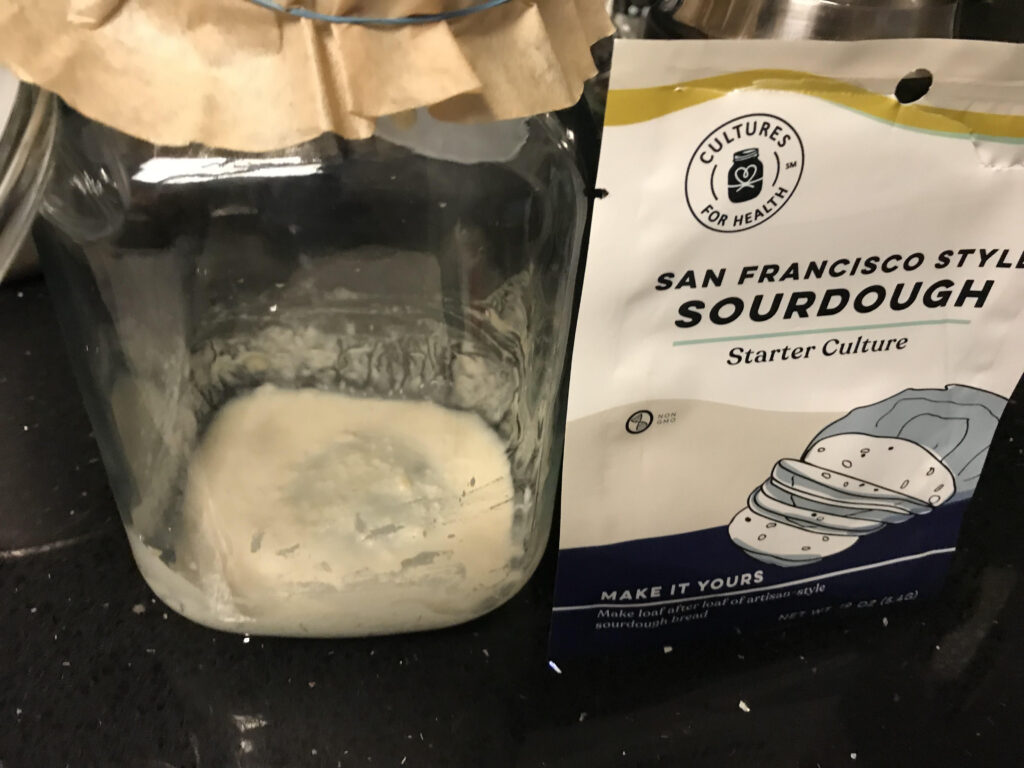
San Francisco style sourdough starter culture
index sitemap advanced

Ads we feature have been independently selected and reviewed. If you make a purchase using the links included, we may earn a commission, which helps support the site. Thank you for your support.

Who doesn’t like the tangy taste of freshly baked sourdough bread? How about pancakes, cupcakes, bran muffins, focaccia, and buttermilk biscuits? The actual baking part doesn’t differ much from the traditional yeast-in-a-package process, but now you’ll need a sourdough starter to replace the yeast.

What is a Starter?

Although the concept may seem a bit esoteric, a starter is a mix of flour and filtered water that provides an environment for a stable blend of beneficial bacteria and wild yeasts. The baker must continually maintain the mixture is with regular refreshments (or feedings) of water and flour. There are basically three ways to get it going.

  • Hit up a friend for a cup. This is the easiest way, if you know someone who is an avid sourdough baker.
  • Buy an affordable packet of wild yeasts all over the place.


You will need:

  • A glass jar; don’t use metal. Silicone spatula“>silicone spatula. This is used for stirring and scraping the inside of your jar.
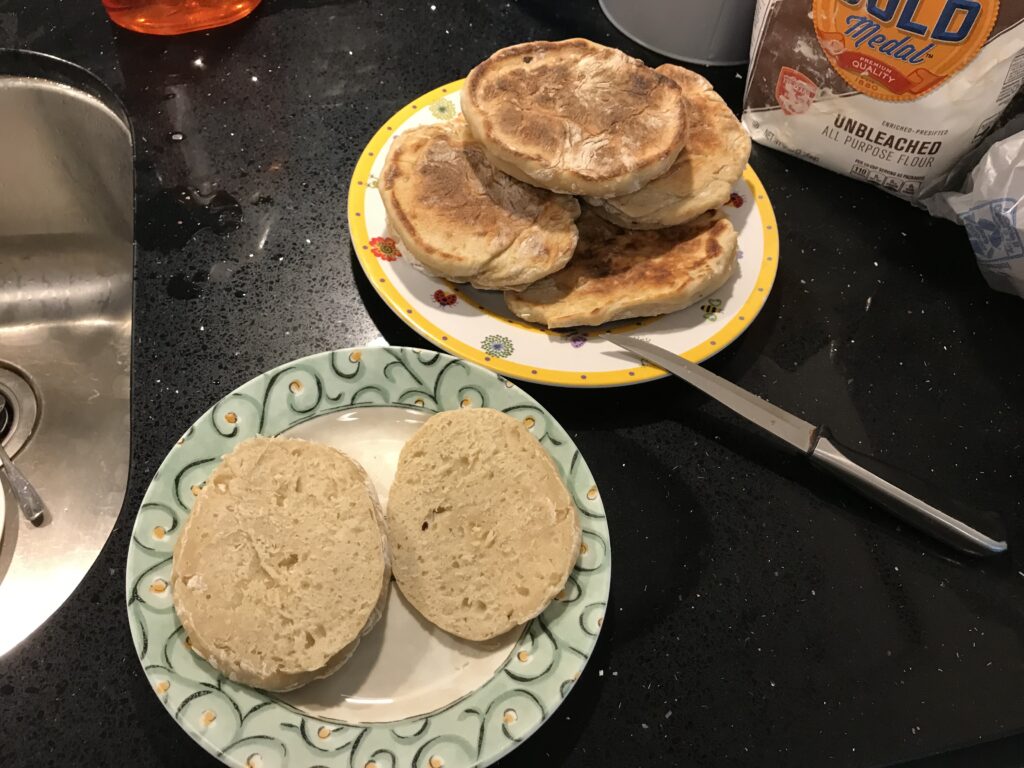
Sourdough English muffins

Whichever way you go, use filtered water. Tap water contains chlorine or chloramine, which are disinfectants used to clean tap water. This can impede fermentation. If you go with the first method, you will just need to feed it every day with equal measures of organic white flour and water until you have more than enough for your recipe.

If you go the packaged route, the instructions will be on the package. This usually entails feeding it more every day for a week or so.

Starting from scratch is a bit different. Here’s a basic recipe.

  1. Day 1: The starter adventure begins. Combine 4 ounces all-purpose flour (3/4 cup plus 2 tablespoons) and 4 ounces water (1/2 cup) in your jar. Stir well until it is combined into a smooth batter. Scrape down the sides with your spatula and loosely cover the jar. Place your jar somewhere with a consistent room temperature of 70°F to 75°F. Let it sit for 24 hours.
  2. Day 2: Feed your starter. For this, use 4 ounces all-purpose flour (3/4 cup + 2 tablespoons) and 4 ounces water (1/2 cup). You might see small bubbles here and there. Bubbles mean that the wild yeast have began being comfortable and active in your starter. They eat the sugars in the flour and continue to release carbon dioxide and alcohol. Additionally, they will increase the acidity of your starter, which assists in fending off any unwanted bacterias. At this point, your starter should begin to smell fresh, mildly sweet, and yeasty.
  3. Day three: Feed your starter again. This time, use the same quantities as day 2. By now, the surface of your starter might be speckled with bubbles and be larger in volume. If you stir the starter, it will still feel thick and batter-like, but you’ll hear bubbles popping. It should also start smelling a little sour and musty.
  4. Day 4: Feed your starter again. Use the same amounts of water and flour. The starter will feel looser than day 3 and have embeded bubbles.
  5. Day 5: Your starter should be ready to begin using. It should be doubled in bulk since day 4. It should also be very bubbly. If not, it can still be used but it won’t have the same leavening power. Feed it again.
  6. Day 6 and going forward: Maintain the starter. Discard (or use) about about 1/3 of the starter and then feed it with new flour and water; you know the drill by now. If you’re using the starter every few days, leave it out on the counter and continue discarding half and feeding it daily. But, say, you are only using it on the weekend, cover it tightly and place it in the refrigerator. You must still take it out and feed it once a week; let it sit out overnight to give the yeast time to gather strength before returning it to the fridge.


There will be times when you go out of town on business or on vacation and you won’t be able to tend to it properly. When this happens, you can feed the starter double the amount of flour to make it thicker and dough-like before you store it in the refrigerator.

Now you know how to make a sourdough starter. It’s not rocket science but it may seem like a lot of work. But, like shaving or brushing your teeth, the process soon becomes just another small effort in life, albeit one with palatable rewards.


Looking for more great content? Visit our main page or partner sites:

Considered Opinions Forum

I Can Fix Up My Home

The Green Frugal

Running Across Texas


As Featured On Ezine Articles

I offer article and blog-writing services. Interested? Contact me for a quote!


Did you find this article helpful? Millions of readers rely on information on this blog and our main site to stay informed and find meaningful solutions. Please chip in as little as $3 to keep this site free for all.


Visit Kelly’s profile on Pinterest.

About the Author:

Photo of Kelly R. SmithKelly R. Smith is an Air Force veteran and was a commercial carpenter for 20 years before returning to night school at the University of Houston where he earned a Bachelor’s Degree in Computer Science. After working at NASA for a few years, he went on to develop software for the transportation, financial, and energy-trading industries. He has been writing, in one capacity or another, since he could hold a pencil. As a freelance writer now, he specializes in producing articles and blog content for a variety of clients. His personal blog is at Considered Opinions Blog where he muses on many different topics.

Creamy, Zesty Guacamole Recipe

My Take on This Mexican Food Classic For an Appetizer or Main Course

Photo of Kelly R. Smith   by Kelly R. Smith © 2022

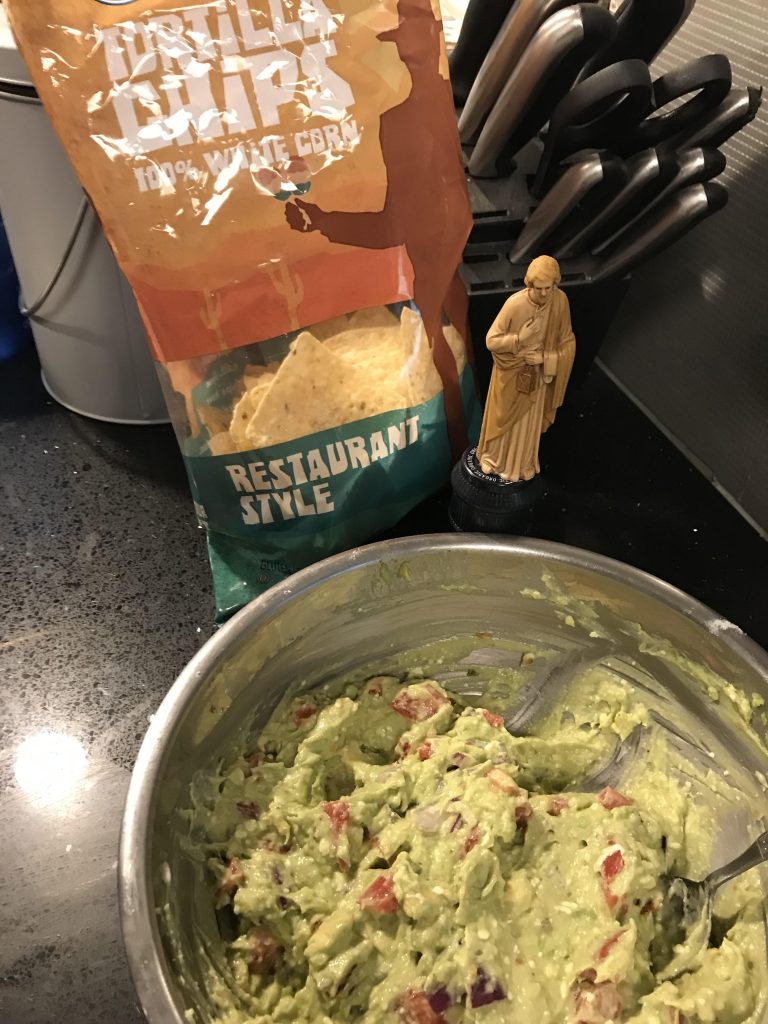
The blessing of the guacamole
index sitemap advanced

Ads we feature have been independently selected and reviewed. If you make a purchase using the links included, we may earn a commission, which helps support the site. Thank you for your support.

Who doesn’t like Mexican (or Tex Mex, if you prefer) guacamole? I know everyone in my home does! I set out to make a batch the other day. Love to cook, love to explore. When I enter my experimental kitchen, anything can happen.

The avocado is the base ingredient, of course; it is one of God’s greatest gifts. In my opinion. This fruit was originally called the alligator pear. I don’t see any correlation between the critter and the food, but still, interesting trivia. The nutrition is solid ― one cup supplies 21.4 g fat (mostly the good kind), 12 g carbohydrates, 2.9 g protein, 14.6 mg Vitamin C, 0.4 mg B-6, 708 mg potassium, and 42.3 mg magnesium. This recipe just adds to the nutritional spectrum. By the way, it pays to grow your own avocado tree when the fruit gets pricey.


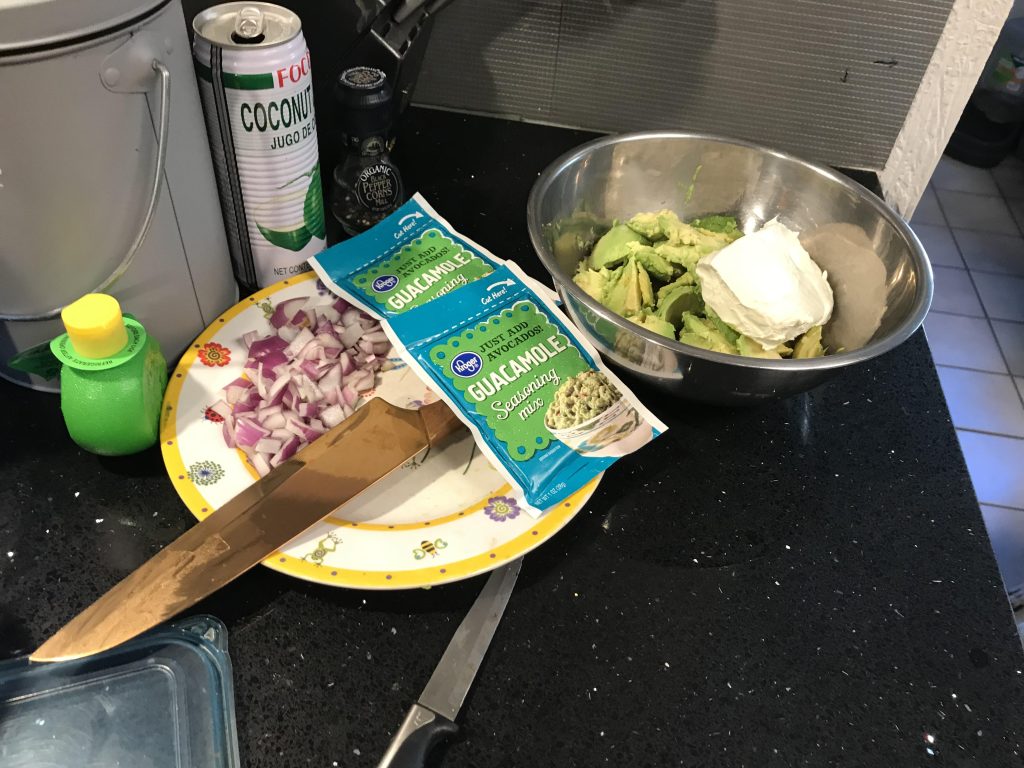
Zesty guacamole ingredients

Ingredient List

  • 4 or 5 large avocados
  • 2 packages of guacamole seasoning mix; I used the Kroger brand
  • 1 package cream cheese; again, Kroger brand. Yay, frugality!
  • 3/4 cup chopped red onions
  • red pepper flakes to taste
  • pepper to taste
  • Pink Himalayan salt to taste
  • Juice of one lemon
  • 4 diced roma tomatos


Preparation Steps

  1. In a large mixing bowl, mash the avocados. Use your device of preference; I just used a fork. Throw the husks in your compost pile.
  2. Mix in the seasoning packets.
  3. Mash in the cream cheese. You did let it come to room temperature, right?
  4. Mix in salt, pepper, lemon juice, and red pepper flakes.
  5. Mix in the tomatos.
  6. Chop and mix in the red onions.
  7. Break out the chips and enjoy!

Looking for more great content? Visit our main page or partner sites:

I Can Fix Up My Home

The Green Frugal

Running Across Texas

I offer article and blog-writing services. Interested? Contact me for a quote!


Did you find this article helpful? Millions of readers rely on information on this blog and our main site to stay informed and find meaningful solutions. Please chip in as little as $3 to keep this site free for all.


Visit Kelly’s profile on Pinterest.

About the Author:

Photo of Kelly R. SmithKelly R. Smith is an Air Force veteran and was a commercial carpenter for 20 years before returning to night school at the University of Houston where he earned a Bachelor’s Degree in Computer Science. After working at NASA for a few years, he went on to develop software for the transportation, financial, and energy-trading industries. He has been writing, in one capacity or another, since he could hold a pencil. As a freelance writer now, he specializes in producing articles and blog content for a variety of clients. His personal blog is at Considered Opinions Blog where he muses on many different topics.

Creamy Turkey Mushroom Couscous Recipe

This Pasta and Lean Meat Dish is a Real Crowd-Pleaser

Photo of Kelly R. Smith   by Kelly R. Smith

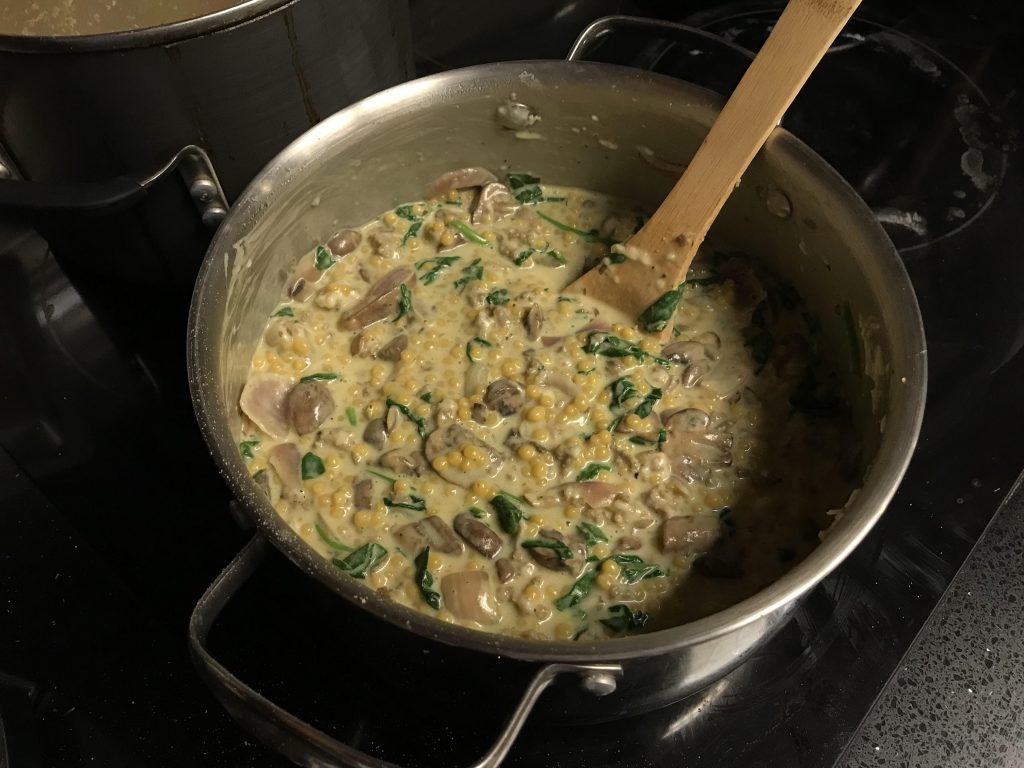
Creamy turkey mushroom
Creamy turkey mushroom couscous
index sitemap advanced

Ads we feature have been independently selected and reviewed. If you make a purchase using the links included, we may earn a commission, which helps support the site. Thank you for your support.

I’ve long wanted to try a couscous recipe just because the word sounds cool. How shallow, right? But, anything pasta is tickety-boo here in the Smith abode. Pasta forms the basis of many recipes that I keep going back to again and again. Who doesn’t like Beef Stroganoff, for example?

But hey, you are here for a more specific recipe, right? I looked at a lot of different recipes that were similar but not. quite. right. So, here we go!


Ingredient List (Organic When Possible)

  • 2 tablespoons olive oil
  • 1 lb. Turkey sausage
  • 8 oz. fresh mushrooms, sliced and chopped, cremini or baby bella
  • 3/4 cup onion
  • 3/4 cup bell pepper
  • 3 tablespoons butter
  • 3 eggs, whisked
  • 2 ounces Parmesan cheese, finely grated (about 1 cup), plus more for serving
  • 2 cloves garlic
  • 1 1/2 teaspoons pink Himalayan salt
  • 1/4 teaspoon freshly ground black pepper
  • 1 pound dried pearl couscous pasta (about 2 1/2 cups)
  • 2 cups low-sodium chicken or vegetable broth
  • 2 cups whole milk
  • 4 cups packed baby spinach (about 4 ounces)


Preparation Steps

Creamy turkey mushroom couscous  preparation
Creamy turkey mushroom couscous preparation
  1. Finely grate the Parmesan cheese (about 1 cup), mince the garlic, and slice the mushrooms 1/4-inch thick.
  2. Heat 2 tablespoons of olive oil in a large Dutch oven or similar pot using medium-high heat until shimmering. Add in the sausage meat and brown it. Add in the mushrooms, 1 1/2 teaspoons of the pink salt, the onion, and 1/4 teaspoon black pepper. Cook, stirring occasionally, until the mushrooms are slightly browned and tender. This should take 5 to 8 minutes. Next, add in the garlic, the and the dried pearl couscous pasta (about 2 1/2 cups) and sauté until fragrant, about 1 minute.
  3. Stir in the 2 cups of broth and the 2 cups of whole milk and bring it all to a boil. Next, reduce the heat to maintain a simmer. Cook uncovered, stirring frequently to keep the orzo from sticking, until the orzo is al dente and most of the liquid is absorbed and has formed a creamy sauce, about 10 minutes or according to package instructions.
  4. Remove your pot from the heat. Add the eggs, packed baby spinach, the bell pepper. and the Parmesan. Stir it until the spinach is just barely wilted and the cheese is melted, about 1 minute. Serve topped with more grated Parmesan cheese.


I hope you found this creamy turkey mushroom couscous recipe as delicious as we did! I love experimenting in the kitchen and this was somehow my first time cooking with couscous and now I’m a fan.

More Favorite Recipes and Nutrition Info


Looking for more great content? Visit our main page or partner sites:

I Can Fix Up My Home

The Green Frugal

Running Across Texas


As Featured On Ezine Articles

I offer article and blog-writing services. Interested? Contact me for a quote!


Did you find this article helpful? Millions of readers rely on information on this blog and our main site to stay informed and find meaningful solutions. Please chip in as little as $3 to keep this site free for all.


Visit Kelly’s profile on Pinterest.

About the Author:

Photo of Kelly R. SmithKelly R. Smith is an Air Force veteran and was a commercial carpenter for 20 years before returning to night school at the University of Houston where he earned a Bachelor’s Degree in Computer Science. After working at NASA for a few years, he went on to develop software for the transportation, financial, and energy-trading industries. He has been writing, in one capacity or another, since he could hold a pencil. As a freelance writer now, he specializes in producing articles and blog content for a variety of clients. His personal blog is at Considered Opinions Blog where he muses on many different topics.

Crustless Tomato Pie Recipe

Combine the Goodness of Tomatoes, Bell Peppers, and Lots of Cheese

Photo of Kelly R. Smith   by Kelly R. Smith

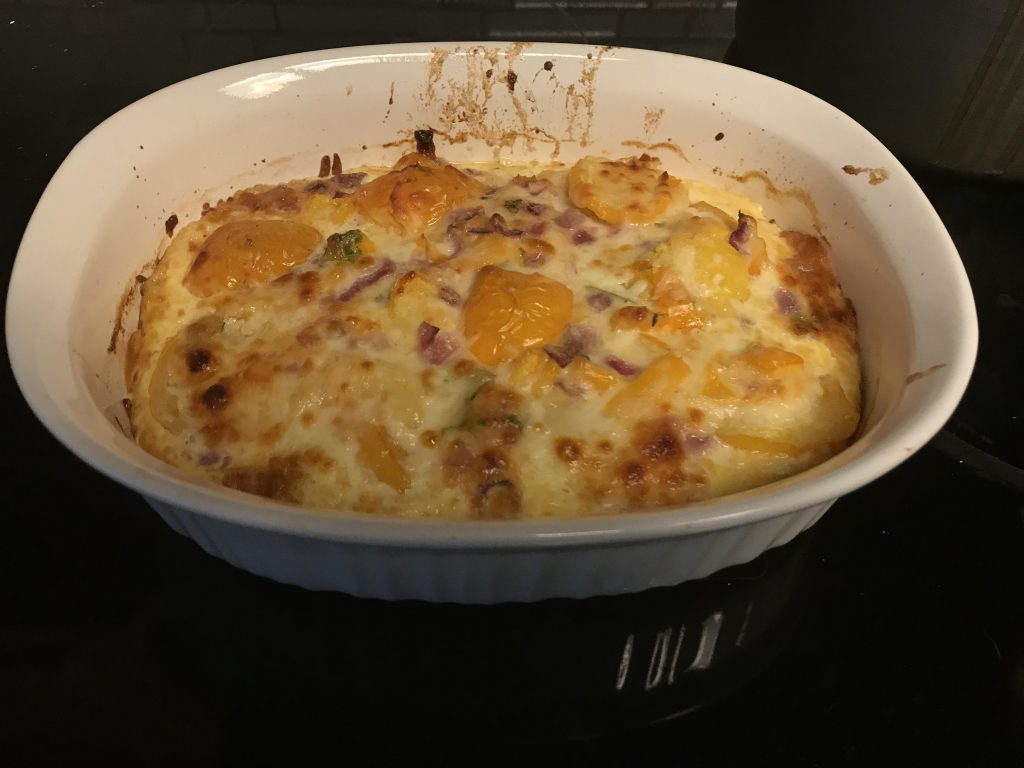
Crustless tomato pie right out of the oven
index sitemap advanced

Ads we feature have been independently selected and reviewed. If you make a purchase using the links included, we may earn a commission, which helps support the site. Thank you for your support.

I love to come up with new recipes. I’m especially partial to baking bread and comfort food casserole-type dishes. This tomato pie recipe was prompted by the fact that the tomatoes in my garden are coming in fast and furious, like a profitable jackpot from a slot machine. No complaints about that, but it’s use ’em or lose ’em; am I right? This year my vegetable garden is home to red and yellow tomatoes as well as herbs like basil and lemon balm, which not only makes great tea but has medicinal benefits. Using as many ingredients from my own garden means I can be sure they are organic. Anyhow, on to the recipe.


Crustless Tomato Pie Ingredients

  • 4 tomatoes sliced, about 1/4 inch
  • Salt
  • 3 tablespoons butter
  • 3 eggs, beaten
  • 3/4 cup onion (I like red ones)
  • 3/4 cup bell pepper
  • 1/2 teaspoon black pepper
  • 4 tablespoons cilantro, chopped (that’s right out of my garden as well)
  • 2 cups shredded mozzarella cheese, plus extra for sprinkling over top
  • 4 tablespoons fresh cilantro, chopped
Tomato Pie Preparation

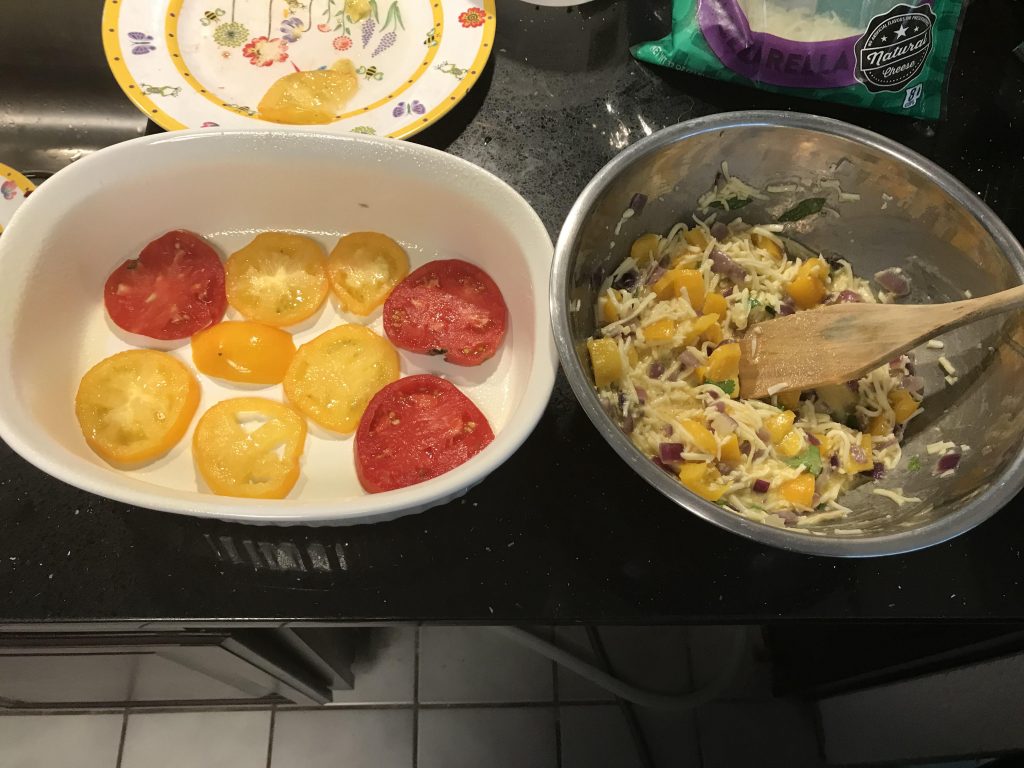
Preparation Steps

  1. Slice the tomatoes and lay them out on plates. Sprinkle lightly with pink Himalayan salt and let them rest for 30 minutes. This step is important to leech out excess water.
  2. Melt the butter in a saucepan, add the onions, and saute until they are soft.
  3. Transfer mixture into a medium-sized mixing bowl.
  4. Mix in the eggs, cheese, bell pepper, pepper, and cilantro.
  5. This is a good time to preheat your oven to 375 degrees.
  6. Spray cooking spray on your casserole dish. I used my 2 1/2 quart Corningware.
  7. Tilt your plates to spill off the excess water. Then, lightly press down with paper towels to remove even more water.
  8. Line the bottom of the dish with tomato slices and spoon a thin layer of the mixture on them. Keep going, in like fashion, building up layers. Spread a final thin layer of cheese across the final, top layer.
  9. Bake for 30-40 minutes. It’s done when lightly browned. Remove from the oven and allow it to cool a bit before serving.

And there you have it. There are other versions but this is my crustless tomato pie recipe. Are there other possible ingredients? Sure, depending on your taste. Try serving it with something like a raw Tuscan kale salad.

More Recipes to Try (and Some Nutrition Info Thrown In)


Looking for more great content? Visit our main page or partner sites:

I Can Fix Up My Home

The Green Frugal

Running Across Texas


As Featured On Ezine Articles

I offer article and blog-writing services. Interested? Contact me for a quote!


Did you find this article helpful? Millions of readers rely on information on this blog and our main site to stay informed and find meaningful solutions. Please chip in as little as $3 to keep this site free for all.


Visit Kelly’s profile on Pinterest.

About the Author:

Photo of Kelly R. SmithKelly R. Smith is an Air Force veteran and was a commercial carpenter for 20 years before returning to night school at the University of Houston where he earned a Bachelor’s Degree in Computer Science. After working at NASA for a few years, he went on to develop software for the transportation, financial, and energy-trading industries. He has been writing, in one capacity or another, since he could hold a pencil. As a freelance writer now, he specializes in producing articles and blog content for a variety of clients. His personal blog is at Considered Opinions Blog where he muses on many different topics.

Baked Eggplant Fries Recipe

Eggplant is an Overlooked Vegetable That is Low-Calorie and High in Nutritional Value

Photo of Kelly R. Smith   by Kelly R. Smith

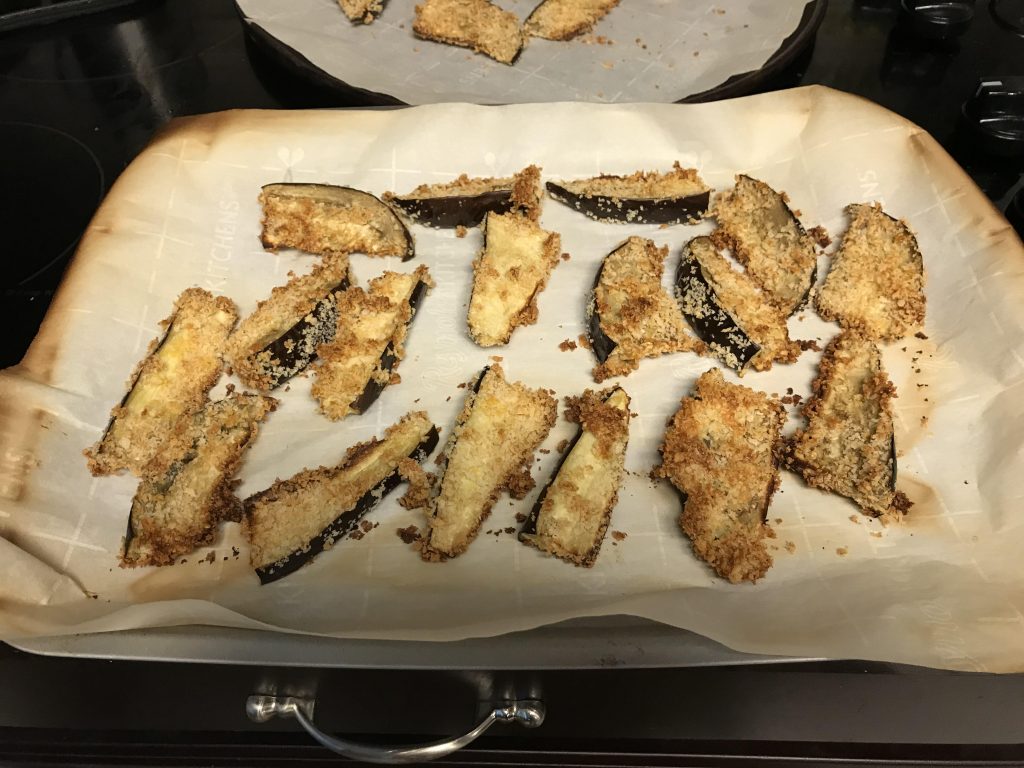
Baked eggplant fries
index sitemap advanced

Ads we feature have been independently selected and reviewed. If you make a purchase using the links included, we may earn a commission, which helps support the site. Thank you for your support.

You say, “Fries that aren’t potatoes? Blasphemy!” Well, call them whatever you want; baked eggplant fries are good. Unless you’re talking about Eggplant Parmesan, this nightshade vegetable gets comparatively little air-time. But it should. There are many varieties but at the end of the day, it originally came from India and Asia, where it grows wild to this day. Eggplants made their way to Europe with the Islamic empire in the 7th and 8th centuries.

Eggplant Nutrition?

This vegetable really stands out in this department. A 3.5-ounce (100-gram) serving of eggplant has:

  • 25 calories
  • 1 gram of protein
  • 0.2 grams fat
  • 6 grams carbohydrates
  • 3 grams fiber (we all love regularity, right?)

It’s also an excellent source of many vitamins and minerals. It has antioxidants like vitamins A and C, which help protect your cells against damage. It’s also high in natural plant chemicals called polyphenols, which may help cells do a better job of processing sugar if you have diabetes. It’s also rich in acetylcholine, a neurotransmitter that helps lower blood pressure.


Baked Eggplant Fries Ingredient List

  • 1 eggplant
  • 2 cups panko breadcrumbs
  • 1/2 cup grated parmesan cheese
  • 2 large eggs, whisked
  • salt and pepper to taste
  • Olive oil cooking spray (or the spray of your choice that you have on hand)
  • Marinara sauce or your choice, for dipping

Preparation

  • Preheat oven to 425 degrees F.
  • Place the whisked eggs into a shallow bowl and season them with a little salt and pepper. Place the breadcrumbs onto a plate, add the parmesan cheese to the breadcrumbs, toss to combine.
  • Wash and cut off ends of eggplant.
  • Slice down the middle and keep slicing until they are about 1/4″ thick.
  • Line 2 cookie sheets with parchment paper.
  • Coat each slice with the whisked egg, coat it with panko, and arrange them on the cookie sheets. You might have to change out the moist panko for fresh dry. Keep the wet panko!
  • Bake for 20-25 minutes.
  • Remove and enjoy!

Additional Notes

Of course, I had some whisked egg and wet panko left over. So, waste not, want not. I mixed the two, added another egg, some grated cheese, and baked it. Not exactly a souffle, but the next best thing. Just throw in whatever you want. Well, that’s the Baked Eggplant Fries Recipe. Enjoy!


More Recipes to Try (and Some Nutrition Info Thrown In)


Looking for more great content? Visit our main page or partner sites:

I Can Fix Up My Home

The Green Frugal

Running Across Texas


As Featured On Ezine Articles

I offer article and blog-writing services. Interested? Contact me for a quote!


Did you find this article helpful? Millions of readers rely on information on this blog and our main site to stay informed and find meaningful solutions. Please chip in as little as $3 to keep this site free for all.


Visit Kelly’s profile on Pinterest.

About the Author:

Photo of Kelly R. SmithKelly R. Smith is an Air Force veteran and was a commercial carpenter for 20 years before returning to night school at the University of Houston where he earned a Bachelor’s Degree in Computer Science. After working at NASA for a few years, he went on to develop software for the transportation, financial, and energy-trading industries. He has been writing, in one capacity or another, since he could hold a pencil. As a freelance writer now, he specializes in producing articles and blog content for a variety of clients. His personal blog is at Considered Opinions Blog where he muses on many different topics.

Cheesy Chicken Enchilada Recipe

Traditional Homemade Tex-Mex Comfort Food

Photo of Kelly R. Smith   by Kelly R. Smith

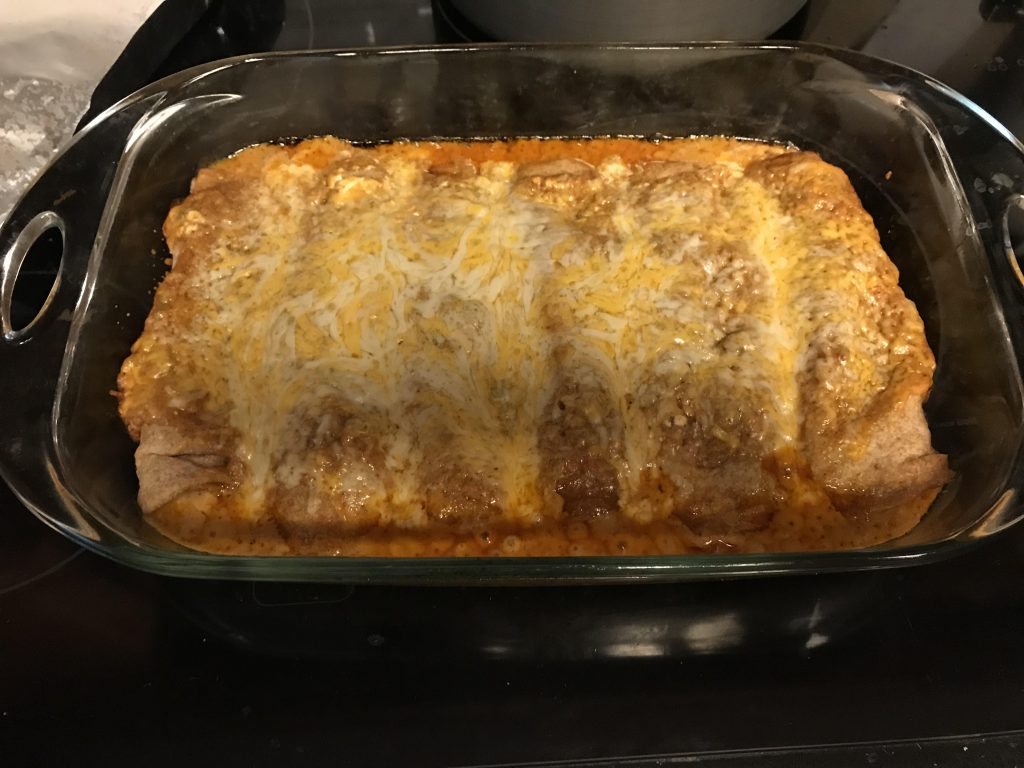
Homemade chicken enchiladas
index sitemap advanced

Ads we feature have been independently selected and reviewed. If you make a purchase using the links included, we may earn a commission, which helps support the site. Thank you for your support.

Enchiladas are originally from traditional Mexican cuisine, but the ones I make have sort of crossed the border to Tex-Mex. They can be filled with a variety of ingredients, including meats, cheese, beans, potatoes, vegetables, or usually, a combination. The sauces are usually chili-based sauces, like salsa roja, various moles, or cheese-based sauces, like chile con queso. The recipe I present here is the one I made a couple of nights ago, but feel free to indulge in modifications!

Chicken Enchilada Ingredients

  • 6 – 8 whole wheat tortillas
  • 1 lb. cooked, shredded chicken; I simply used a rotisserie chicken from the grocery store to expedite the process.
  • 3 oz cream cheese at room temperature
  • 1/2 cup sour cream
  • 4 – 4.5 oz diced green chilis with their juice
  • 1 14 oz. can oz mild red or green enchilada sauce
  • salt and pepper to taste
  • 1/2 cup diced red onions
  • 2 1/2 cups shredded cheese (Mexican, Four Cheese, or Colby Jack)
  • 1/4 cup chopped green onions or chives
  • Optional: chopped jalapeno, serrano, or (whew) habanero peppers to taste


Chicken enchiladas in the pan

Enchilada Preparation

  1. Preheat the oven to 400°F.
  2. Grease a 9×13 casserole dish.
  3. Add all ingredients except for the cheese and the chicken into a large mixing bowl.
  4. Mix completely.
  5. Transfer 1/3 of the mixture into another mixing bowl.
  6. Add the chicken and 2 cups of your cheese to the 2/3 bowl and mix in well.
  7. Generously add contents of the 2/3 bowl to the center of each tortilla and roll up tortillas tightly. Arrange them in your dish as you go.
  8. Pour the reserved 1/3 of sauce over the tortillas, spread well, and top with the remaining 1/2 cup cheese (you can add more cheese if you desire).
  9. Cover the dish with foil and bake at 400˚F for 35 minutes.
  10. Remove and enjoy!

I hope you enjoy this Cheesy Chicken Enchilada recipe as much as we do. I always get an opinion from She-Who-Must-Be-Obeyed and this dish got two thumbs up! Next time I’ll experiment a bit more. The basil in my garden is really taking off now so…


Trending Recipes


Looking for more great content? Visit our main page or partner sites:

I Can Fix Up My Home

The Green Frugal

Running Across Texas


As Featured On Ezine Articles

I offer article and blog-writing services. Interested? Contact me for a quote!


Did you find this article helpful? Millions of readers rely on information on this blog and our main site to stay informed and find meaningful solutions. Please chip in as little as $3 to keep this site free for all.


Visit Kelly’s profile on Pinterest.

About the Author:

Photo of Kelly R. SmithKelly R. Smith is an Air Force veteran and was a commercial carpenter for 20 years before returning to night school at the University of Houston where he earned a Bachelor’s Degree in Computer Science. After working at NASA for a few years, he went on to develop software for the transportation, financial, and energy-trading industries. He has been writing, in one capacity or another, since he could hold a pencil. As a freelance writer now, he specializes in producing articles and blog content for a variety of clients. His personal blog is at Considered Opinions Blog where he muses on many different topics.

Oatmeal Coconut Flour Bread Recipe

A Hearty New Combination of Baking Ingredients

Photo of Kelly R. Smith   by Kelly R. Smith

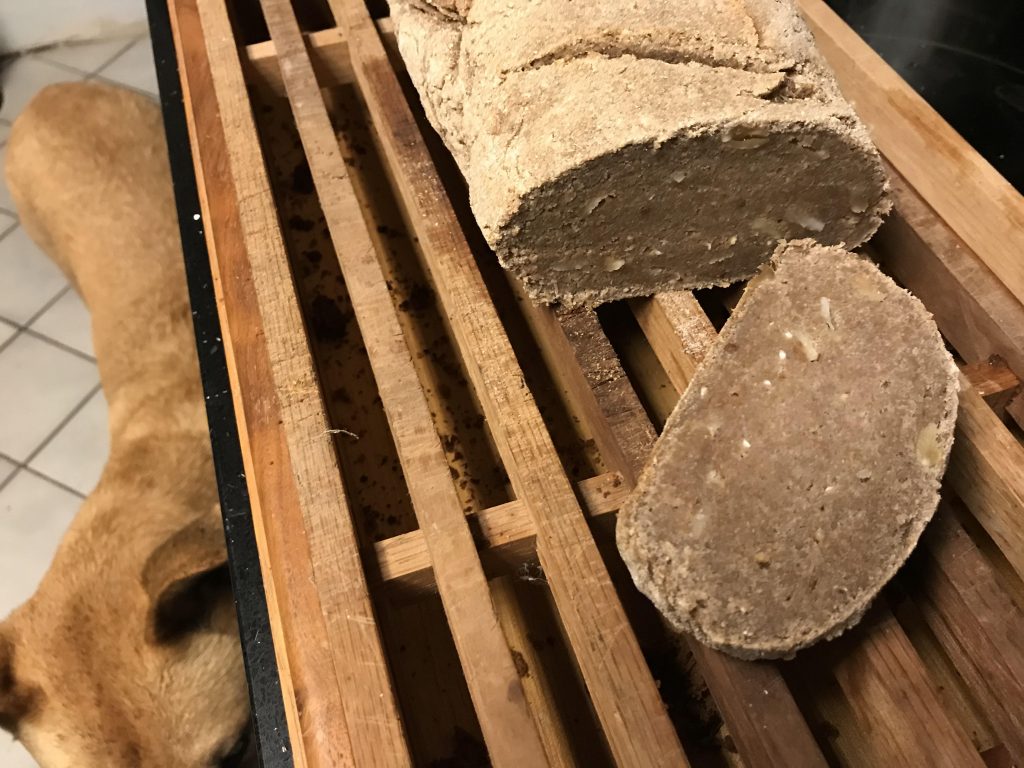
Oatmeal coconut flour bread
index sitemap advanced

Ads we feature have been independently selected and reviewed. If you make a purchase using the links included, we may earn commission, which helps support the site. Thank you for your support.

Developing this recipe the other day, I started with the oatmeal, which I usually do for its fiber and cholesterol-lowering properties. Then I decided to have a go with the coconut flour, having heard so much about it. The result is this interesting oatmeal coconut flour bread recipe.

Why Coconut Flour?

It’s gaining popularity among the low-carb diet crowd and those who have a gluten intolerance. It has an impressive nutrition profile and may offer several additional health benefits. These include increasing blood sugar stability, better gut digestion, heart health, and even weight loss.

Ingredient List

  • 3 cups coconut flour
  • Whole wheat flour as needed
  • 1 cup quick steel cut oats; I used the HEB brand but any will do.
  • 1 teaspoon pink Himalayan salt
  • 1 1/2 cups pure cane sugar
  • 1 large egg
  • 1/3 cup flaxseed meal
  • 1/3 cup wheat bran
  • 1 tablespoon gluten (optional)
  • 3 cups water, heated
  • 1/2 cup nuts of your choice, chopped (optional)
  • 1 packet yeast

Preparation Steps

  1. If using fast-rising yeast, preheat oven to 425℉.
  2. Combine the oatmeal and 1 cup of very hot water in your mixing bowl. Allow 15 minutes for the oatmeal to soften.
  3. Mix in the remaining cups of warm water and the yeast.
  4. Mix in the egg, salt, sugar, flaxseed meal, wheat bran, gluten, and nuts.
  5. Mix in the coconut flour, 1/2 cup at a time. The dough will look a bit different that what you are used to with just wheat.
  6. Begin adding in the whole wheat flour and mixing until you have a nice, workable dough ball.
  7. Turn the dough ball out onto your whole wheat floured kneading surface. I’ve become a big fan of silicone baking mats.
  8. Continue to add whole wheat flour as needed as you knead. I do about 30 folds.
  9. If you did not use fast-rising yeast, let it rise for a couple of hours, and punch it down. If you did, just preheat the oven and proceed.
  10. Gently shape and press the dough into a rice flour dusted Banneton proofing basket.
  11. Turn it out onto a prepared (I use spray olive oil; butter will do as well) baking sheet (I use a pizza sheet).
  12. Bake for 40 minutes or until a toothpick comes out clean. Start checking at 30 minutes.
  13. Let the loaf cool on a rack and enjoy!

So that’s it for the oatmeal coconut flour bread recipe. It makes a very heavy, compact loaf. If you take a look a the picture at the top of the loaf you’ll notice a very unusual texture, not porous at all. Take that, wimpy store-bought white bread!


Additional Reading


Looking for more great content? Visit our main page or partner sites:

I Can Fix Up My Home

The Green Frugal

Running Across Texas


As Featured On Ezine Articles

I offer article and blog-writing services. Interested? Hire Me!


Did you find this article helpful? Millions of readers rely on information on this blog and our main site to stay informed and find meaningful solutions. Please chip in as little as $3 to keep this site free for all.


Visit Kelly’s profile on Pinterest.

About the Author:

Photo of Kelly R. SmithKelly R. Smith is an Air Force veteran and was a commercial carpenter for 20 years before returning to night school at the University of Houston where he earned a Bachelor’s Degree in Computer Science. After working at NASA for a few years, he went on to develop software for the transportation, financial, and energy-trading industries. He has been writing, in one capacity or another, since he could hold a pencil. As a freelance writer now, he specializes in producing articles and blog content for a variety of clients. His personal blog is at I Can Fix Up My Home Blog where he muses on many different topics.

Ham and Onion Quiche Recipe

Perfect for Breakfast, Brunch, or Dinner

by Kelly R. Smith

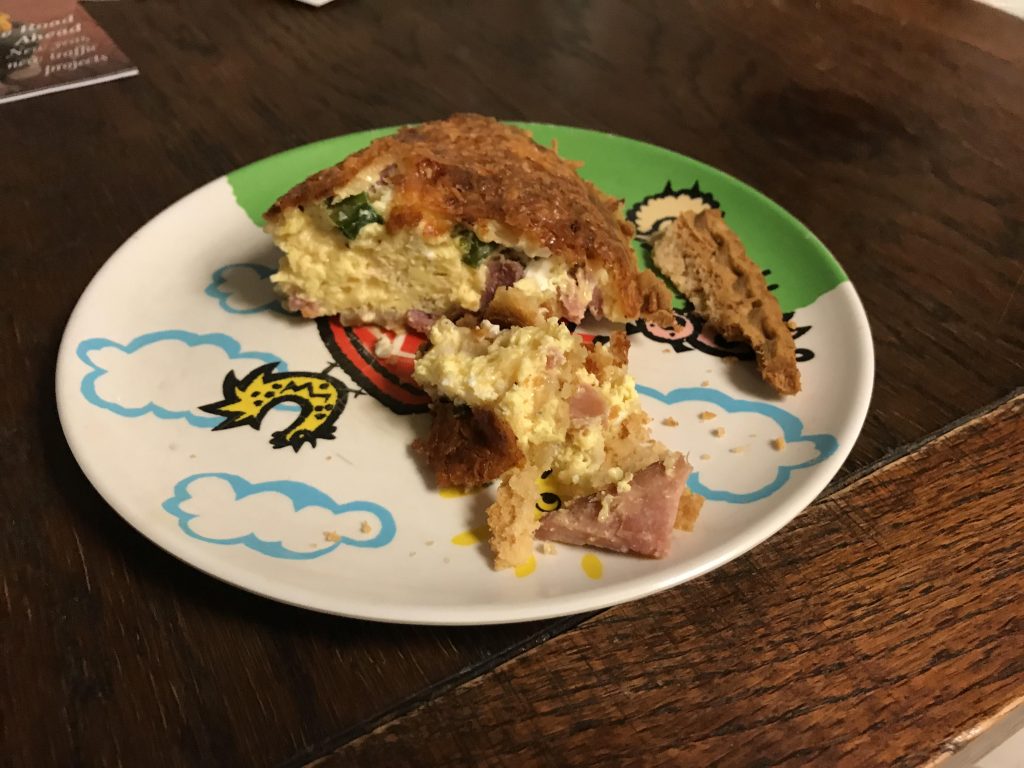
Ham and onion quiche served up
Ham and onion quiche served up!
index sitemap advanced

Ads we feature have been independently selected and reviewed. If you make a purchase using the links included, we may earn commission, which helps support the site.

Who doesn’t like quiche? It’s easy to make, versatile, and works for any meal. How about after a long weekend workout or a post New Years Eve brunch? The ingredient list is easy to procure if you don’t already have it on hand. As far as ingredients and spices go, there’s no limit that I’ve found. All you really need are eggs and cheese. Heck, you don’t even need a crust if you are on a low-carb regimen like the Atkins diet. To explore a broad range of possibilities, check out a quiche cookbook. But I digress. Let’s jump into my ham and onion quiche recipe.

Quiche Ingredients

  • 1 frozen pie crust, thawed, or make your own
  • 6 large eggs
  • 3/4 cup milk (whole milk is richer)
  • Kosher or pink salt to taste
  • Freshly-ground pepper to taste
  • 1 1/2 cup chopped cooked ham
  • 1 1/2 cup shredded cheese (I used Parmesan last night, but it’s your call.)
  • 1 or 2 green onions, chopped (hint: reserve the root section with about 3/4 inch of the onion. Plant it in a pot or your herb garden, roots down, covered with 1/2 inch of soil. 99% chance it will sprout.)


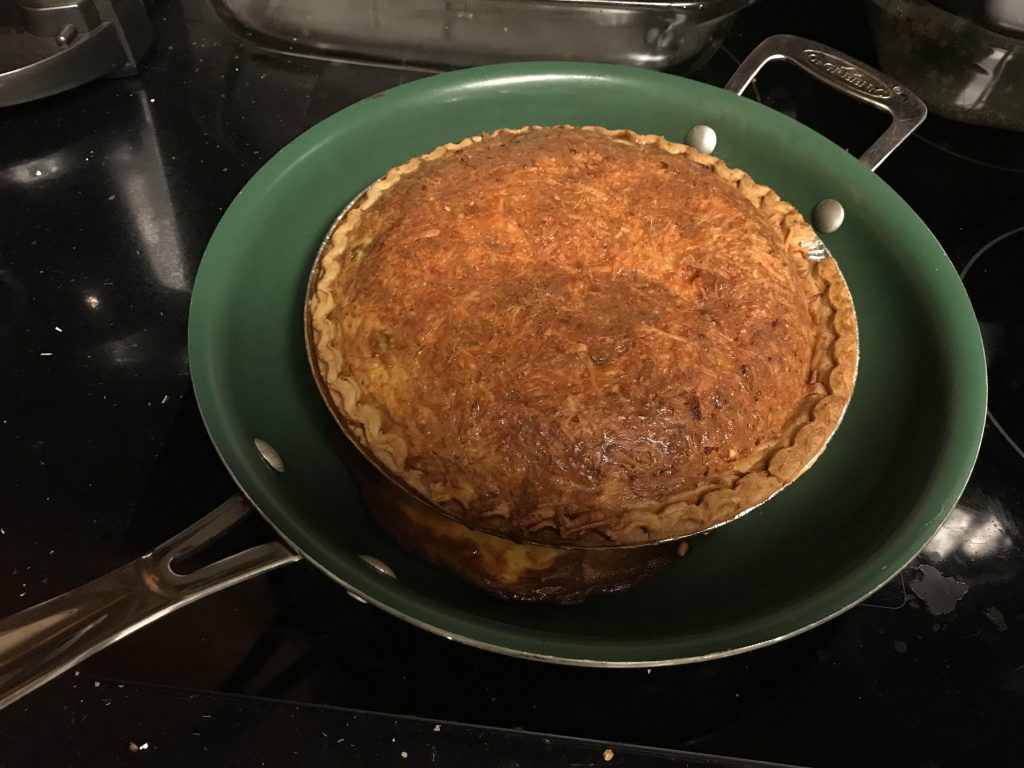
Ham and onion quiche done!

Preparation Steps

  1. Preheat oven to 375⁰ F.
  2. Whisk together eggs, salt, pepper, and milk, in a mixing bowl.
  3. In the crust, make 2 layers; each has half of the ham, half of the green onions, and 1/2 cup cheese.
  4. Pour the egg mixture over it evenly.
  5. Sprinkle the remaining cheese over it evenly. Note: as you see in the picture above, I used an oven-safe skillet to hold the pie tin because it was SO full. If you have egg mixture left over, that’s OK; cook it up separately. Waste not, want not.
  6. I baked mine for an hour to perfection; I suggest you start checking after about 40 minutes. If the top jiggles when you shake it, it’s not done.
  7. Remove, cool for a few minutes, and enjoy!


That’s all there is to this easy ham and onion quiche recipe. It may be fairly basic but it’s not hard to see the many possible variations you can come up with depending on your mood. I’m a big believer in experimentation in the kitchen.

You Will Also be Interested In


Did you find this article helpful? Millions of readers rely on information on this blog and our main site to stay informed and find meaningful solutions. Please chip in as little as $3 to keep this site free for all.


Visit Kelly’s profile on Pinterest.

About the Author:

Photo of Kelly R. SmithKelly R. Smith is an Air Force veteran and was a commercial carpenter for 20 years before returning to night school at the University of Houston where he earned a Bachelor’s Degree in Computer Science. After working at NASA for a few years, he went on to develop software for the transportation, financial, and energy-trading industries. He has been writing, in one capacity or another, since he could hold a pencil. As a freelance writer now, he specializes in producing articles and blog content for a variety of clients. His personal blog is at I Can Fix Up My Home Blog where he muses on many different topics.

close

Enjoy this blog? Please spread the word :)

RSS
Follow by Email
Twitter
Follow Me
Tweet
Pinterest
Pinterest
Pinterest
Instagram
LinkedIn
Share