Organic Foliar Feeding with Garrett Juice

Spray Fertilization Will Take the Health and Yield of Your Garden to the Next Level
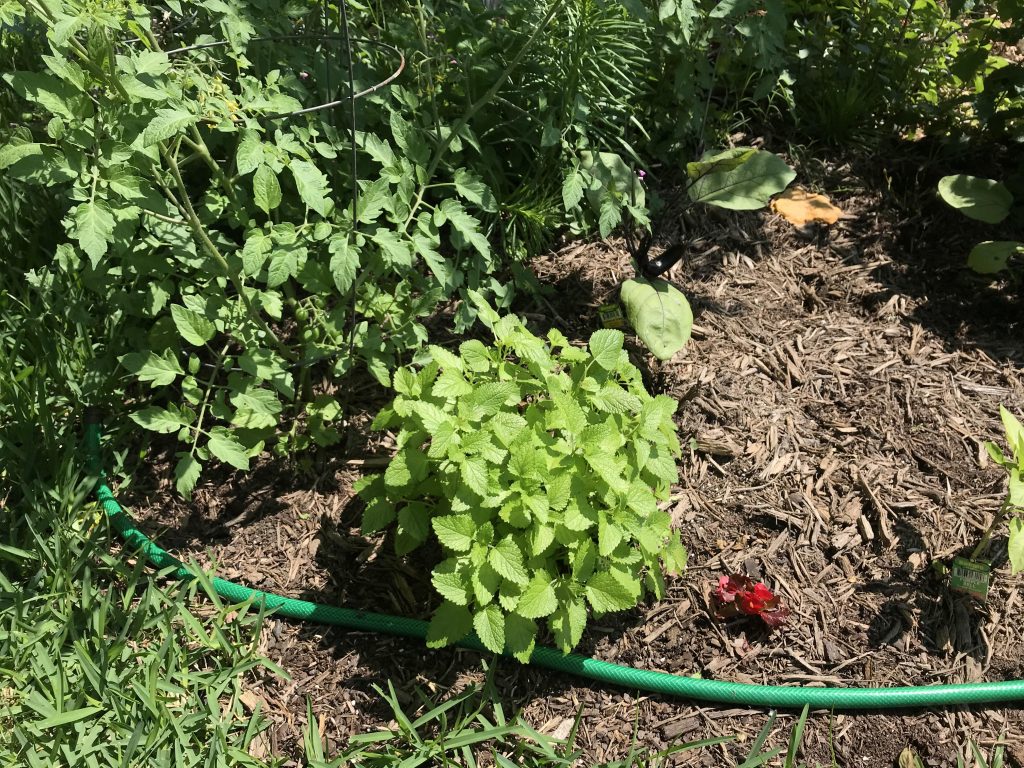
Photo of Kelly R. Smith   by Kelly R. Smith © 2022

Lemon balm and tomato plant
index sitemap advanced

Ads we feature have been independently selected and reviewed. If you make a purchase using the links included, we may earn a commission, which helps support the site. Thank you for your support.

Many gardeners unknowingly miss half of their fertilization schedule because they focus on the ground, which is understandable. Roots, right?. But, foliar feeding with a product such as Medina Hasta Grow Plant Food will increase your harvest. Why? Because plants also uptake nutrients through their leaves.

Medina Hasta Grow is one of the best sprays on the market, but perhaps you might be the DIY sort? In that case, Garret Juice is your answer. In addition to stimulating plant growth, this organic concoction will also protect against some garden pests. Why add foliar feeding to your schedule when you already fertilize on a regular basis? Because it offers yet another, safer avenue to getting nutrition into your vegetable garden, fruit trees, and rose bushes rather than using chemicals and neurotoxins.


If you have chosen backyard homesteading and self-sufficiency, or prepping as a lifestyle, or just want to get a better return on your labor and investment, then organic foliar feeding with Garrett Juice is a given. Enjoying better, healthier yields relies on this type of horticultural strategy.

Basic Garrett Juice Ingredients

Be sure to use organic ingredients and methods whenever possible.


Additives for Pest and Insect Control

Want to boost it up for insect control? Add 1/4 cup garlic tea/pepper spray. To make this, use a blender. Liquefy 1 clove of peeled garlic, 1 quartered habanero pepper, and 16 ounces of water. Everyone, but especially those wearing contact lenses, needs to wear disposable gloves when cutting the habanero or when you take your lenses out for the night, you’ll never be able to use them again. Been there, done that. Great balls of fire!

You’ll need to strain the solids out of the resulting liquid. Since the particles are so small, you’ll need a very fine strainer so you won’t clog up your spray tip. A good choice is the small fuel strainer for Coleman lanterns and camping stoves. You will have some leftover but you can save it for spot treatments later with a hand bottle sprayer. For spot treatment, mix it with 3 parts water.

Foliar Feeding Procedure

Add all ingredients to a pump-up garden sprayer and mix well by shaking. The molasses is a very thick liquid so give it a little extra shake than you normally would. Pump up your sprayer and adjust the tip to a wide mist, not a jet spray. Just lightly coat the leaves; a little goes a long way. If you have any left over, go ahead and use it up on your ornamentals. I always make enough to spray my magnolia tree, for example. For tall trees like these, you will need to adjust the sprayer tip to a stronger stream in order to reach the higher leaves. Or, conversely, drag out that ladder.

Using Garrett Juice for foliar feeding on a monthly basis will give your plants and trees a new zest for life. And of course, your vegetable garden will put more on your table.


Looking for more great content? Visit our main page or partner sites:

I Can Fix Up My Home

Considered Opinions Forum

The Green Frugal

Running Across Texas


As Featured On Ezine Articles

I offer article and blog-writing services. Interested? Contact me for a quote!


Did you find this article helpful? Millions of readers rely on information on this blog and our main site to stay informed and find meaningful solutions. Please chip in as little as $3 to keep this site free for all.


Visit Kelly’s profile on Pinterest.

About the Author:

Photo of Kelly R. SmithKelly R. Smith is an Air Force veteran and was a commercial carpenter for 20 years before returning to night school at the University of Houston where he earned a Bachelor’s Degree in Computer Science. After working at NASA for a few years, he went on to develop software for the transportation, financial, and energy-trading industries. He has been writing, in one capacity or another, since he could hold a pencil. As a freelance writer now, he specializes in producing articles and blog content for a variety of clients. His personal blog is at Considered Opinions Blog where he muses on many different topics.

Homemade Dog Food Recipe

How to Give Up on the Kibbles and Bits Dog Diet and Embrace Nutrition

Photo of Kelly R. Smith   by Kelly R. Smith
Homemade dog food ready to serve
index sitemap advanced

Ads we feature have been independently selected and reviewed. If you make a purchase using the links included, we may earn commission, which helps support the site.

I guess there’s no sugar-coating it; I do dote on my dogs. Which is not such a bad thing. Heck, I like dogs more than I like most humans. Cats? Not so much. But dogs? Yep. I am always looking for ways to make things better. Already I have gotten away from store-bought treats an make them chicken jerky in my food dehydrator.

So the next step? Well, She-Who-Must-Be-Obeyed read an article about all the bad stuff that goes into your favorite Kibbles-n-Bits type of commercial dog food. It’s pretty crazy. What the heck is a meat by-product anyway? If it is not meat, just say so. Well, long story short, a bit of research and imagination got me to this first stab at a homemade dog food recipe.

Homemade Dog Food Ingredients

This is my first take at the recipe and it is subject to change according to my ever-changing whims. Note however, there was nary a complaint when I served it up!

  • 2 cups brown rice
  • 1 lb. ground turkey
  • 6 cups water
  • 1 Tbsp fresh rosemary
  • 2 lbs. broccoli, carrots, cauliflower (in a frozen bag or regular produce, your choice)
  • one chunk of ginger, grated, about as big as your thumb.
  • 2 oz. olive oil
  • 1 lb. chicken livers
  • omega 3 source, I just threw in a few capsules
  • pumpkin seeds, about 30 or so

Preparation

This is simple. Just put your very large sauce pan or Dutch oven on the stove and cook everything together. The dogs really don’t care but the meat should be well-done.


I hope you and your dogs will enjoy this homemade dog food recipe. As with all my culinary concoctions, feel free to adapt and make substitutions. Life is good. Appreciate the pups.

Further Reading


Did you find this article helpful? Millions of readers rely on information on this blog and our main site to stay informed and find meaningful solutions. Please chip in as little as $3 to keep this site free for all.


Visit Kelly’s profile on Pinterest.

About the Author:

Photo of Kelly R. SmithKelly R. Smith is an Air Force veteran and was a commercial carpenter for 20 years before returning to night school at the University of Houston where he earned a Bachelor’s Degree in Computer Science. After working at NASA for a few years, he went on to develop software for the transportation, financial, and energy-trading industries. He has been writing, in one capacity or another, since he could hold a pencil. As a freelance writer now, he specializes in producing articles and blog content for a variety of clients. His personal blog is at I Can Fix Up My Home Blog where he muses on many different topics.

8 Benefits of Hibiscus Tea

And How to Grow Hibiscus for Tea at Home

by Kelly R. Smith

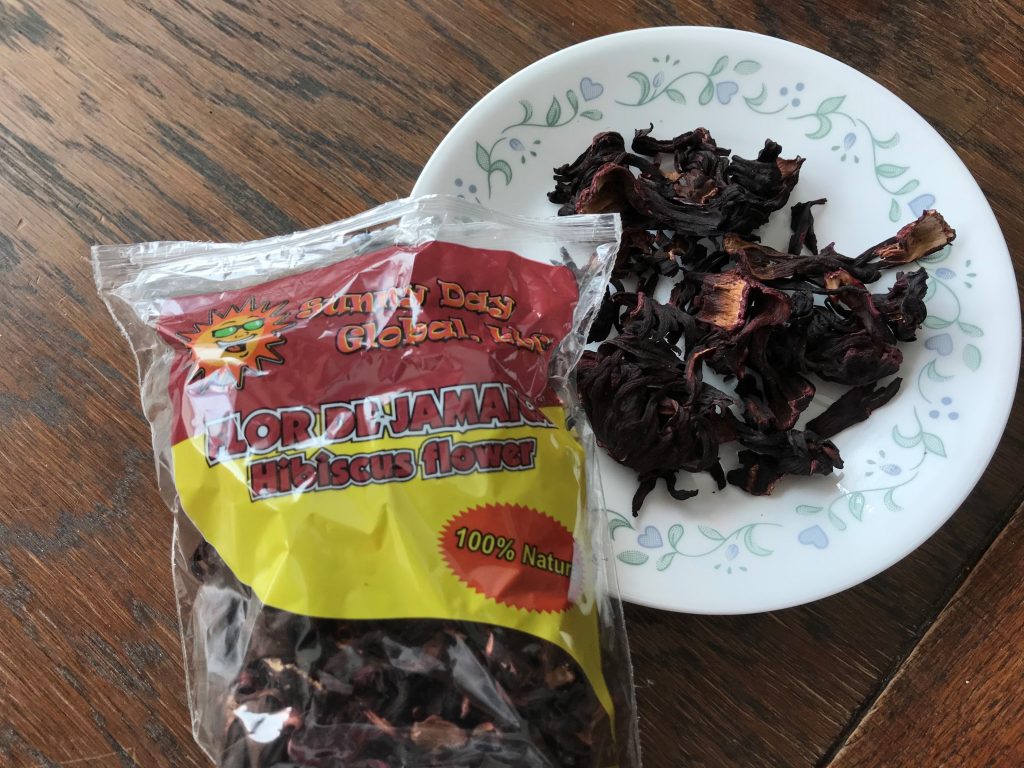
Dried hibiscus flowers for healthy tea
index sitemap advanced

Ads we feature have been independently selected and reviewed. If you make a purchase using the links included, we may earn commission, which helps support the site.

Hibiscus tea (sometimes called “sour tea”) might not be so well known in the USA but it certainly is in other parts of the world. I’ve been drinking it for a few years now, both for the taste and the health benefits; it’s another item in my toolbox to keep my blood pressure in a reasonable range.. I add it to the grounds of my cold brew coffee maker, sometimes with fresh mint from my garden. Yeah, I know; wild, living on the edge. There are several hundred species of hibiscus plants that vary by the location and climate they are grown in, but Hibiscus sabdariffa or roselles is most commonly used to make hibiscus tea. As a bonus, they are stunning in tropical landscape plantings. But we are here to talk about the health benefits of hibiscus tea.

Health Benefits of Hibiscus Tea

  • It lowers blood pressure. This is a big one for me. All blood pressure medications have side effects. For me, I take lisinopril, an ACE inhibitor. It causes coughing and the feeling of being lethargic. Rebekah Edwards says, “A 2013 review by the University of Arizona discovered that hibiscus tea is used in 10 or more countries as a normal hypertension treatment without any reported adverse events or side effects — except in extremely high doses.”1
  • It’s packed with antioxidants. What are antioxidants? They are molecules that help fight compounds we call free radicals, which inflict damage to your cells. The National Library of medicine noting their study says, “Hibiscus anthocyanin extract has reducing power that is approximately 2-fold that of the synthetic antioxidant, butylated hydroanisole.”2 Other than hibiscus, many other foods contain them; tart cherries are a good example.


  • It supports healthy cholesterol and triglycerides. Dyslipidemia is a type of disorder that is characterized by noticeable changes in plasma lipids or lipoproteins, including two you are probably familiar with: cholesterol and triglycerides. As with blood pressure, hibiscus tea’s ability to reduce high “blood lipids” also extends to those with diabetes. A 2009 study had diabetes patients drink hibiscus tea two times a day for a full month and they found a significant increase in HDL (good) cholesterol and a marked decrease in total cholesterol, LDL (bad) cholesterol and triglycerides.
  • It may help to lower blood fat levels. The National Library of medicine citing a study of sour tea (ST) and black tea (BT) says, “The results of the present study showed that ST has a significant effect on blood lipid profile in patients with diabetes.”3 Many studies have shown that hibiscus tea reduces blood cholesterol and triglycerides in people suffering from diabetes and metabolic syndrome. That said, other studies have shown conflicting results. Obviously, more research is needed in the general population.
  • It prevents oxidative stress. Like most healthy teas on the market, hibiscus is chock full of antioxidants that combat free radical damage caused by substandard nutrient diets and frequent exposure to dangerous chemicals. These antioxidants are found primarily in the anthocyanins of the plant, the natural pigments that give this flower its brilliant red color.
  • It may boost liver health. Your liver is essential to your overall health. Some of its jobs include producing proteins, secreting bile, and breaking down fat. One small human research study found that supplementing with hibiscus tea raised the antioxidant load in the bloodstream as well as reducing compounds that contribute to oxidative stress that damages cells.
  • It shows promise in fighting certain cancers. Although this idea is only starting to gain traction, there is already some evidence to support hibiscus tea’s anticancer power. It has been shown that hibiscus extracts cause apoptosis, or cell death, in leukemia cells. Although the exact mechanisms behind this aren’t clear as of yet, this could be a promising step in the ever-going fight against leukemia, which affects about a quarter of the children and adolescents currently struggling with cancer.
  • It reduces obesity and related risks. How? Human and animal studies have found a link between hibiscus tea and an elevated metabolism. Hibiscus extract may even inhibit you from absorbing as much starch and sucrose as you might from a typical meal. One study in particular gave 36 overweight participants either hibiscus extract or a placebo. After 12 weeks, hibiscus extract reduced body weight, body fat, body mass index and hip-to-waist ratio


Growing and Preparing Hibiscus for Tea at Home

Test your soil pH in a well-draining area that receives full sun at least six months before planting if possible, and, if needed, amend it using elemental sulfur or dolomitic lime to adjust the pH to between 6.1 and 7.8. The do best in humus-rich soil and full sunlight.

Harvest your flowers after they have bloomed. You want the calyxes (the main body of the flower). They should snap right off. Once you have your harvest, complete the steps to prepare and dry them. This video explains it in detail.

How to process hibiscus flowers for tea

Can you benefit from hibiscus tea? Of course! There’s something for everybody and if you grow your own supply you will save money and be certain it is organic.

Others are Reading

Reference

  1. .Rachael Link, Dr. Axe, Hibiscus Tea: The Antioxidant ‘Therapeutic Agent’ You Should Be Drinking, https://draxe.com/nutrition/hibiscus-tea/
  2. Taofeek O Ajiboye, et al, National Library of medicine, Antioxidant and drug detoxification potentials of Hibiscus sabdariffa anthocyanin extract, https://pubmed.ncbi.nlm.nih.gov/21314460/
  3. Hassan Mozaffari-Khosravi, et al., National Library of medicine, Effects of sour tea (Hibiscus sabdariffa) on lipid profile and lipoproteins in patients with type II diabetes, https://pubmed.ncbi.nlm.nih.gov/19678781/


Did you find this article helpful? Millions of readers rely on information on this blog and our main site to stay informed and find meaningful solutions. Please chip in as little as $3 to keep this site free for all.


Visit Kelly’s profile on Pinterest.

About the Author:

Photo of Kelly R. SmithKelly R. Smith is an Air Force veteran and was a commercial carpenter for 20 years before returning to night school at the University of Houston where he earned a Bachelor’s Degree in Computer Science. After working at NASA for a few years, he went on to develop software for the transportation, financial, and energy-trading industries. He has been writing, in one capacity or another, since he could hold a pencil. As a freelance writer now, he specializes in producing articles and blog content for a variety of clients. His personal blog is at I Can Fix Up My Home Blog where he muses on many different topics.

Indoor Gardening: Basic Hydroponic Tools and Equipment

index sitemap advanced
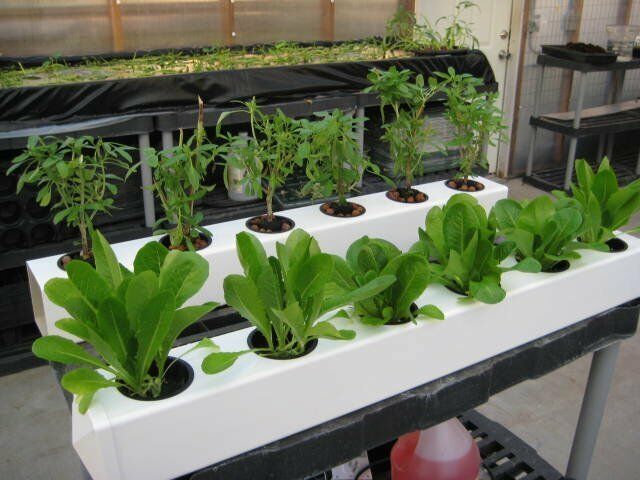
Indoor hydroponic gardening

It is no secret that commercial growers have been using hydroponic tools and equipment for indoor gardening for years. Like other businesses, these farmers need to generate revenue and provide a product to customers year-round. What if you want to become more self-sufficient during the COVID-19 lock-down? What about the average person that wants to do it on a smaller scale? The good news is that you can. Let’s look at what you need to get started.

Light for Photosynthesis

Dictionary.com defines photosynthesis thus, “the complex process by which carbon dioxide, water, and certain inorganic salts are converted into carbohydrates by green plants, algae, and certain bacteria, using energy from the sun and chlorophyll.”

Yeah, yeah, yeah; what you really need to know is that your plants need light to grow. Of course, sunlight is optimal; it provides the full spectrum of visible and non-visible light. It’s offered to us for free and is the best way to provide light for hydroponics. Many vegetable plants and herbs like mint and basil do best on at least six hours of direct light each day. Southern-facing windows and greenhouses have the potential to provide this amount of sunlight.

But what if that’s not in the cards? You’ll be best investing in grow lights. Look for ones from 4,000 to 6,000 kelvin to insure that they deliver both cool (blue) and warm (red) light.

Substitute Substrate for Soil

This is where the hydro part comes in. The water and nutrients circulate through the substrate which is a material such as pea gravel, sand, coconut fiber, peat moss, expanded clay pellets, etc.

Water

Clean water is critical. The water of choice is treated by reverse osmosis (RO). This purification process results in water that is 98% to 99% pure and your plants will thank you for it. You will also have to keep an eye on the water pH (a measure of alkalinity or acidity. For example, if you are growing tomatoes, they prefer a pH of 6.0 to 6.8 on a scale where 7.0 is considered neutral. Mint plants prefer 6.5 to 7.5. Growing beets? Shoot for 6.0 to 6.8. Knowing these numbers is important as you consider companion plants for your garden.

As far as fertilizer goes, you’ll want to buy a hydroponic premix because it will contain all the nutrients needed. I suppose you could cobble together your own but the expense/work ratio doesn’t make sense to me. Of course, it wouldn’t hurt to add foliar feeding every couple of weeks.

Types of Hydroponic Systems

As you might suspect, there is a range of systems to choose from.

  • Water culture. Uses a non-submersible air pump, air hose, floating platform, rope wicks, and grow tray.
  • Nutrient film. Uses non-submersible air pump, air hose, submersible pump, air stone, overflow tube, and grow tray.
  • Wick system. Uses non-submersible pump, air stone, air hose, rope wicks, and grow tray.
  • Ebb and flow. Submersible air pump, air hose, timer, overflow tube, and grow tray.
  • Aeroponic. Subersible pump, mist nozzles, air hose, and short-cycle timer.
  • Drip system. Non-submersible air pump, submersible pump, air hose, timer, drip lines, overflow tube, drip manifold, grow tray.

There are your basic hydroponic tools and equipment for indoor gardening. Whether you approach it as a hobby, as a serious farmer who is going off the grid, there are numerous benefits. The produce will be fresh, as organic as you make it, and available year-round.


Looking for more great content? Visit our partner sites:

The Green Frugal

Running Across Texas


As Featured On Ezine Articles

I offer article and blog-writing services. Interested? Hire Me!


Did you find this article helpful? Thanks for supporting this free site with a small donation!


Visit Kelly’s profile on Pinterest.


About the Author:

Photo of Kelly R. SmithKelly R. Smith is an Air Force veteran and was a commercial carpenter for 20 years before returning to night school at the University of Houston where he earned a Bachelor’s Degree in Computer Science. After working at NASA for a few years, he went on to develop software for the transportation, financial, and energy-trading industries. He has been writing, in one capacity or another, since he could hold a pencil. As a freelance writer now, he specializes in producing articles and blog content for a variety of clients. His personal blog is at I Can Fix Up My Home Blog where he muses on many different topics.

Foliar Feeding with Medina Hasta Gro Plant Food

index sitemap advanced
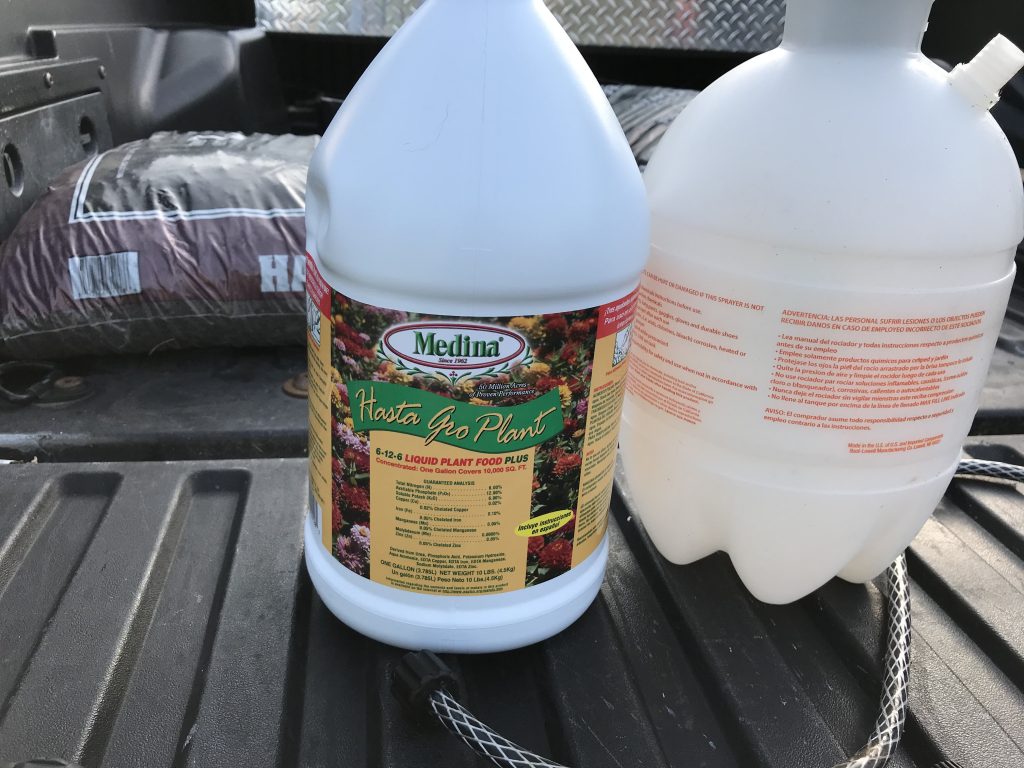
Medina Hasta Gro Plant Food Plus and a pump-up sprayer.
Medina Hasta Gro Plant Food Plus and a pump-up sprayer

If you have any kind of garden — vegetables with their recommended companion plants, ornamental, or fruit trees, you know that fertilizing is key to healthy plants and a good yield. But did you know that in addition to ground fertilizer (not those little stakes), foliar feeding is important. Dictionary.com defines foliar as, “of, relating to, or having the nature of a leaf or leaves.” I do my foliar feeding with Medina Hasta Gro Liquid Plant Food.

Make-Up of Medina Hasta Gro

Fertilizers may use any number of ingredients but what you want to look for is the N-P-K ratio. For this product I use 6-12-6.

  • N = nitrogen. This is responsible for leaf growth and development. Its role relates to the plant’s coloring and chlorophyll. Nitrogen depletion may present as leaf yellowing in typically green plants often indicates a lack of nitrogen. In the case of Medina it is is derived from clean urea sources and has humic acid added into the mix.
  • P = phosphorus. This component targets root growth and flower and fruit development.
  • K = potassium. Potassium also plays a part in root growth as well as in stem development.

Foliar Fertilizer Application

This fertilizer is remarkably inexpensive. The jug in the photo at the top of the page contains one gallon of concentrate. It’s mixed at the ratio of 1/2 liquid ounce (about one tablespoon) per gallon of water. That is enough to do my small vegetable garden, my herbs (mint, rosemary, parsley, basil, etc.), two fig trees, one orange tree, and a sapling Don Juan Avocado tree.

To apply, just mix the concentrate and water in the sprayer, pump it up, and spray the leaves. Try to apply it on both the tops and bottoms of the leaves. How much? Enough so that you can see it dripping off. The best time of day for application is early morning or evening when it’s not too hot. Don’t wash the spray off the foliage. If you have any left over in your sprayer, don’t hesitate to spray your lawn or mulch. Waste not; want not.

I’ve had great results with Foliar Feeding with Medina Hasta Gro Plant Food on my garden this year. Applying it every couple of weeks works very well. I’ve seen better results at a better price than when I’ve used compost tea. Give it a try and happy gardening!


Looking for more great content? Visit our partner sites:

The Green Frugal

Running Across Texas


As Featured On Ezine Articles

I offer article and blog-writing services. Interested? Hire Me!


Did you find this article helpful? Thanks for supporting this free site with a small donation!


Visit Kelly’s profile on Pinterest.


About the Author:

Photo of Kelly R. SmithKelly R. Smith is an Air Force veteran and was a commercial carpenter for 20 years before returning to night school at the University of Houston where he earned a Bachelor’s Degree in Computer Science. After working at NASA for a few years, he went on to develop software for the transportation, financial, and energy-trading industries. He has been writing, in one capacity or another, since he could hold a pencil. As a freelance writer now, he specializes in producing articles and blog content for a variety of clients. His personal blog is at I Can Fix Up My Home Blog where he muses on many different topics.

Creamy Potato Gratin Recipe

Creamy Potato Gratin

This very-familiar comfort food is just as well known as Pizza Margherita but the following recipe for Potato Gratin is my take on it and I find it superior to the mainstream version. The name sounds fancy but in reality, gratin just means ” a dish with a light browned crust of breadcrumbs or melted cheese.”

Potato Gratin Ingredient List (use organic when possible)

  • Cooking spray such as Pam
  • 1 cup heavy whipping cream
  • 1/4 cup mayo (I use the kind made with olive oil because it is more heart-healthy)
  • 1 tsp Himalayan or pink salt
  • Black pepper to taste
  • 3/4 cup shredded cheddar cheese
  • 1 1/2 pounds russet potatoes (I leave the skins on for the nutrition)
  • 1/2 cup shredded Parmesan cheese
  • 1/4 cup chopped parsley
  • 3/4 cup chopped basil

Preparation Steps

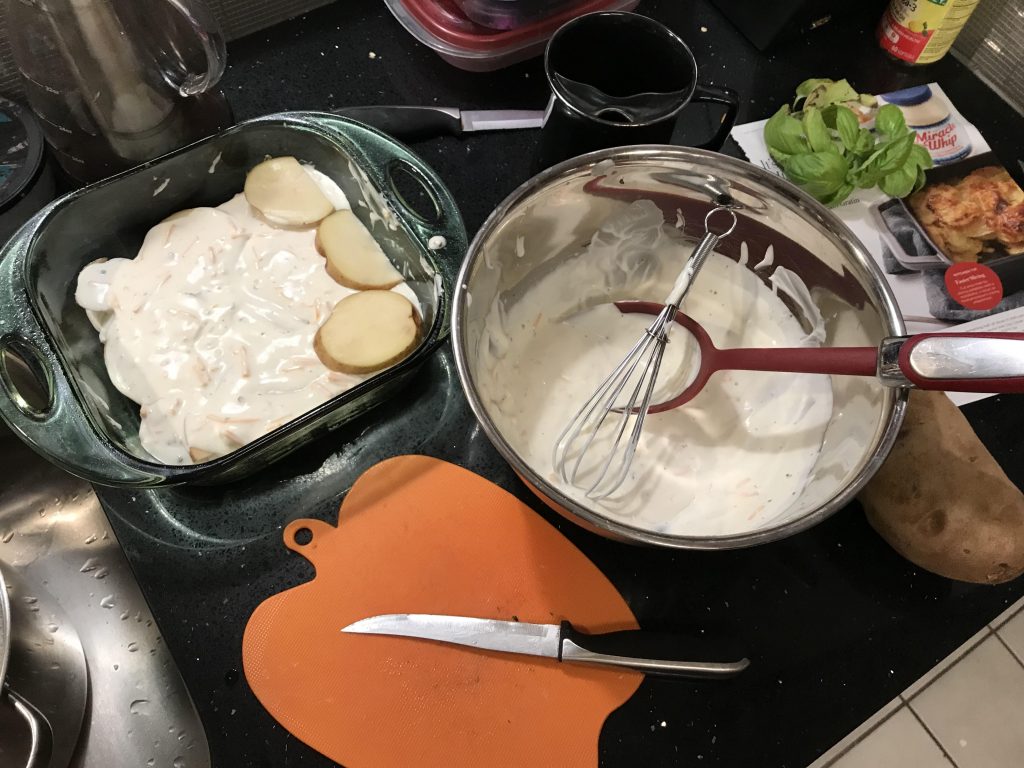
Creamy Potato Gratin Preparation
  • Preheat oven to 350 degrees F.
  • Spray the bottom of a 9″ X 9″ glass baking dish with the cooking spray.
  • In a mixing bowl, whisk the mayo, pepper, salt, cream, and cheddar cheese.
  • Wash and slice potatoes 1/8″ thick.
  • Arrange potato slices in the baking dish, spread on a layer of the cream sauce, and sprinkle on some parsley and basil.
  • Repeat layers as needed (you might have some potato left over).
  • Cover with foil and bake for 1 hour.
  • Remove foil, sprinkle the Parmesan cheese on top, and broil until the top is lightly browned, about 2-5 minutes.

That’s all there is to it. Creamy potato gratin is suitable for a side or a main dish by itself. Give it a try; if you have any interesting ingredients to add, let our readers know in the comment section. Feel free to pass this recipe along to your friends and social media.


Looking for more great content? Visit our partner sites:

The Green Frugal

Running Across Texas


As Featured On Ezine Articles

I offer article and blog-writing services. Interested? Hire Me!


Did you find this article helpful? Please consider supporting this free site with a small donation! We rely on our readers rather than a paywall to keep the lights on and the info flowing.


Visit Kelly’s profile on Pinterest.


About the Author:

Photo of Kelly R. SmithKelly R. Smith is an Air Force veteran and was a commercial carpenter for 20 years before returning to night school at the University of Houston where he earned a Bachelor’s Degree in Computer Science. After working at NASA for a few years, he went on to develop software for the transportation and financial and energy trading industries. He has been writing, in one capacity or another, since he could hold a pencil. As a freelance writer now, he specializes in producing articles and blog content for a variety of clients. His personal blog is at I Can Fix Up My Home Blog where he muses on many different topics.


Companion Planting Guide for Your Veggie Garden

index sitemap advanced
Swiss Chard Garden
Swiss Chard Garden

This article was updated on 03/01/20.

Many people put in their vegetable gardens every year and do their best to do the proper fertilization, watering, and weeding. Yet, no bounty for the table. It might be that the neighboring plants are the wrong types.

Some vegetable plants will benefit their neighbors; others will hinder their growth and yield. The answer is to plant correctly paired species. Sometimes even certain flowers will provide great benefits. This applies to both traditional and raised bed gardens.

First, Plan Your Garden

To take advantage of companion agriculture in order to get more bang for your buck, you first need to choose which vegetables and then mate them up with something else you want to bring to the table.

Personally, I choose the things that I love to eat but are either hard to find or expensive. For example, so far this year I’ve put in tomatoes, basil, strawberries, Brussels sprouts, rosemary, and chocolate mint (goes great in my espresso grounds).

As a side note, it never hurts to have fruit trees. When they are blossoming, that means more bees which will also pollinate your vegetables. My “mini-orchard” contains two fig trees, a plum tree, a Republic of Texas orange, a mandarin orange, a Sam Houston peach, a mulberry tree, and an improved Meyer lemon. All organic.

Recommended Companion Plants

There are a lot of popular plants that have plant friends. Let’s look at some of the most popular.

Asparagus. Good with basil, tomatoes, and parsley. Asparagus in the home garden is a good investment, it is low-maintenance, less expensive than at the store, and a bed will produce for years.

Basil. Good for most garden crops except rue. It improves the growth and flavor of many vegetables, especially tomatoes and lettuce.

Beets. Plant with broccoli, Brussels sprouts, cabbage bush beans, onions, cauliflower, chard, and kohlrabi.

Bush Beans. They like cauliflower, cucumbers, corn, beets, potatoes, carrots, cabbage, strawberries, catnip, marigolds, and savory. Why catnip if you don’t own a cat? It repels flea beetles.

Brussels Sprouts and Broccoli. Good friends of thyme, mint, chamomile, dill, hyssop, beets, buckwheat, onions, rosemary, sage, wormwood, marigolds, nasturtiums, calendula, carrots. But not strawberries.

Cantaloupe. Likes sunflowers and corn, but not potatoes.

Carrots. Plant near cabbage, chives, early potatoes, leeks, salsify, wormwood, peas, radishes, rosemary, lettuce, onions, and sage.

Corn. Compatible with early potatoes, melons, beans, cucumbers, soybeans, squash, peas, and pumpkins .

Cucumbers. Plant near cabbage, corn, radishes, sunflowers, early potatoes, and beans. Not compatible with late potatoes.

Eggplant. Pair up with beans and marigold. Avoid potatoes as companions.

Onions. They like the companionship of beets, carrots, strawberries, tomatoes, summer savory, and cabbage. Avoid beans and English peas.

Parsley. Great with asparagus and tomatoes.

Soybeans. The ideal plant. They work with and help anything.

Squash. Good with corn, radishes, marigolds, and nasturtium. Not friendly with Irish potatoes.

Tomatoes. Works well with onions, marigold, asparagus, cucumbers, basil, carrots, and parsley.

Use marigold flowers for pest control
Use marigold flowers for pest control and beneficial companionship

More gardening tips

There are many other things to tip a generous harvest in your favor. This spring I took up rainwater harvesting for garden and tree watering. There are two main reasons that this is a good idea in my humble opinion. First, rainwater is free. Secondly, plants prefer the Ph in rainwater as compared to tap water.

Another good tip is to apply beneficial nematodes to your lawn and garden during the spring. On your lawn they will eliminate fleas without using pesticides. In your garden they will organically control sod webworms, cutworms, maggots, various types of ants, and many more. Pesticides are a bad idea; they kill beneficial ladybugs. They will also kill the earthworms that keep your garden soil aerated. Also, pesticides are taken up by the plant roots and kill the microscopic microbes that keep the roots healthy. Eventually, those toxins will make their way to your dining room table.

Did this post on companion planting for your garden help you? If so, feel free to share the link with your friends and your social media contacts.


Looking for more great content? Visit our partner sites:

The Green Frugal

Running Across Texas


As Featured On Ezine Articles

I offer article and blog-writing services. Interested? Hire Me!


Did you find this article helpful? Thanks for supporting this free site with a small donation!


Visit Kelly’s profile on Pinterest.


About the author:

Photo of Kelly R. SmithKelly R. Smith is an Air Force veteran and was a commercial carpenter for 20 years before returning to night school at the University of Houston where he earned a Bachelor’s Degree in Computer Science. After working at NASA for a few years, he went on to develop software for the transportation and financial and energy trading industries. He has been writing, in one capacity or another, since he could hold a pencil. As a freelance writer now, he specializes in producing articles and blog content for a variety of clients. His personal blog is at I Can Fix Up My Home Blog where he muses on many different topics.


How to Build a Raised Garden Bed

index sitemap advanced
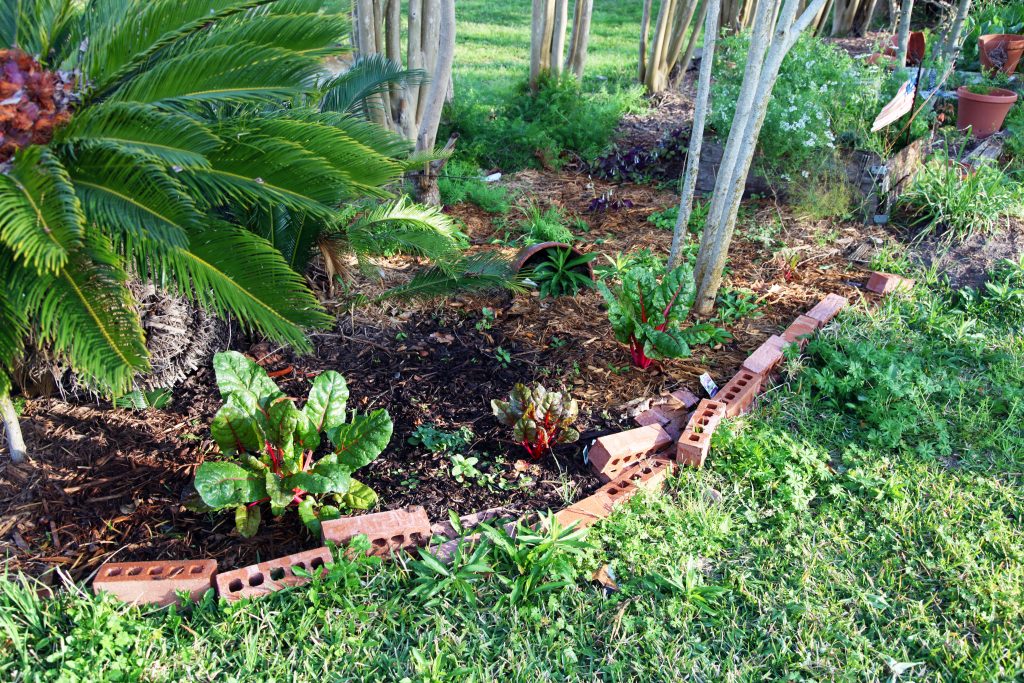
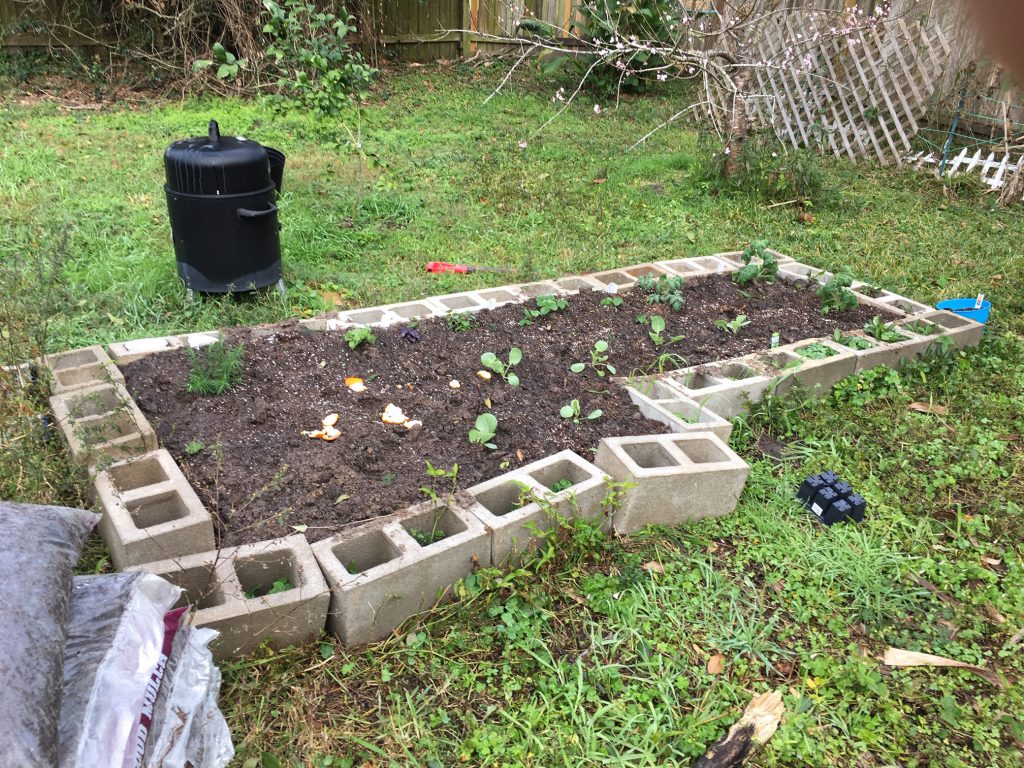
Raised Garden Bed
Raised Garden Bed

A raised garden bed (or raised bed garden if you prefer) is a great way to grow your own organic produce. It’s a simple weekend DIY project. The picture above shows the one I just built. It still needs a bit of tightening up but the basics are there.

Types of Raised Bed Gardens

The one I built was made using cinder blocks. The benefits are low cost of materials and the ability to expand easily. Kits are also available but they cost a bit more and not all are expandable. They can also be built using wood (cedar is a good choice) and stakes.

Height is also a consideration. The cinder block height works well for me but people with back problems do better with elevated garden kits. It’s all a matter of convenience and personal preference.

Preparing the Garden

A garden laid directly on the ground, like mine, will benefit from a layer of newspaper laid on the grass surface. This will inhibit grass and weeds from making their way up through the dirt.

On top of this goes your dirt with compost added in. It’s easy to mix using a hoe. What type of dirt? I have heard some gardeners swear by rose soil but in my experience regular garden soil works fine. If you already know what you are going to plant this is a good time to test the soil pH and adjust it using the appropriate soil amendments.

Planting Time!

You’ve got two choices–start your plants from seed or buy bedding plants. Seeds are less expensive but using plants will mean you can harvest sooner. I prefer plants. Just plant them at the recommended depth and water them in well.

Next add a couple of inches of mulch to the surface. There many varieties available. I prefer hardwood mulch because of the way it decomposes over time and feeds the soil. Whatever you do, do not use dyed mulch. That dye is chemical and you certainly don’t want roots to be taking it up!

Now toss out some organic fertilizer and some agricultural dried molasses. The molasses stimulates all the beneficial microbes and earthworms, both of which are important for the health of your soil. Microbes share a symbiotic relationship with plants. Worms will keep your soil aerated which helps in water distribution and root growth. Another consideration is spraying out some beneficial nematodes to control fleas and many other pests.

I hope you found this article on building a raised garden bed helpful. If so, please pass it along to your friends. Comments or ideas? Add them in the comment section below. Thanks for visiting and happy gardening!

About the Author:

Kelly R. Smith
Kelly R. Smith

Kelly R. Smith is an Air Force veteran and was a commercial carpenter for 20 years before returning to night school at the University of Houston where he earned a Bachelors Degree in Computer Science. After working at NASA for a few years, he went on to develop software for the transportation and financial and energy trading industries. He has been writing, in one capacity or another, since he could hold a pencil. As a freelance writer now, he specializes in producing articles and blog content for a variety of clients.


Looking for more great content? Visit our partner sites:

The Green Frugal

Running Across Texas


As Featured On Ezine Articles

I offer article and blog-writing services. Interested? Hire Me!


Did you find this article helpful? Thanks for supporting this free site with a small donation!


Visit Kelly’s profile on Pinterest.


The 11 Most popular Diets

Prompted by Health Concerns, Vanity, Eating Disorders

by Kelly R. Smith

Healthy food for weight loss
index sitemap advanced

This article was updated on 12/29/20.

Ads we feature have been independently selected and reviewed. If you make a purchase using the links included, we may earn commission, which helps support the site.

It’s interesting to note that out of all book genres, cook books and diet books rank so high. It seems contradictory, doesn’t it? Yet it makes sense that people want to eat well and stay in shape and be healthy all at the same time. Fair enough.

When following a diet, it is important to keep track of how you are doing. Keeping a log is a good idea. If you use a Garmin GPS sports watch, you already know that the Garmin web app (Garmin Connect) keeps a graph of your weight. But the weight you get from your simple digital bathroom scale isn’t enough; it doesn’t give you the whole picture. You need to also track your BMI (Body Mass Index). You can use a weight/BMI scale or do the math calculation yourself.

Most diets are associated with weight loss but some are more lifestyle, part of a religious faith, or as part of a periodical detox program. Let’s look at 11 of the most popular diets (as of this writing; fad diets pop up all the time).

  • Atkins Diet. This is one of the big ones. In fact, it was the number one diet of 2017. Oddly, when it was first developed it wasn’t even meant to be a weight loss program; it was designed to benefit folks with cardiovascular risk. This diet relies on restricting carbs. The result is controlled insulin levels so that fat is burned for energy rather than carbs.
  • Gluten Free. Gluten is a naturally-occurring protein in grain plants such as wheat. Anyone who bakes homemade bread for example knows that gluten is the “glue” that holds bread together. Unfortunately, many people are sensitive to it. Many others adhere to this diet because they just believe it to be healthier. Some do it because they think they sound like a hipster when they mention it. It can result in weight loss because, like Atkins, it restricts some carbs. It can be expensive though. Marketing likes trendiness.
  • Ketogenic. This is another one that was developed for other purposes. For example, it has been used for decades as a treatment for epilepsy. It’s basically the same at Atkins in that it reduces carbohydrate intake (less than 10% of daily calories) and raising fat intake. Many researchers are looking at using this diet for  diabetes management and general metabolic health.
  • The Volumetrics Diet. This one puts the focus on the energy density in various foods. This is the number of calories in a certain amount of food. Foods that rate a high-energy density have lots of calories per a little amount of food, and low-energy density foods have fewer calories for more food.
  • Whole 30 Diet. This program relies on abstaining from most processed foods (there is a list of permitted items) along with grains, dairy, alcohol, legumes and sweeteners for 30 days. It has been described as a “nutritional reset program that emphasizes whole foods.” Meat, eggs, fruit, and vegetables are allowed as part of the diet. Dairy products, grains, legumes, alcohol, and sugar are not allowed.
  • Intermittent Fasting. Fasting has been used for centuries for different reasons. In the past it was mostly for religious and ceremonial reasons. Today, weight loss and an improvement of the body’s functionality are the focus here in the west. There are several intermittent fasting plans or methods.
  • Vegetarian Diet. This diet comes in many flavors: living food diet, vegetarian, lacto-vegetarian, fruitarian vegetarian, lacto-ovo vegetarian, pesco-vegetarian, ovo-vegetarian, and semi-vegetarian just to name more than a few. Whew. Studies have demonstrated that vegetarians suffer less from diseases, enjoy a lower body weight,  and may have a longer life expectancy than people who eat meat.
  • Vegan Diet. Veganism is considered more of a way of life and a philosophical outlook than a diet per se. Vegans will not consume anything that is animal-based, which can be very hard. This includes eggs, dairy, and honey. Vegans don’t always get into veganism simply for health reasons, but in addition for environmental, ethical, and compassionate reasons.
  • Mediterranean Diet. This diet has been around for quite a while and as might be guessed it is modeled after, well, the Mediterranean style of eating. In a nutshell, the fare is high in monounsaturated fats from nuts and oils, vegetables, whole grains, and seafood. It also includes token amounts of fruit, dairy, eggs, and a bit of red meat every now and then. It is thought by many to be one of the most beneficially ways to eat for overall health, especially for the cardiovascular system.
  • The Raw Food Diet. Sometimes referred to as raw foodism, it is defined by consuming food and drink that has not been processed. This diet is completely plant-based, and organic whenever possible. The four basic categories of raw foodists are raw vegetarians, raw vegans, raw omnivores, and raw carnivores. This last one scares me.
https://www.amazon.com/gp/product/0544559118/ref=as_li_tl?ie=UTF8&camp=1789&creative=9325&creativeASIN=0544559118&linkCode=as2&tag=ic07f-20&linkId=9789f4b2be609914c7139c56453ffab0
  • The DASH diet. This diet was was developed with the idea of lowering high blood pressure. Its hallmark is consumption of a mix of fruits, vegetables, whole grains, lean protein and low-fat dairy. In addition, it is important to avoid saturated fat, sugary beverages, sweets, full-fat dairy, and some oils, and as might be guessed, less salt overall.


There’s certainly a lot of options to choose from, which is a good thing. Certain lifestyles are palatable to one person and not to another. In many cases it is possible to mix and match. The important thing when taking on one of these popular diets is dedication.

Others are Reading:


Did you find this article helpful? Millions of readers rely on information on this blog and our main site to stay informed and find meaningful solutions. Please chip in as little as $3 to keep this site free for all.


Visit Kelly’s profile on Pinterest.

About the Author:

Photo of Kelly R. SmithKelly R. Smith is an Air Force veteran and was a commercial carpenter for 20 years before returning to night school at the University of Houston where he earned a Bachelor’s Degree in Computer Science. After working at NASA for a few years, he went on to develop software for the transportation, financial, and energy-trading industries. He has been writing, in one capacity or another, since he could hold a pencil. As a freelance writer now, he specializes in producing articles and blog content for a variety of clients. His personal blog is at I Can Fix Up My Home Blog where he muses on many different topics.

Panamanian-Style Ceviche Recipe

by Kelly R. Smith

index sitemap advanced
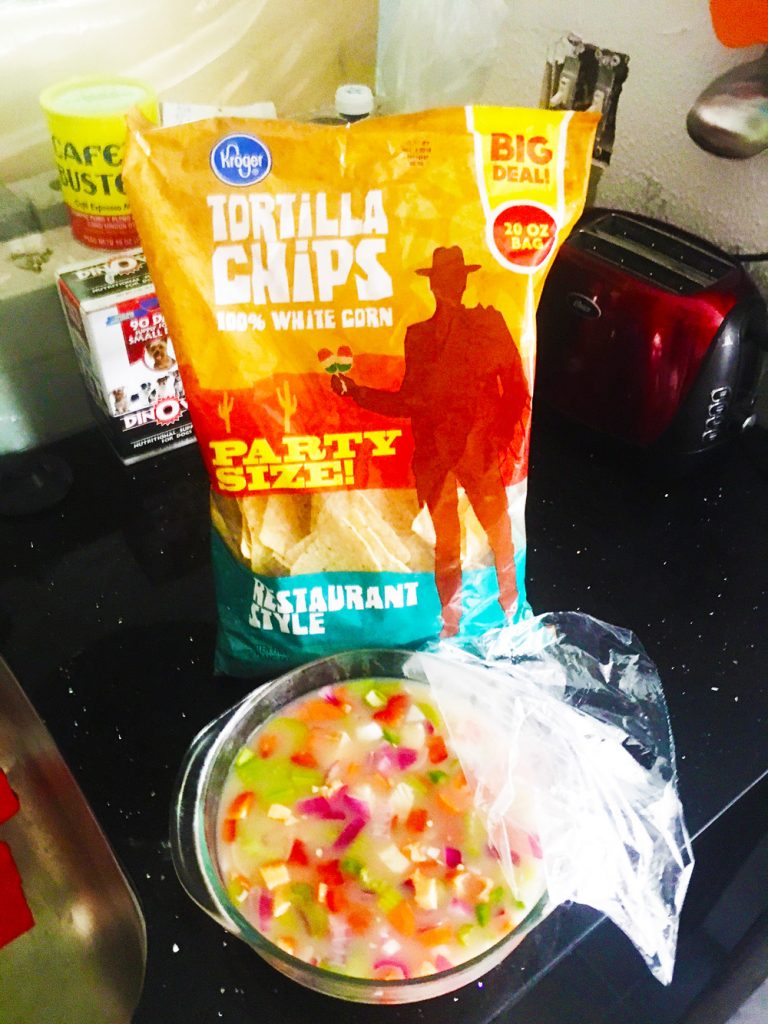
Panamanian-style ceviche and tortilla chips

This article was updated on 10/05/20.

Ceviche (alternatively known to a lesser extent as cebiche, seviche or sebiche) is a seafood dish popular in most Latin American countries. The exact preparation location dictates the exact ingredient list but the one we will consider here is the Panamanian-style ceviche recipe since that’s what I grew up on.

This dish can be eaten as an appetizer before your homemade pizza or other main dish although I don’t see any reason not to just go ahead and make a meal of it. Although some people have have characterized it as raw fish like sushi, nothing could be further from the truth. The fish undergoes chemical cooking (from the acid in the lime juice) rather than thermal cooking. Just your basic science.

For the purpose of this article I’ll give the ingredients for a small batch, as pictured above. If you’re making more just keep the ratios the same, to your liking. Try to use organic ingredients where possible. If you like it hot but your family/guests do not, divide the ceviche into two containers and then put the hot peppers in one.

Ceviche Ingredient List

  • 1 filet of fish, approximately 8″ long, cut in 1/4″ – 1/2″ cubes. Use any white-flesh, non-oily species. In Panama corvina is used but I can’t get it here so this time I used cod. I used shark once. Only the hot pepper bit back.
  • 1/2 large onion, diced. Any type will do; I use red onions because they taste superior and they add color to the dish.
  • 3 sticks of celery, sliced about 1/4″.
  • Kosher or Himilayan (pink) salt as desired; I leave it out because of blood pressure.
  • 2 carrots, cubed or sliced thinly.
  • 1/2 large red bell pepper, cut into 1/2″ chunks.
  • 1 large tomato, diced.
  • 2 large serrano or jalapeno peppers, finely diced. Habanero pepper is traditional if you dare; one of these will do fine.
  • 1/2 cup chopped cilantro.
  • 1/4 cup chopped parsley.
  • Sufficient lime juice to cover ingredients. (Lemon juice can be used in a pinch.) Save yourself some work by buying a bottle at the store rather than squeezing them yourself.

Ceviche Preparation

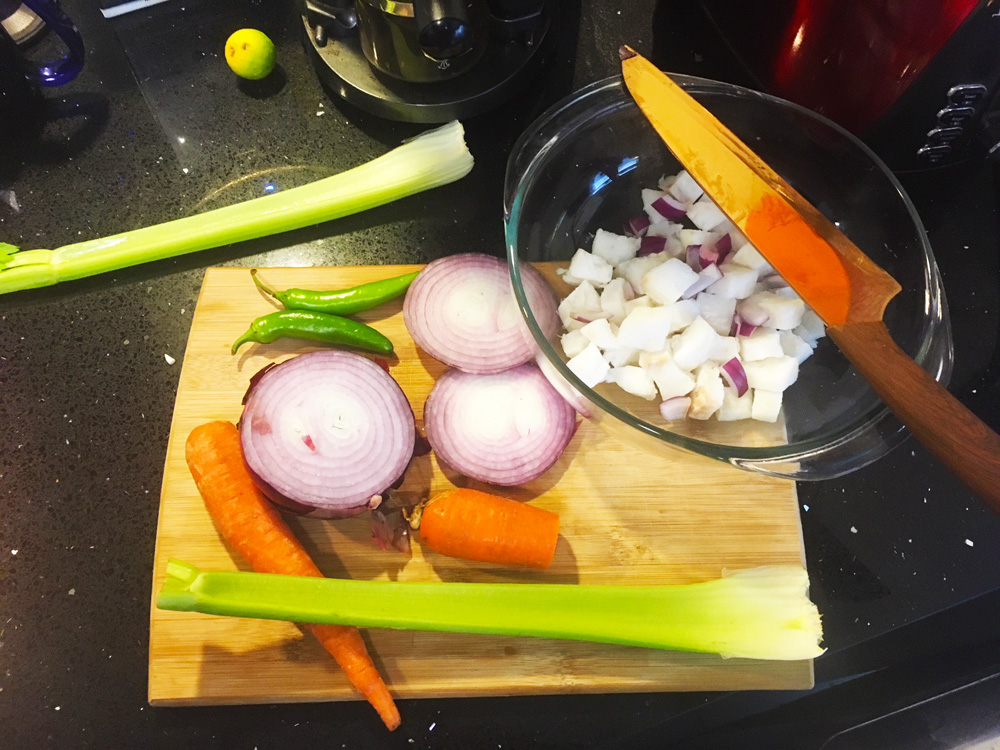
Panamanian-style ceviche ingredients

Cut up all ingredients and combine in a Pyrex container. Never metal! It doesn’t play well with the acidity of the lime juice. Keep in mind that the fish is much easier to work with if it is frozen. Add the lime juice until it just covers the mixture.

Cover the container with plastic wrap or a lid and store it in the refrigerator for a minimum of 24 hours. This will give the fish and vegetables in the ceviche time to cook and combine flavors. It is OK to stir it periodically.

One of the best things about Panamanian-style ceviche is that it is so versatile. The list of vegetables is up to your taste and imagination.  Some areas of Mexico substitute scallops for the fish; Colombians prefer shrimp.

Enjoy your Panamanian-style cevice with a spoon or over homemade oatmeal flax seed bread or scoop it with tortilla chips! Have you experimented with any interesting twists to this recipe? Share them with our readers in the comment section below.

You Might Also Want to Try These Recipes:


Looking for more great content? Visit our partner sites:

The Green Frugal

Running Across Texas


As Featured On Ezine Articles

I offer article and blog-writing services. Interested? Hire Me!


Did you find this article helpful? Thanks for supporting this free site with a small donation! We depend on our readers rather than a bothersome paywall to keep the lights on here in the shop.


Visit Kelly’s profile on Pinterest.


About the Author:

Photo of Kelly R. SmithKelly R. Smith is an Air Force veteran and was a commercial carpenter for 20 years before returning to night school at the University of Houston where he earned a Bachelor’s Degree in Computer Science. After working at NASA for a few years, he went on to develop software for the transportation, financial, and energy-trading industries. He has been writing, in one capacity or another, since he could hold a pencil. As a freelance writer now, he specializes in producing articles and blog content for a variety of clients. His personal blog is at I Can Fix Up My Home Blog where he muses on many different topics.


close

Enjoy this blog? Please spread the word :)

RSS
Follow by Email
Twitter
Follow Me
Tweet
Pinterest
Pinterest
Pinterest
Instagram
LinkedIn
Share