Yes, I am back in the experimental recipe zone again. So comfortable with my culinary thinking hat on; I have an affinity for Frank Zappa’s Muffin Man. This recipe combines good veggies and spices with Italian sausage but with aorta-healthier turkey rather than pork. I don’t need to further push my high blood pressure. This recipe serves 6 and is ready in about an hour.
Ingredient List
3 tpsp. olive oil
1 tpsp. apple cider vinegar
3 cloves garlic, minced
1 tsp. crushed red pepper flakes
3 bell peppers, sliced and diced (why not use all the colors)
1/2 large red onion, diced
Himalayan or pink salt to taste (it’s chock full of minerals and nutrients, unlike the regular stuff)
Black pepper to taste
6 Italian sausages sliced thin (hot or sweet, your choice)
1/4 cup fresh basil, sliced up
Preparation
Preheat your oven to 400 degrees.
Combine and mix the vinegar, red pepper, oil, and garlic in a mixing bowl.
This turkey Italian sausage and peppers recipe is very filling which is good if you have been working out or are on an intermittent fasting routine. It also keeps well in the refrigerator and even makes a tasty sandwich.
Looking for more great content? Visit our partner sites:
Kelly R. Smith is an Air Force veteran and was a commercial carpenter for 20 years before returning to night school at the University of Houston where he earned a Bachelor’s Degree in Computer Science. After working at NASA for a few years, he went on to develop software for the transportation, financial, and energy-trading industries. He has been writing, in one capacity or another, since he could hold a pencil. As a freelance writer now, he specializes in producing articles and blog content for a variety of clients. His personal blog is at I Can Fix Up My Home Blog where he muses on many different topics.
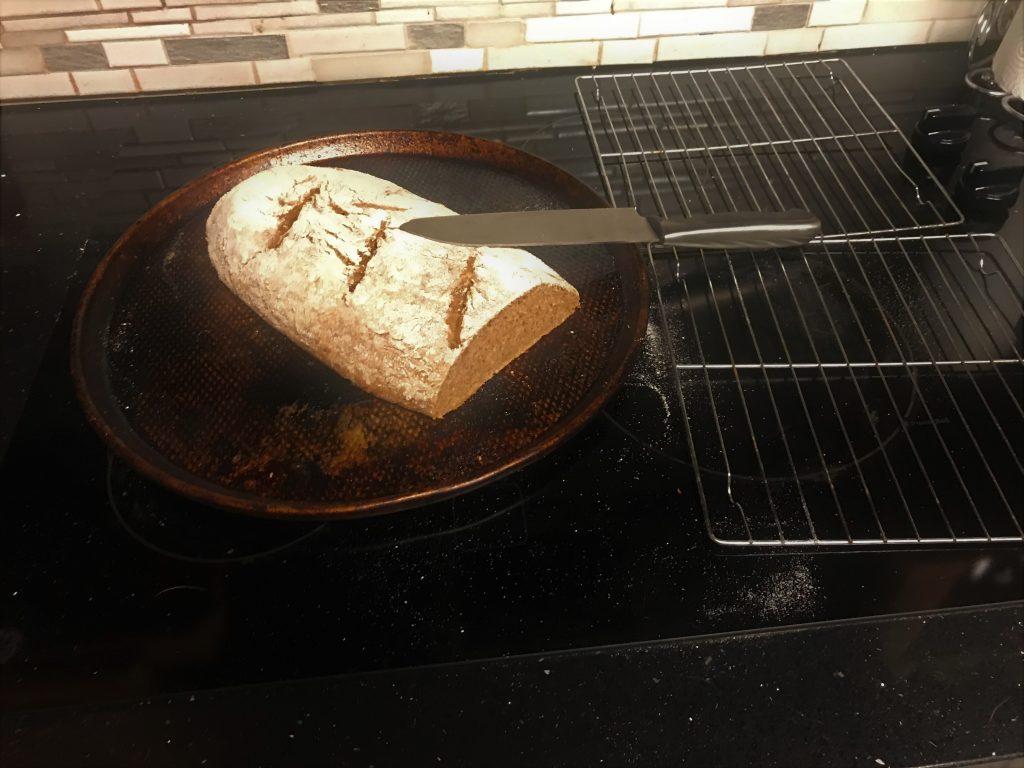
Loaf of bread with an oval Banneton proofing basket
It may seem strange that I called this particular recipe the Covid-19 Lock-down recipe but there’s a reason for it. Since we all began this pandemic adventure America has become a nation of bakers. Yeast is a rare commodity; I searched high and low for two weeks until I struck gold. Good whole wheat was almost as hard to come by.
Anyway, I like to experiment and this is what I came up with yesterday. It may seem an odd assortment of ingredients but it really worked. I used the oval Banneton proofing basket and a cookie sheet rather than a loaf pan.
Use organic ingredients whenever possible. You can also use this dough ingredient list when you are making homemade pizza.
Ingredient List for Covid-9 Bread
1 c Quick-cooking steel-cut oatmeal
1/2 c quinoa
Dash of Himalayan salt; I like because they don’t remove all the minerals like regular salt.
2 T Gluten; it’s optional but gluten is the “glue” that holds the loaf together.
1 T Cinnamon
3 c Very warm water
3-4 c Whole wheat flour; as much as you need to make the dough and knead it.
1/2 c Rice flour if you are using a proofing basket.
Just a thought: next time I’m going to try putting in some finely-sliced basil leaves; it’s going gang-busters in my garden right now.
Preparation Steps
Put the oatmeal and quinoa in your mixing bowl and just cover the mixture with water. Since the mixture will absorb water, check it periodically and add water as needed. About an hour will do the trick.
Add the 3 c warm water.
Mix in the yeast well.
Mix in the rest of the dry ingredients; the flour is last.
Stir in the flour well bit by bit until it is hard to turn over.
Turn the dough out on a floured surface. Sprinkle some flour on top of it so sticking to your hands is minimal.
Commence kneading, adding flour as needed (see what I did there?). I usually fold it over 20-30 times.
Proofing time! If you use a proofing basket, prepare it by spraying the inside lightly with water and sprinkle rice flour. Wheat flour will NOT work. Fit the dough in and cover with a damp dish towel. If you are using a mixing bowl, lightly coat it with olive oil or cooking spray so it won’t stick. Plop the dough in and cover with a damp dish towel.
Let it rise for 2-3 hours or whatever your brand of yeast recommends.
Put a pan of water on the oven rack; the steam will keep you loaf from drying out.
Preheat your oven to 450 degrees.
Turn your dough out onto either cooking-sprayed cookie sheet if you used a proofing basket or into a buttered loaf pan. Cut 3 thin slits across the top of the loaf; I used an X-acto knife.
Bake it! 25 minutes was perfect for me. Use the toothpick test to be sure.
Turn the loaf out onto cooling racks and let it rest for at least 10 minutes.
Enjoy!
Hot, fresh homemade bread
Looking for more great content? Visit our partner sites:
Kelly R. Smith is an Air Force veteran and was a commercial carpenter for 20 years before returning to night school at the University of Houston where he earned a Bachelor’s Degree in Computer Science. After working at NASA for a few years, he went on to develop software for the transportation, financial, and energy-trading industries. He has been writing, in one capacity or another, since he could hold a pencil. As a freelance writer now, he specializes in producing articles and blog content for a variety of clients. His personal blog is at I Can Fix Up My Home Blog where he muses on many different topics.
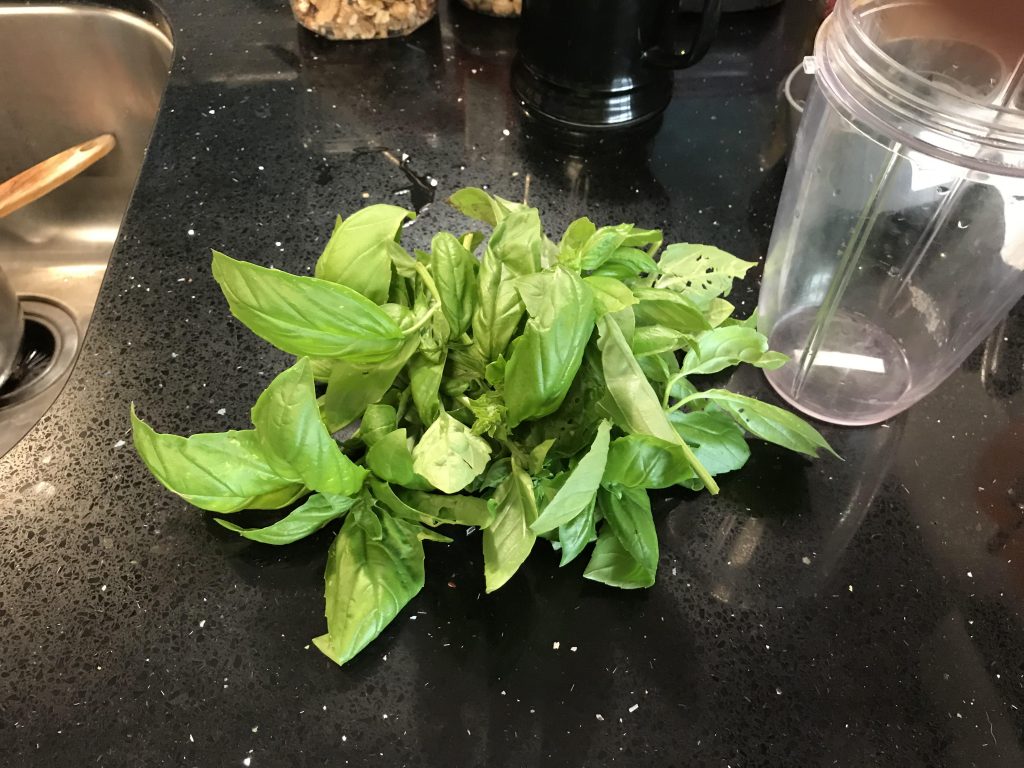
The basil pictured above is fresh-harvested from my garden in preparation for making pesto (yum). Believe it or not, it is a member of the mint family. It is also known as great basil, sweet basil, or for the scientifically-minded, Ocimum basilicum. Whatever you call it, it’s delicious and an essential part of any foodie’s herb garden.
All other things aside, consider the economics of the situation — you can buy a plant from the nursery, or even Walmart for crying out loud, for the same price or cheaper than a plastic-wrapped one-time-use bundle from the grocery store. Who knows where that came from? Mine is organic and two minutes from plant to recipe. Why is there even a comparison? I understand that even apartment-dwellers can grow it in the kitchen window or better yet, a balcony if you have one.
Health Benefits of Basil
Most of the studies that indicate that tulsi (holy basil) was used to determine benefits. Tulsi is traditionally used for religious and traditional medicine purposes, and for its essential oil. It is widely used as an herbal tea, commonly used in Ayurveda.
Supports liver health.
Fights cancer. This is due to the phytochemicals present by increasing antioxidant activity, changing gene expression, triggering cell death, and slowing cell division.
Supports liver health.
Protects against skin aging. This effect is from using basil extracts in topical skin creams to improve skin hydration and reduce roughness and wrinkling. Eating it will not provide the benefit.
Supports cardiovascular function. The theory is that it lowers blood pressure due to the plant’s eugenol content. This can block calcium channels in the body, lowering high blood pressure. Calcium channel blockers are a popular class of blood pressure medications.
Boosts mental health.
Reduces swelling and inflammation.
Fights infection. A study in 2013 as reported by the US National Library of Medicine showed that sweet basil oil was effective against E. coli bacteria. The researchers determined that certain preparations of basil oil could help treat or even prevent some varieties of infection.
Recipes for Basil
It goes without saying that basil can be added to almost any recipe but here are a few of my favorites. Try them all. These are recipes that I have either invented or morphed together from several traditional recipes and modified to my taste. When I get into the kitchen to experiment, my wife invariably says, “Oh no!” But never fear, she has approved all the ones below.
Obviously, basil can be added to a variety of dishes whether you are going for taste or the nutritional value. But to ensure freshness, availability, and organic quality, plant it in your herb garden.
Looking for more great content? Visit our partner sites:
Kelly R. Smith is an Air Force veteran and was a commercial carpenter for 20 years before returning to night school at the University of Houston where he earned a Bachelor’s Degree in Computer Science. After working at NASA for a few years, he went on to develop software for the transportation, financial, and energy-trading industries. He has been writing, in one capacity or another, since he could hold a pencil. As a freelance writer now, he specializes in producing articles and blog content for a variety of clients. His personal blog is at I Can Fix Up My Home Blog where he muses on many different topics.
What’s not to like about Beef Stroganoff ? It’s a timeless dish that won’t break the budget and is easy to prepare. When I got a hankerin’ for it yesterday I did an internet search and was surprised by all the variations.
If you are on a low-carb diet but are hankerin’ for something pasta-y and this dish sounds a bit too much, I suggest trying my low-carb spaghetti carbonara recipe.
In case you are curious — the Stroganoff (or Stroganov) family in 18th century Russia is mainly associated with the popular beef dish which bears its name. The dish likely goes back to a much earlier peasant favorite, but is now usually attributed to the household of Count Pavel Stroganoff (1774-1817).
Beef Stoganoff Ingredients
1 1/2 pounds of beef sirloin steak, 1/2 inch thick
1/4 cup butter (I prefer Kerrygold unsalted Irish butter but suit yourself)
1 teaspoon Worcestershire sauce
1/2 teaspoon salt
1 1/2 cups sour cream
1/4 cup all-purpose flour
3 cups hot cooked egg noodles
Preparation Steps
Cut the beef across the grain into roughly 1 1/2×1/2-inch strips.
Cook the mushrooms, onions, and garlic in butter using a 10-inch skillet over medium heat. Stir occasionally until the onions are tender. Then, remove from skillet.
Cook the beef strips in the same skillet until they’re brown. Next, stir in 1 cup of the broth, the salt, and the Worcestershire sauce. Heat to boiling; reduce heat. Cover the skillet and simmer 15 minutes.
Stir the remaining 1/2 cup of broth into the flour and stir into the beef mixture. Stir in the onion mixture and heat to just boiling, stirring constantly to maintain consistency. Boil and stir for 1 1/2 minutes and reduce heat. Finally, now stir in the sour cream. Heat until hot but do not boil it. Serve over noodles and enjoy.
So that’s all there is to making classic beef Stroganoff. Like most of the recipes that I enjoy, it is very adaptable; throw in any extra ingredients or condiments that you like (I’m fond of homemade habanero hot sauce). If you like this recipe, please share the link with your friends. Enjoy!
Nutritional Information
Calories: 435
Calories from fat: 295
Total Fat
23 g
Saturated Fat
10 g
Cholesterol
115 mg
Sodium
620 mg
Potassium
560 mg
Total Carbohydrate
31 g
Dietary Fiber
2 g
Protein
28 g
Looking for more great content? Visit our partner sites:
Kelly R. Smith is an Air Force veteran and was a commercial carpenter for 20 years before returning to night school at the University of Houston where he earned a Bachelor’s Degree in Computer Science. After working at NASA for a few years, he went on to develop software for the transportation and financial and energy trading industries. He has been writing, in one capacity or another, since he could hold a pencil. As a freelance writer now, he specializes in producing articles and blog content for a variety of clients. His personal blog is at I Can Fix Up My Home Blog where he muses on many different topics.
I don’t make any bones about it; I like hot sauce and spicy food. I’m not sure if this is something masochistic or not–I try not to overthink it. We have a lot of hot sauce choices here in South Texas; we are not limited to the ubiquitous “Tabasco” brand. But I wanted something different. So here is what I came up with and I think you’ll like it too.
I have to tell you in advance that I am, as much as possible, a stickler for homegrown and organic ingredients (the photo above is one of the habanero pepper bushes I have been cultivating for the past year).
To be honest, I’m not sure about the name of the pepper. It depends. The one I bought called it habanero but they are also called Scotch Bonnet. Back home in Panama we called them Aji Chombo which is likely not a politically-correct term anymore so if you do not want to be called racist do not use it. Whatever you call them, they register, on the Scoville heat unit (SHU) rating, 350,000, which is 100 times hotter than a 3,500 SHU jalapeño. Hungry yet?
I am always looking for more seasoning and sauce recipes for dishes like low-carb egg noodles so here we go.
The Hot Sauce Ingredient List
I did a lot of research and took what I considered to be the best ideas for the ingredients. This is not to say that I plagiarized any other cook’s recipe. I simply developed my own and is quite simple.
6 habanero peppers
6 oz. balsamic vinegar (other recipes favored regular but I just prefer the flavor of balsamic)
Juice of 3 limes
(optional) 1/4 cup ground flaxseed. High levels of Omega-3 fatty acids is great for cardiovascular health.
Making the Hot Sauce
This is easy as well. Simply whip up all the ingredients in your food processor or juicer. I used my Ninja Bullet that I use to make spaghetti sauce, pesto, and smoothies.
To store the sauce I used one of those glass salad dressing carafes that you can find on the grocery store shelf. I haven’t researched it but I know that when I make hot pepper dishes like Panamanian ceviche I always have to use either glass or metal. It has to do with the acidity, hotness, etc. In any event, I don’t want to be melting a plastic container.
Looking for more great content? Visit our partner sites:
Kelly was a commercial carpenter for 20 years before returning to night school at the University of Houston where he earned a Bachelor’s Degree in Computer Science. After working at NASA for a few years, he went on to develop software for the transportation and financial and energy trading industries. He has been writing, in one capacity or another, since he could hold a pencil. As a freelance writer now, he specializes in producing articles and blog content for a variety of clients. His personal blog is at I Can Fix Up My Home Blog where he muses on many different topics.
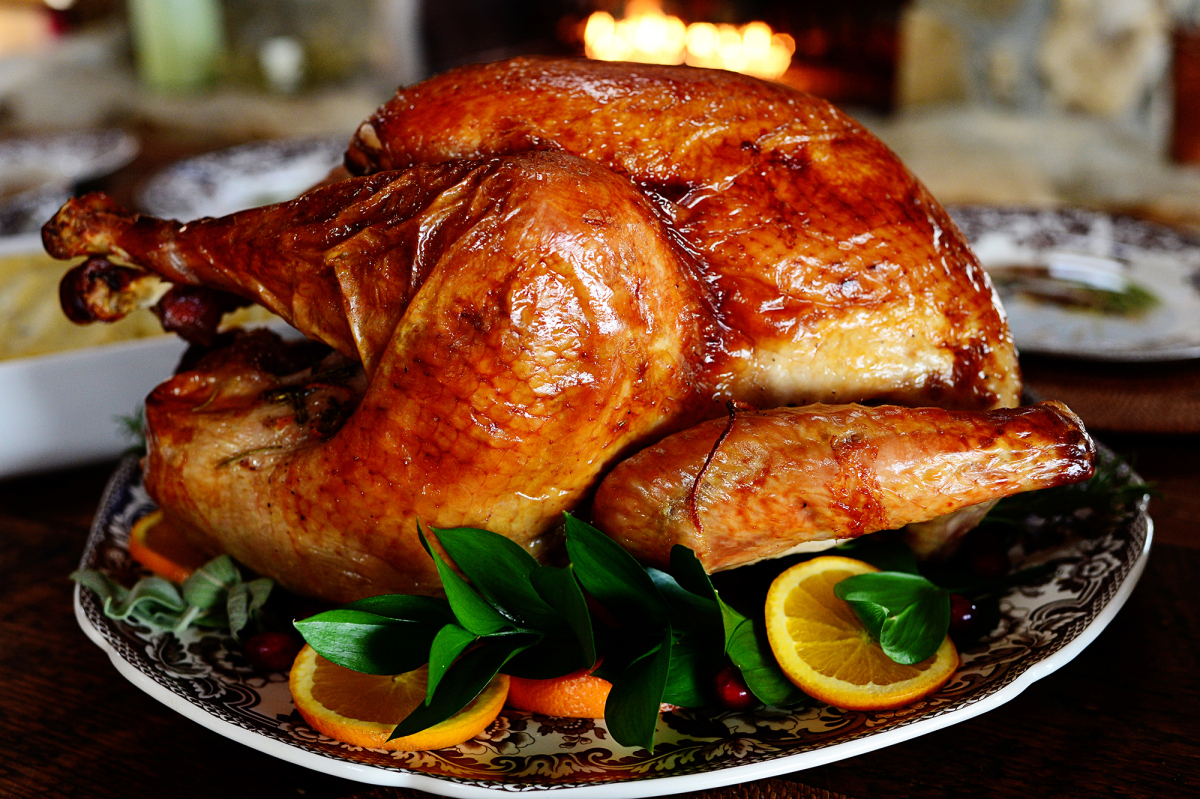
It’s fair to say that there is nothing quite as emblematic of Thanksgiving and Christmas dinner as that prince of birds — the turkey. It didn’t make it to be the national bird though Ben Franklin lobbied for it, but it did make it to being the savory symbol of two of our favorite national holidays.
That said, the preparation can cause severe anxiety just as holiday season loneliness can. It’s far too easy to get it wrong; too dry, undercooked, or overcooked. Let’s look at 10 common turkey cooking mistakes.
Not Thawing the Turkey Long Enough
This is a very common mistake, especially for those first-timers. This mistake will lead to forehead slapping and a mad attempt to finish the thawing process in a sink full of warm or cool water. Now which was it again?
As a rule of thumb, allow one day in the refrigerator for each 4 pounds of turkey. Using this rule it is easy to determine approximately how long you need to let it defrost before getting busy cooking your turkey. Taking this into consideration, be sure you have enough room in your fridge before you go shopping.
Over-Brining the Bird
Many recipes call for brining — soaking in a solution of salt and spice which is a snap to do with an herb brine kit. However, many of the most available commercially-produced turkeys, such as frozen Butterball birds, have already been pre-treated with a solution of salt and spices. This is done in order to stretch out the shelf life, not necessarily to please your palate. That’s why the brine kit is a better idea; it’s specially prepared for flavor, not storage.
If you do this again (just because the recipe says so), you will end up with a salty bird indeed. Just check the label before you proceed. On the one hand, if the producers have already done it, you have less work to do albeit while sacrificing some flavor. On the other hand, it’s a real chore hand-pick your favorite spices.
Not Drying the Turkey Sufficiently
If your aim is a crispier skin on the outside you’ll want to thoroughly pat the bird down using paper towels before it goes in the oven. Drying the inside cavity of the turkey is also important but not doing so is also a common mistake. Generally speaking, having a well dried turkey inside and outside will yield a more evenly-cooked and flavorful bird.
Cooking the Stuffing Inside the Cavity
Whatever Grandma told you, this is not the best of ideas. The main problem here is that to cook the stuffing through fully and guarantee that all of the bacteria inside the raw bird has been eliminated, you will need to cook the turkey for a longer period of time. The result? Dry, overcooked meat. Embarrassing, Chef.
The obvious answer is to make the stuffing from scratch or use one of those basic boxed delicacies. I like to bake a loaf using my oatmeal flax seed bread recipe ahead of time and make it from that. Super healthy. Either way, cook it outside the bird. We won’t tell if you don’t.
Trussing the Legs too Tightly
It makes sense when you think about it; closing off the cavity means longer roasting time and possibly uneven cooking. Your only real limitation is the width of your roasting pan. If you are going to buy one of those disposable roasting pans at the store, buy it at the same time that you buy your turkey to be sure you have a good fit.
Not Investing in a Real Meat Thermometer
Sure, it’s tempting to rely on that little pop-up button thingamajiggy that the poultry farmers embed in the bird’s hide, but these are notoriously unreliable. These may be faulty and pop up when the meat is already overcooked. Since you’ve only got one shot at this, go ahead and invest in a real meat thermometer. You will get more accurate results and as a bonus, you dinner guests will regard you as a professional.
Cooking at the Wrong Oven Temperature
We all know some cooks that recommend blasting the turkey at high heat (425°F) for about 30 minutes first and then lower the temperature. However, a low, steady temperature of 325°F from beginning to end is preferable.
Certainly, the initially high-heat method may take 30 to 90 minutes off your total cooking time, but remembering to reduce the temperature is just one more thing to remember on what is already very busy day.
Not Allowing Your Bird to Rest
No, we’re not talking about letting the turkey take a break. Resting simply means taking it out of the oven when it’s done and simply letting it sit there. This should be done with all meats actually. With a turkey the recommended resting time is 15 minutes.
Why do we do this you might ask? Resting time allows the juices inside the turkey to soak back into the meat, instead of dripping out as soon as you you slice into it. This results in a moister bird. More bang for your buck. It’s still important to keep the turkey warm so tent it with foil until carving time arrives.
Not Preparing the Surface of the Turkey Properly
It’s not clear whether the Pilgrims did this step (some history revisionists even claim that there wasn’t even a turkey present) or not but things have changed since then. It’s not a difficult step; just rub the turkey all over with olive oil or melted clarified butter. The main reason for this is to ensure that the turkey browns evenly. Aesthetics is important; just ask any chef.
Not Inserting the Thermometer in the Correct Spot
You can’t just spear the bird willy-nilly and expect to get the result that you want. Your target is in the thickest part of the thigh, right smack-dab in the crease where it meets the breast. If your bird weighs in at 18 pounds or less, monitor the temperature beginning at 2.5 hours and every 15 minutes following that. For a turkey above 18 pounds, start checking at 3 hours.
Avoid these 10 common turkey cooking mistakes and you and your guests won’t have to be confronted with a foul fowl.
It’s true that stuffing is the most traditional side dish and that’s fine. But if you like to step out of the box and add a very non-traditional dish, you won’t go wrong with Spaghetti Carbonara.
If you are worried that your guests are getting too hungry due to the extra preparation time it takes to do it just right, why not put out an appetizer? I’ve found that Panamanian-Style Ceviche hits the mark rather well.
Did you find this article helpful? Millions of readers rely on information on this blog and our main site to stay informed and find meaningful solutions. Please chip in as little as $3 to keep this site free for all.
Kelly R. Smith is an Air Force veteran and was a commercial carpenter for 20 years before returning to night school at the University of Houston where he earned a Bachelor’s Degree in Computer Science. After working at NASA for a few years, he went on to develop software for the transportation, financial, and energy-trading industries. He has been writing, in one capacity or another, since he could hold a pencil. As a freelance writer now, he specializes in producing articles and blog content for a variety of clients. His personal blog is at I Can Fix Up My Home Blog where he muses on many different topics.
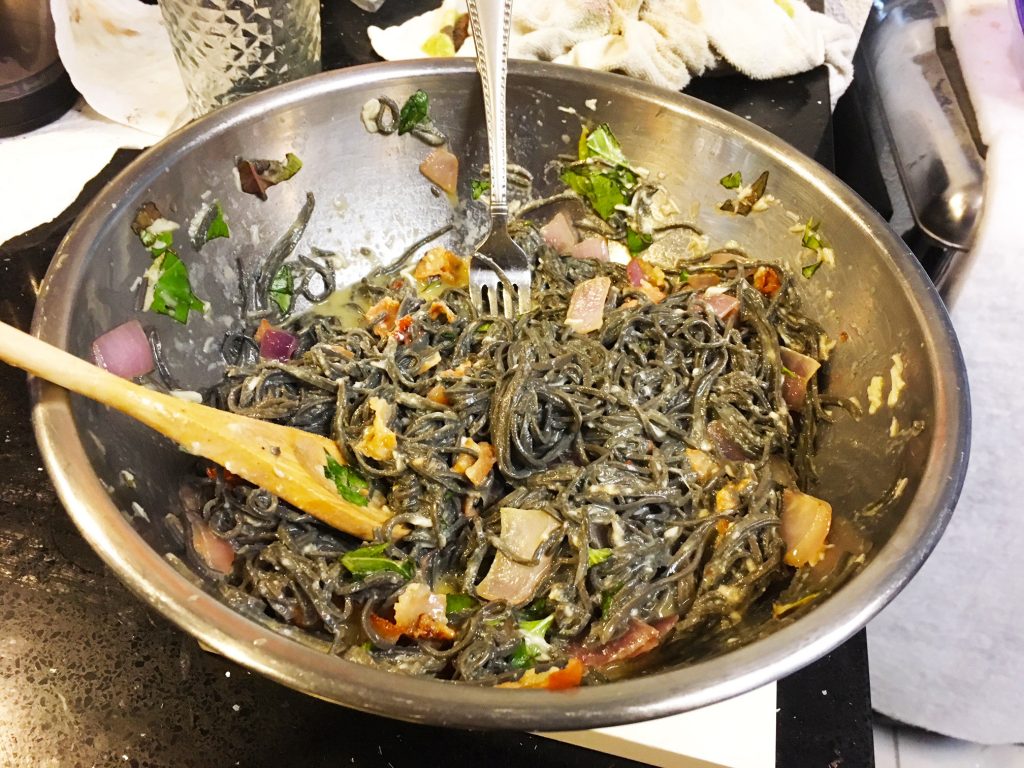
Carbonara spaghetti may sound exotic but it is really a simple dish. This recipe is a variation on the typical one as it is made with a low-carb diet in mind. One of the things I like about this recipe is that it is open to modification if you feel like adding more spices, using a different species of cheese, etc.
Low-carb black bean spaghetti carbonara
I for one love Italian food. Homemade pizza always goes over big here and one of our favorites is Pizza Margherita. Of course there is always that debate over crispy or thick crust. That’s a battle I have yet to win, yet in the pursuit of domestic tranquility…
Speaking of low-carb Italian dishes, have you tried your hand at making egg noodles? Zero carbs with plenty of nutritional value is a good thing.
Ingredient List
16 oz black bean spaghetti (this is what makes the dish low-carb; if that is not important to you use any kind of past you prefer)
4 eggs
1 cup onions, chopped
10 slices chopped bacon (nitrate free if possible)
1 1/2 cup grated parmesan cheese
30 fresh basil leaves, chopped
16 oz black bean spaghetti
Chopped parsley (you decide how much)
Directions
Whisk the eggs thoroughly in a large mixing bowl.
Whisk in the basil.
Whisk in the cheese.
Put the spaghetti in a large pan, cover with water, and bring to a boil; stir occasionally.
Start cooking the bacon in a skillet or sauce pan; add the onion when the bacon is half-way done; set the pan aside when the bacon is done. There is no need to drain it.
When the spaghetti is al dente begin adding it to the egg mixture. Add a bit at a time while mixing.
Mix in the bacon/onion mixture.
Serve and top with more cheese and parsley if desired.
Did you make any interesting and tasty tweaks to this low-carb spaghetti carbonara recipe? If so, share with our fellow foodies in the comment section below.
Looking for more great content? Visit our partner sites:
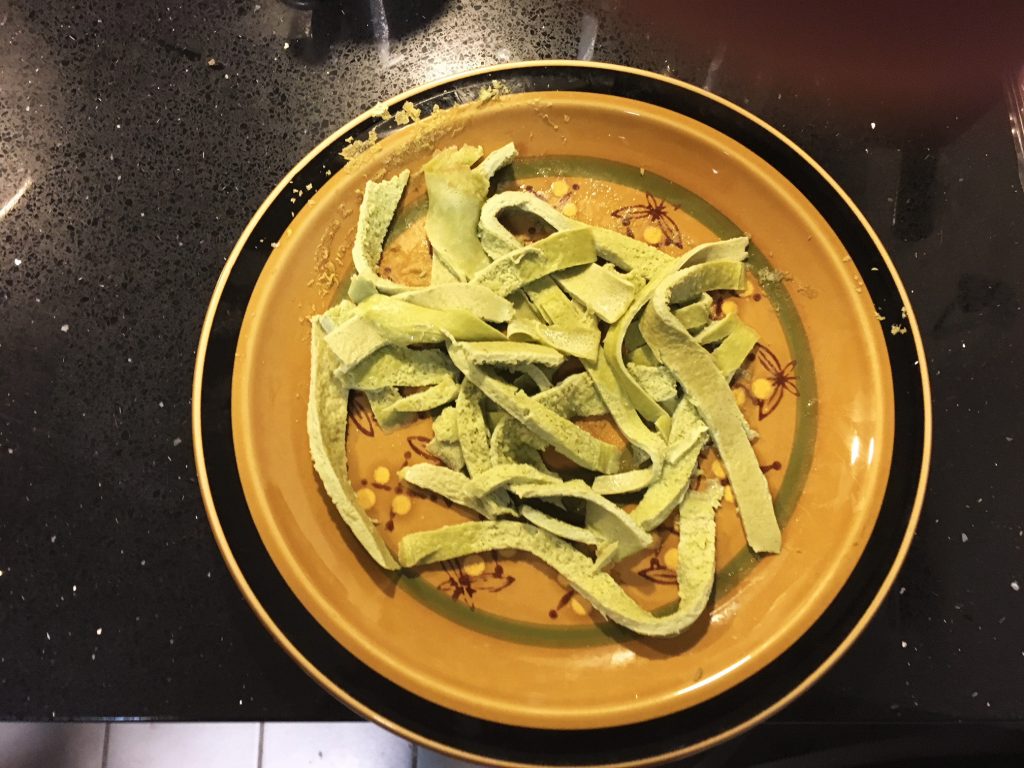
Low Carb diets are very popular these days. The main problem is that they can be quite restrictive. People love their pasta; it seems like we are hard-wired for carbohydrates. Pasta is very high in carbohydrates so even one “cheat meal” can set a weight loss program way back. Oh, the guilt! But thanks to this low carb egg noodles pasta recipe, all is not lost.
Note that this recipe is not gluten-free but it boasts 0 carbs per serving (unless you add something else. And with just three basic ingredients it is not a very difficult dish to prepare.
Egg Noodles Pasta Ingredient List (2 smallish servings)
2eggs atroom temperature
1ouncecream cheese atroom temperature
1teaspoonwheat gluten;this is optional but it creates a better texture
A dozen or so fresh basil leaves or spice/herb of your choice (basil adds only about 1 carb but 6% RDA of vitamin A)
Broth of your choice
Gluten is not the villain it is made out to be. In reality it is a protein and it is the “glue” that holds bread together, especially homemade bread. But if you are sensitive to it just leave it out of the recipe.
Preparation Instructions
Preheat the oven to 325 degrees F.
Add the cream cheese, eggs, and gluten to a blender jar.
Blend on high until smooth, about 1 minute.
Pour the mixture out onto a silicone mat that has been placed on top of a heavy baking pan.
Smooth mixture out into a rectangle shape while keeping the mixture very thin.
Bake at 325 degrees F until set; about 15 minutes but your time may vary.
Remove from oven and let it set and cool for a few minutes prior to cutting into strips.
Next, gently simmer in the broth for about 6 minutes minutes. The broth can be retained for soup or another use. Waste not, want not.
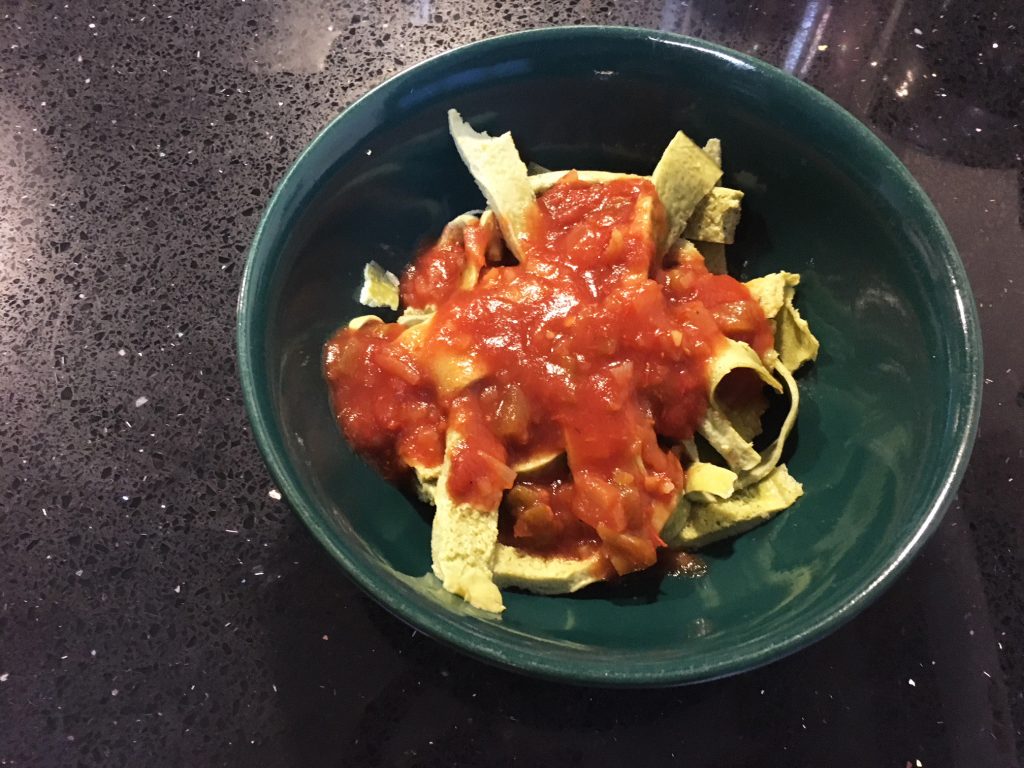
Low carb noodles with Pace Picante Sauce
Enjoy your low carb egg noodles with the topping of your choice. I enjoy it with Panamanian style ceviche once in a while but each to his own I always say. In the photo above the noodles are slathered with Pace Picante Sauce (hot).
I suppose that makes it like a breakfast burrito minus the tortilla.
Looking for more great content? Visit our partner sites:
Ceviche (alternatively known to a lesser extent as cebiche, seviche or sebiche) is a seafood dish popular in most Latin American countries. The exact preparation location dictates the exact ingredient list but the one we will consider here is the Panamanian-style ceviche recipe since that’s what I grew up on.
This dish can be eaten as an appetizer before your homemade pizza or other main dish although I don’t see any reason not to just go ahead and make a meal of it. Although some people have have characterized it as raw fish like sushi, nothing could be further from the truth. The fish undergoes chemical cooking (from the acid in the lime juice) rather than thermal cooking. Just your basic science.
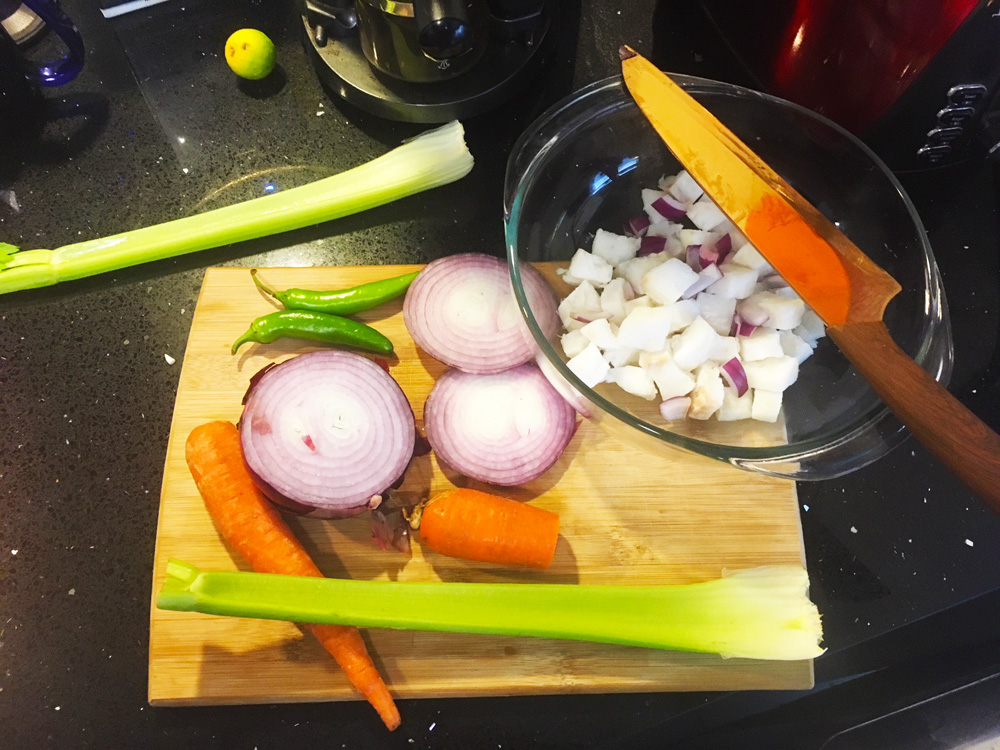
For the purpose of this article I’ll give the ingredients for a small batch, as pictured above. If you’re making more just keep the ratios the same, to your liking. Try to use organic ingredients where possible. If you like it hot but your family/guests do not, divide the ceviche into two containers and then put the hot peppers in one.
Ceviche Ingredient List
1 filet of fish, approximately 8″ long, cut in 1/4″ – 1/2″ cubes. Use any white-flesh, non-oily species. In Panama corvina is used but I can’t get it here so this time I used cod. I used shark once. Only the hot pepper bit back.
1/2 large onion, diced. Any type will do; I use red onions because they taste superior and they add color to the dish.
3 sticks of celery, sliced about 1/4″.
Kosher or Himilayan (pink) salt as desired; I leave it out because of blood pressure.
2 carrots, cubed or sliced thinly.
1/2 large red bell pepper, cut into 1/2″ chunks.
1 large tomato, diced.
2 large serrano or jalapeno peppers, finely diced. Habanero pepper is traditional if you dare; one of these will do fine.
1/2 cup chopped cilantro.
1/4 cup chopped parsley.
Sufficient lime juice to cover ingredients. (Lemon juice can be used in a pinch.) Save yourself some work by buying a bottle at the store rather than squeezing them yourself.
Ceviche Preparation
Panamanian-style ceviche ingredients
Cut up all ingredients and combine in a Pyrex container. Never metal! It doesn’t play well with the acidity of the lime juice. Keep in mind that the fish is much easier to work with if it is frozen. Add the lime juice until it just covers the mixture.
Cover the container with plastic wrap or a lid and store it in the refrigerator for a minimum of 24 hours. This will give the fish and vegetables in the ceviche time to cook and combine flavors. It is OK to stir it periodically.
One of the best things about Panamanian-style ceviche is that it is so versatile. The list of vegetables is up to your taste and imagination. Some areas of Mexico substitute scallops for the fish; Colombians prefer shrimp.
Enjoy your Panamanian-style cevice with a spoon or over homemade oatmeal flax seed bread or scoop it with tortilla chips! Have you experimented with any interesting twists to this recipe? Share them with our readers in the comment section below.
I offer article and blog-writing services. Interested? Hire Me!
Did you find this article helpful? Thanks for supporting this free site with a small donation! We depend on our readers rather than a bothersome paywall to keep the lights on here in the shop.
Kelly R. Smith is an Air Force veteran and was a commercial carpenter for 20 years before returning to night school at the University of Houston where he earned a Bachelor’s Degree in Computer Science. After working at NASA for a few years, he went on to develop software for the transportation, financial, and energy-trading industries. He has been writing, in one capacity or another, since he could hold a pencil. As a freelance writer now, he specializes in producing articles and blog content for a variety of clients. His personal blog is at I Can Fix Up My Home Blog where he muses on many different topics.
I can safely state that one thing I cannot tolerate is store-bought white bread. It’s full of crap ingredients and air. If I can’t buy some good stuff, I just prefer to make my own. The good thing about homemade bread is that I get to control the ingredients.
So, that being said, here is the recipe for the oatmeal flax/chia seed whole wheat bread that I baked today. I like to pair it with a bowl of Panamanian-style ceviche but it works fine by itself or toasted. Enjoy!


 Kelly R. Smith is an Air Force veteran and was a commercial carpenter for 20 years before returning to night school at the University of Houston where he earned a Bachelor’s Degree in Computer Science. After working at NASA for a few years, he went on to develop software for the transportation, financial, and energy-trading industries. He has been writing, in one capacity or another, since he could hold a pencil. As a freelance writer now, he specializes in producing articles and blog content for a variety of clients. His personal blog is at I Can Fix Up My Home Blog where he muses on many different topics.


 Kelly R. Smith is an Air Force veteran and was a commercial carpenter for 20 years before returning to night school at the University of Houston where he earned a Bachelor’s Degree in Computer Science. After working at NASA for a few years, he went on to develop software for the transportation and financial and energy trading industries. He has been writing, in one capacity or another, since he could hold a pencil. As a freelance writer now, he specializes in producing articles and blog content for a variety of clients. His personal blog is at


