2020 National Electrical Code Changes

National Electrical Code
index sitemap advanced

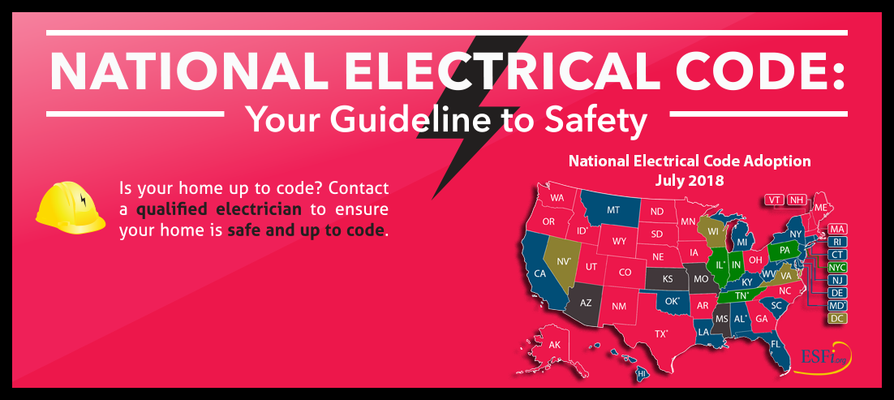
The National Electrical Code (NEC), or NFPA 70, is a regionally adoptable standard for the safest installation of electrical wiring and equipment, only in the United States, although of course other countries can follow it if they wish. The NEC is a part of the National Fire Code series published by the National Fire Protection Association (NFPA), which is a private trade association. Despite the use of the term “national”, it is not a federal law. It can be adopted as is by any state or municipality or adapted.

The 2020 version of the National Electric Code includes requirement updates in the following four significant areas: firemen’s disconnect, solar power, surge protection, and GFCI protection . To ensure providing the best, safest work possible, become familiar with the official NEC codes mandated by your state. Whether you are a professional or a DIY project person, a knowledge of electrical safety requirements is important.

Emergency Disconnects

  • Must function from outside dwellings
  • Applies to generators and energy storage systems (ESS)
  • Required for all single- and two-family dwellings
  • Must be readily accessible
  • Generators must be marked with one of the following: EMERGENCY DISCONNECT, METER DISCONNECT, NOT SERVICE EQUIPMENT, EMERGENCY DISCONNECT, SERVICE DISCONNECT, or EMERGENCY DISCONNECT, NOT SERVICE EQUIPMENT

Surge Protection

  • Must be part of service equipment or adjacent to it
  • New article (242) includes service lines to dwelling units
  • May be located at each level of downstream distribution as needed
  • As of 2020 applies to: replacements and service upgrades and line side and load side services 

Solar (Applies to California)

  • Solar panels on new construction (California requires solar photovoltaic systems for newly constructed healthcare facilities starting January 1, 2020)
  • Outdoor disconnect required for all energy storage units

Articles Removed from NEC 2017

  • Article 553 Floating Building
  • Article 285 SPDs 1,000V or less
  • Article 280 SPDs over 1,000V
  • Article 328 MV Cable Type MV

New Articles Added

  • Article 800 General Requirements for Communication Systems: consolidates the previous contents of 2017 NEC chapter 8 into one articles and addresses requirements for communication circuits, to include television and radio distribution antennae as well as network powered broadband systems.
  • Article 242 Overvoltage Protection: combines the two articles 280 and 285 and addresses surge protective requirements, devices and arresters.
  • Article 337 Type P Cable: covers 600V Type P cables that are used in industrial and hazardous areas and specifications.
  • Article 311 MV Connectors and Cable: Expands on the deleted article 328 and goes on to address medium voltage conductors and cables, their use, and their specifications.

Look for Updates Every 3 Years

The National Fire Protection Agency continues to publish official updates to the NEC every three years. These updates have run like clockwork since 1897, when the code was first introduced. 2020 NEC is the end result of more than 5,000 public inputs and comments, 18 panels, the annual NFPA meeting, and more than 2,000 revisions. Get ahead of the curve by learning about the 2020 National Electrical Code changes.

Looking for more great content? Visit our partner sites:

The Green Frugal

Running Across Texas


As Featured On Ezine Articles

I offer article and blog-writing services. Interested? Hire Me!


Did you find this article helpful? Thanks for supporting this free site with a small donation!


Visit Kelly’s profile on Pinterest.


About the Author:

Photo of Kelly R. SmithKelly R. Smith is an Air Force veteran and was a commercial carpenter for 20 years before returning to night school at the University of Houston where he earned a Bachelor’s Degree in Computer Science. After working at NASA for a few years, he went on to develop software for the transportation, financial, and energy-trading industries. He has been writing, in one capacity or another, since he could hold a pencil. As a freelance writer now, he specializes in producing articles and blog content for a variety of clients. His personal blog is at I Can Fix Up My Home Blog where he muses on many different topics.

Trim Nailers & Finish Nailers

A Guide to Choosing the Right Wood Trim Finishing Tools

Photo of Kelly R. Smith   by Kelly R. Smith

Ryobi 18-gauge brad nailer
index sitemap advanced

Ads we feature have been independently selected and reviewed. If you make a purchase using the links included, we may earn commission, which helps support the site.

This article was updated on 02/28/21.

Whether you call them finish nailers or trim nailers, the end result is the same. These guns deliver nails of various sizes (tool-dependent) with the help of an air compressor or an airless system. The Ryobi AirStrike brad nailer pictured above is battery-powered. I use it for projects like door trim and baseboard.

Why use a nailer vs the old hammer and nail set method? For me the answer is two-fold. First, It is just faster and easier with less chance of marring the soft or hardwood surface. Secondly, you get to a point as your nail size diminishes where you just can’t hammer it without it bending. For example, brads are almost impossible (at least for me).

Which Pneumatic-Trim-Nailer is Right for You?

Ideally, you would own the entire spectrum of nail-size guns. But in reality, unless you make a living as a trim carpenter or cabinet-maker, you’ll most likely have to compromise and pick one or two. First, choose whether you want to drag a compressor hose or periodically re-charge batteries. For my purposes, being highly mobile is key so I do batteries. So what about sizes? Actually, I’ve stuck to all rechargeable Ryobi 18-Volt battery tools, even the electric mower (40-Volts).

  • Brad Nailers. These 18-gauge nails are up to 2 inches long. Since the nails are thinner in the cross section, they leave a smaller hole and are so they are less likely to split narrow wood trim and molding. This could be your choice for stop and cove moldings or baseboard shoe molding, or crown molding trim.
  • Pin Nailers. These 23-gauge nails come in both the headless and the slight-headed models; they are just what the doctor ordered for attaching delicate trim pieces; this makes them a hands-down favorite among certain hobbyists. The hole they leave are almost small enough to disregard under a coat of paint, or blend with the grain of a piece of wood. However, they don’t offer a lot of shear or withdrawal strength so these fasteners are best used for wood-to-wood connections and it’s really advisable to strengthen your connection with wood glue.
  • 15- and 16-Gauge Nailers. These two tools fire nails up to 2-1/2 inches long, and they are considered as the most versatile for interior carpentry applications. They also have a lot of overlap in terms of application which makes them good go-to tools for the DIY folks. Both are widely used for installing baseboard, chair rail, door and window casing, crown molding, as well as prehung door frames.

This overview of trim nailers and finish nailers should help you to decide where to invest your money, depending on your goals.

Further Reading

Looking for more great content? Visit our main page or partner sites:

I Can Fix Up My Home

The Green Frugal

Running Across Texas


As Featured On Ezine Articles

I offer article and blog-writing services. Interested? Hire Me!


Did you find this article helpful? Millions of readers rely on information on this blog and our main site to stay informed and find meaningful solutions. Please chip in as little as $3 to keep this site free for all.


Visit Kelly’s profile on Pinterest.

About the Author:

Photo of Kelly R. SmithKelly R. Smith is an Air Force veteran and was a commercial carpenter for 20 years before returning to night school at the University of Houston where he earned a Bachelor’s Degree in Computer Science. After working at NASA for a few years, he went on to develop software for the transportation, financial, and energy-trading industries. He has been writing, in one capacity or another, since he could hold a pencil. As a freelance writer now, he specializes in producing articles and blog content for a variety of clients. His personal blog is at I Can Fix Up My Home Blog where he muses on many different topics.


Tankless Water Heater Maintenance Tips

Routine Appliance Care Saves Money and Extends Service Life

Photo of Kelly R. Smith   by Kelly R. Smith

Typical tankless water heater anatomy
index sitemap advanced

This article was updated on 04/15/21.

Ads we feature have been independently selected and reviewed. If you make a purchase using the links included, we may earn a commission, which helps support the site. Thank you for your support.

Tankless water heaters have long been a staple in Europe and Asia and are becoming more common in the US. There are many good reasons for this; the primary one is economic. Unlike a typical tank water heater, it only delivers hot water upon demand. Why store it in a bulky tank when you don’t have to? It’s one more way to increase your home’s energy efficiency.

It’s not a complete panacea though. Like any other appliance it requires periodic maintenance to operate effectively. Here are the top tankless water heater maintenance tips that the homeowner can do; make it a periodic DIY project. These generic instructions will work for most units but be sure to check your manual for any proprietary details.

Clean the Air Filter

  • Turn off and unplug the heater or isolate power by flipping the circuit breaker.
  • Find the air filter; remove it.
  • Inspect it carefully; a dirty filter will reduce performance.
  • Clean it with a soft-bristled brush using a mild solution of dish soap and warm water.
  • Rinse it well with clean water and dry it using a lint-free towel, and reinstall.

Clean the In-Line Water Filter

  • Find the in-line water filter at the cold-water inlet.
  • Close the cold-water supply valve to turn off the water supply to the unit.
  • Remove the filter.
  • Clean the filter by tapping it to dislodge sediment, run it under clean, clear water, and wipe it with a cotton swab.
  • Reinstall the filter.
  • Reopen the cold-water supply valve.
  • Check for leaks; tighten as needed.

Flush the Heater

  • Close the shutoff valves on both the hot and cold water lines.
  • Connect a hose from the outlet of a circulation pump to the cold-water service valve. Connect a drain hose to the hot-water service valve.
  • Pour 4 gallons of undiluted food-grade white vinegar into a clean 5-gallon bucket. Place both the drain hose from the hot water service valve and the pump supply hose (connected to the pump’s inlet) into the vinegar bucket.
  • Open the service valves on the hot and cold-water lines.
  • Turn on your pump allowing the vinegar to circulate throughout the heater at a rate of 4 gallons per minute.
  • Let it run an hour and then flush the system with clean, cold water to remove the vinegar and any loose minerals. To do this step, first remove the free end of your drain hose from your bucket, and then run it either to a convenient drain or to the outside. Next, close the cold-water service valve, open the cold-water supply valve, and then let the water flow through your heater for a minimum of five minutes. Next, close the cold-water supply valve, and clean the in-line water filter at the cold-water inlet on the heater to remove any loose deposits the filter picked up during the above process. Again, clean the filter by tapping it, running it under clean water and wiping it with a cotton swab. Finally, replace the filter.
  • Close your hot-water service valve, and then open both the cold and hot-water supply valves.
  • Disconnect all of the hoses, restore power to the heater, and turn it on.

These steps for tankless water heater maintenance should help you to keep your unit running efficiently and save you money by not having to hire a contractor. If you agree, please share with your friends and social media.


Looking for more great content? Visit our partner sites:

The Green Frugal

Running Across Texas


As Featured On Ezine Articles

I offer article and blog-writing services. Interested? Hire Me!


Did you find this article helpful? Thanks for supporting this free site with a small donation!


Visit Kelly’s profile on Pinterest.


About the Author:

Photo of Kelly R. SmithKelly R. Smith is an Air Force veteran and was a commercial carpenter for 20 years before returning to night school at the University of Houston where he earned a Bachelor’s Degree in Computer Science. After working at NASA for a few years, he went on to develop software for the transportation, financial, and energy-trading industries. He has been writing, in one capacity or another, since he could hold a pencil. As a freelance writer now, he specializes in producing articles and blog content for a variety of clients. His personal blog is at Considered Opinions Blog where he muses on many different topics.


How to Determine the Correct Size for a New HVAC System

index sitemap advanced
Servicing an HVAC Unit

Homeowners today have a good selection of different types of HVAC systems to consider. The best type is usually determined by your environment. Swamp coolers are made just for use in hot dry locations. Central air conditioner and heaters work well for most of the country. Heat pumps are very efficient but are expensive to install. The list goes on and on. The thing they all have in common is that they should be properly sized for the structure they will serve.

Furnaces that are too large tend to cycle off and on continuously. A central system that is too large may be less effective at dehumidification than a correctly sized AC unit. And it goes without saying that a larger unit costs more going in. A too-small system works too hard to keep up. But a properly sized system will do the right job for the environment at maximum efficiency.

Contractors Shouldn’t Rely on Rule of Thumb

Too many contractors rely on “experience” or an “educated guess. Bad idea. It’s much better to use worksheets designed by the Air Conditioning Contractors of America (ACCA). They are far more accurate because they take into account individual actual conditions. These include the amount and type of insulation, the size of the home, the size and glazing type of windows, air leakage, lighting, and home appliances.

To make these calculations, the International Residential Code, which is the dominant building code in the U.S. should be followed. It requires that heating and cooling equipment be sized with the help of Manual J, or a similar approved methodology. However, the rule is too often ignored. Studies have demonstrated that heating and cooling equipment is far too often over-sized, often by as much as 200%.

So before you hire a contractor, this is one thing you should quiz him about. Does he follow this protocol (even though your local code may not require it)? After all, a new HVAC system is a big investment and it’s your investment, not his.

Other Ways to Determine HVAC Size

If you really want to be sure that all the factors are being figured correctly, do it yourself and follow Manual J. You will need to determine the U-factors of building components such as windows, doors, insulated walls, determine the “outdoor design temperature” for your area, take an estimate about airtightness, and finally use a heat-loss formula to determine how much energy in Btu your home loses through the building exterior.

You can also hire a pro. This might be a certified HERS rater, a mechanical engineer, or an energy consultant. You may be spending a bit more time and money up front, but generally speaking, contracting a trained professional third party who has no vested interest in selling you a particular brand or size of unit is far preferable to trusting a seat-of-the-pants estimate that might be questionable.

In any event, always be sure that you and any contractor are on the same page before any work begins. Whenever this much money is involved it is always in your best interest.

I hope this information on determining the correct size for a new HVAC system has helped you. If so, pass the URL along to your friends. Thanks for visiting!


Looking for more great content? Visit our partner sites:

The Green Frugal

Running Across Texas


As Featured On Ezine Articles

I offer article and blog-writing services. Interested? Hire Me!


Did you find this article helpful? Thanks for supporting this free site with a small donation!


Visit Kelly’s profile on Pinterest.


About the author:

Photo of Kelly R. SmithKelly R. Smith is an Air Force veteran and was a commercial carpenter for 20 years before returning to night school at the University of Houston where he earned a Bachelor’s Degree in Computer Science. After working at NASA for a few years, he went on to develop software for the transportation and financial and energy trading industries. He has been writing, in one capacity or another, since he could hold a pencil. As a freelance writer now, he specializes in producing articles and blog content for a variety of clients. His personal blog is at I Can Fix Up My Home Blog where he muses on many different topics.


10 DIY New Year Projects to Tackle–Part 2

index sitemap advanced

See the Previous 5 DIY New Year Projects

Install a Pre-hung Door

An Exterior  Pre-hung Door
An Exterior Pre-hung Door

Some things in life just get easier. Hanging doors is one of those things thanks to the pre-hung doors available at home improvement stores. No mortising, no muss, no fuss. To make things even easier, hardware clips called The Quick Door Hanger are available to eliminate shimming the door jamb in the rough opening. Basically, all you need is a 4′ level or plumb bob, a measuring tape, a pencil, and a cordless drill with a Phillips bit. I’ve gotten to where I can hang a door in about 15 minutes. Life is good.

Frame Out Your Basement

Wood framing in a basement

Basements are often basically unused, wasted spaces. This is really a shame because framing and finishing it out expands your living space and boosts your home equity. I mean, that space is included in your property taxes anyway, right? This is a great project that can be put on your schedule for any time of the year. Learn the basics of framing a basement and some of the options that are available to you. Yes, this is a DIY project but you might need to pull some building permits. Always check your local building code.

Dieting is One of the Most Popular New Years Resolutions

Healthy food for weight loss

Exercising, putting down the cigarettes, and going on a diet; these are the big 3 New Years resolutions. But there are a plethora of choices when choosing a diet. Which one is right for you? Which one can you realistically stick to? Inform yourself with these 10 most popular diets today.

Give Your Walls a Face Lift On a Budget

Colorful walls & energy efficient windows

Upgrading the look of your walls is a great way to give your living space a fresh look on a shoestring budget. You can add a bolder texture, hang wallpaper, or choose paint colors that give the illusion of more space or higher ceilings. You can even paint over that dark paneling that looked so cool back in the 60s. Which wall improvement is right for your home? Learn about wall options here. Some people hate painting but that’s the wrong way to look at it. It is one job where you can see the results of your labors in a very short time. Some BEHR paint has the primer built in which basically cuts your time in half.

Install Radiant Barrier Foil in Your Attic

Energy Q Radiant Energy Barrier Foil In the Attic
Energy Q Radiant Energy barrier Foil In the Attic

Sure, everybody knows about maxing out the recommended amount of insulation in the attic (according to location) but that only represents about half the money you could be saving on energy costs. Why not install radiant barrier energy foil over the insulation? The savings are two-fold–it keeps the heat out in the summer but keeps it in during the winter. I can tell you from experience that the colder months are the perfect time for this project. I did mine in March a few years back and it more than paid for itself during the first summer. If you use your attic and it has flooring, there’s no reason you can’t tack it to the underside of the roof sheathing. Or conversely, use the radiant barrier paint.

I certainly hope these 10 DIY New Years projects (the first 5 are on this page) have inspired you. If so, I would appreciate you sharing these pages with your friends. Have a great New Year and thanks for visiting!


Looking for more great content? Visit our partner sites:

The Green Frugal

Running Across Texas


As Featured On Ezine Articles

I offer article and blog-writing services. Interested? Hire Me!


Did you find this article helpful? Thanks for supporting this free site with a small donation!


Visit Kelly’s profile on Pinterest.


10 DIY New Year Projects to Tackle

index sitemap advanced

The clock is ticking down to the new year. That means many things but here are two to consider. Since spring will soon be here it’s time to start planning new year projects. After all, it is a time of new beginnings. Also, right around the temporal corner is income tax refund time to fund those new projects. This may be good news for many–under President Trump’s tax bill, the marriage penalty is mostly gone and the standard deduction is vastly improved.

With those considerations in mind, consider these 10 home improvement and personal improvement projects.

Start Exercising More

A healthy runner is a happy runner.

Pick your sport. For me that means running. Worried about the cold weather? Don’t. It’s not a problem with these cold weather running tips. Other activities are good candidates and one bit of good news is that many are quite inexpensive. Walking and running really only requires comfortable clothing and the right shoes. Cycling is great but requires a heavier investment. Swimming is good if you have access to a pool or open water such as a lake or a beach.

Install a Rainwater Collection Barrel

A Rainwater Harvesting Barrel

Rainwater collection or rainwater harvesting as it is sometimes called is becoming increasingly popular. The idea is simple; as you can see in the above photo, you just install the barrel under the downspout from your rain gutter. A screen on the top keeps leaves and other debris out. The black overflow tube at the top can be directed wherever you like and the spigot at the bottom is threaded to accept a garden hose. It works on the gravity feed principle and provides water for your garden or flower bed. Need more water? Link the overflow tube to another barrel. Using this water not only saves money on your water bill, but plants prefer the pH of rain as opposed to tap water.

Install an A/C Condenser Coil Misting System

Cool-N-Save A/C condenser misting paddle

This simple innovation will really save on your electrical bill during the summer heat. When the compressor kicks on, the upward breeze from the fan lifts the paddle. This opens the valve allowing cool water to flow to the four misting nozzles. This lowers the ambient air temperature which reduces the amount of work the condenser coils must do. This inexpensive tweak saves money and installation requires only about 30 minutes and some basic hand tools.

Make Needed Roofing Repairs

A new roof with a dormer

Having a solid, secure roof is critical. They can really take a beating during the winter. They should be inspected, and repaired if needed, twice a year. Minor repairs such as replacing individual shingles or flashing can be done on an individual DIY basis. For more extensive work, hire a roofing contractor.

Build a Walk-In Kitchen Pantry

A Walk-In Kitchen Pantry

If your home is anything like ours, there’s just not enough storage space in the kitchen. My solution? I built a walk-in kitchen pantry. As you can see in the photo, the back door in the kitchen opened into the garage. I just “stole” some space from the garage and installed the walls (with insulation), turned the existing door into a case opening, and added an energy-efficient door into the rest of the garage. If you are comfortable with framing, hanging drywall, and laying ceramic tile, this is a great weekend DIY project. Follow the link for details.

I certainly hope these DIY New Years projects have inspired you. If so, I would appreciate you sharing these pages with your friends. Have a great New Year and thanks for visiting!

See the Next 5 DIY New Year Projects Here


Looking for more great content? Visit our partner sites:

The Green Frugal

Running Across Texas


As Featured On Ezine Articles

I offer article and blog-writing services. Interested? Hire Me!


Did you find this article helpful? Thanks for supporting this free site with a small donation!


Visit Kelly’s profile on Pinterest.


How Tiny Houses Meet Building Codes

by Kelly Smith

This article was updated on 08/09/20.

A tiny purple house
A tiny purple house
index sitemap advanced

Anyone watching TV these days might think tiny houses are a recent innovation, a minimalist invention of the ultra-hip, resource-conserving, save-the-planet, green-living crowd. And while these diminutive abodes do indeed meet many of these goal, history shows that they have been around for some time.

As a matter of fact, these houses were popular at the turn of the 20th century during an American growth phase and in the 21st century when property values were increasing. Today they must meet building code requirements. They are recognized in the 2018 edition of the International Residential Code (IRC) in Appendix Q where, because of their size they get several special dispensations. This is how tiny houses meet building codes. This article addresses the dimensional aspect of construction, but if you are building know that the electrical code remains the same as for larger structures.


Loft Requirements

A notable IRC guideline is that we shouldn’t be trying to occupy too small an area. This is defined as saying that a habitable room cannot be less than 70 square feet or less than 7 feet in any cross-sectional dimension. Although the main floor in a tiny home must follow these requirements, the loft above that generally acts as the bedroom is treated somewhat differently. 

Bedroom lofts are allowed to be as small as 35 square feet as long as it has a minimum 5-foot cross-sectional area. To give you a rough idea, this just as bit larger than a queen-size bed. Additionally, the ceiling in these rooms shall be lower than 6 feet, 8 inches, Contrast this height with the standard height in full-sized homes of 8 feet.

Committing the ceiling to be this low in a loft instills the expectation to the owner before they even attempt to climb up. Safety is often linked to expectation in building codes, so when you lessen the safety factor, you need to lessen the expectation of said safety.

Specified is an absolute 36 inch minimum ceiling height for lofts but it only applies to the space which contains the minimum 35 square feet. Even so, there is an exception to the exception and here it is. Loft spaces under a roof/ceiling slope of 6-inch-12 or steeper, this area is permitted to have ceilings at the sloped areas as low as 16 inches above the finished floor.

Requirements for Access to the 
Loft

Since stairs eat up a lot of real estate, especially in a tiny home, they must be designed with this in mind. Usually owners don’t employ standard furniture in their loft so the minimum stairway width allowed is lowered from 36 inches to 17 inches above the handrail and 20 inches below it.

The lowest allowed stairway height of 6 feet 8 inches is permitted to be reduced to 6 feet 2 inches. Because many lofts have to be accessed by crawling, stairs ascending to a loft with a ceiling height less than 6 feet 2 inches may terminate at a landing platform. This is a new tiny home term coined by the IRC. Requirements for a normal landing has to be at least 36 inches deep but a landing platform must be between 18 inches and 22 inches deep.

Guardrail Requirements

The purpose of the minimum guardrail height is to protect a standing person from taking a fall, as you might expect. But since the reduction allowed in tiny house loft-ceiling height, a standard-height guardrail is just overwhelming. With this in mind, guardrails in a tiny home are allowed to be at least one-half of the ceiling height at its highest point.

Requirements for Emergency Escape and Rescue Openings

Thee is no window requirement for secondary emergency egress from a bedroom or loft space, but a so-called opening is. Because there exists a particular egress-window expectation of society, the authors of the tiny home appendix to the IRC felt it sufficient that a roof hatch or skylight would also be sufficient to meet that expectation.

If there is a minimalist residence in your future, now you know how tiny houses meet building codes.


Looking for more great content? Visit our partner sites:

The Green Frugal

Running Across Texas


As Featured On Ezine Articles

I offer article and blog-writing services. Interested? Hire Me!


Did you find this article helpful? Thanks for supporting this free site with a small donation!


Visit Kelly’s profile on Pinterest.


Choosing the Right Trees

Tree Selection Depends on Purpose; Fruit-Bearing, Ornamental, Privacy, or Shade

Photo of Kelly R. Smith   by Kelly R. Smith

U.S. Hardiness Zone Map
index sitemap advanced

This article was updated on 05/23/21.

Ads we feature have been independently selected and reviewed. If you make a purchase using the links included, we may earn a commission, which helps support the site. Thank you for your support.

Trees in our yards serve many purposes. Some are ornamental, some, like avocado trees, bear fruit, some are for privacy, and some provide shade which reduces energy bills. With that in mind, when choosing the right trees you must ask yourself what purpose they will serve.

How to Choose Fruit Trees

Many people want their own fruit trees and why not? Free food is great. Also, for some of us it’s that nice, fuzzy feeling that comes with the assurance that the fruit is truly organic. I myself fall into that category; I once made the commitment to plant one fruit tree per year. Now, I’ve about run out of real estate.

The mistake many people make is neglecting to research the required chill hours the trees need. I see it all the time; people buying trees at the local big box store. They plant them and wait. No fruit cometh forth. The map at the top of this page will show you the zone you live in and the corresponding temperature range. You might pay more for trees at a nursery but you will know what you are getting.


I’m here in South Texas and I’ve got a peach tree, two fig trees, a plum tree, and an Improved Meyer Lemon tree. I lost two orange trees and a couple of palm trees in the unprecedented freeze of 2021. Still, any kind of citrus tree is a good choice for my family. Another factor when choosing fruit (as well as vegetable garden plants) is vitamin and mineral content.

Republic of Texas Orange Tree
My Republic of Texas Orange Tree

Choosing Shade Trees

Shade trees are very beneficial. They help to maximize your energy efficiency. When they shade your house from the sun, you save money.  Basically, the southern side of your home will receive up to three times more sunlight than the western and eastern facing sides in the wintertime, and just one-third as much during the hot summertime. Deciduous trees are a better choice than evergreens because they lose their leaves in the wintertime when you benefit from the warming sun. Weather plays a big part in your energy consumption.

Planting trees with this in mind is called a passive solar concept. One note of caution–do not plant them too close to the house or you risk root damage to your foundation, which can be especially expensive and intrusive to repair if you have a concrete slab. Large trees should be no closer than thirty feet away and small ones no closer than eight feet away. As a preventative measure, install root barriers.

Choosing Privacy Trees

Privacy trees keep those pesky peeping neighbors at bay and deter crooks from seeing what property you have on your property. Some good candidates are Thuja Green Giant, Leyland Cypress, Emerald Green Arborvitae, and Italian Cypress. Since they are relatively fast growing, the benefits arrive quickly.

A Row of Privacy Trees

Trees are not only helpful; they also add a lot of equity to your home. Select and plant them properly and they’ll take care of you. Remember to care for them with pruning and a fertilization schedule and your investment in your home equity will be protected for years to come.


More Trending Articles


Looking for more great content? Visit our main page or partner sites:

I Can Fix Up My Home

The Green Frugal

Running Across Texas


As Featured On Ezine Articles

I offer article and blog-writing services. Interested? Contact me for a quote!


Did you find this article helpful? Millions of readers rely on information on this blog and our main site to stay informed and find meaningful solutions. Please chip in as little as $3 to keep this site free for all.


Visit Kelly’s profile on Pinterest.

About the Author:

Photo of Kelly R. SmithKelly R. Smith is an Air Force veteran and was a commercial carpenter for 20 years before returning to night school at the University of Houston where he earned a Bachelor’s Degree in Computer Science. After working at NASA for a few years, he went on to develop software for the transportation, financial, and energy-trading industries. He has been writing, in one capacity or another, since he could hold a pencil. As a freelance writer now, he specializes in producing articles and blog content for a variety of clients. His personal blog is at Considered Opinions Blog where he muses on many different topics.

Rainwater Harvesting 101

index sitemap advanced
Rainwater harcesting or rainwater collection
A typical rainwater harvesting barrel

This article was updated on 06/20/20.

Rainwater harvesting or rainwater collection as some call it has been gaining in popularity. There was a time when folks didn’t think much about using water. After all, it is inexpensive and flows from the tap; in our society hauling it home from a well or stream is the stuff of nostalgic folklore.

But that is not the case in many parts of the world. And since we now revel in global awareness, the availability of potable water has become a push-button issue among the green conscious folks among us.

In some parched parts of India men take on an additional spouse whose duty is to transport water from the source to the dwelling–it is a full time job. These “water wives” are often widows or single mothers wishing to “regain respect” in their communities. He notes that they usually do not share the marital bed and often live in separate apartments.

Minimizing Our Use of Potable Water

In our efforts to lower out consumption of tap water we have already trended towards the new normal; in the mid-’90s water conservation laws came into effect, creating the much-dreaded “low-flow” toilet. We also now have low-flow showers (dang it).

Still, it does seem wasteful to expend processed, fluoridated tap water to do things like water the lawn and flower beds. Besides, plants prefer the pH of rain over tap water. Win, win. That is where rainwater harvesting comes in. For residential use it is fairly straightforward. All you really need is a barrel with a screen on top. The water comes from the gutters on the roof line.

A rainwater collection barrel with a mesh filtering screen

How to Install a Water Harvesting Barrel

The good news for homeowner is that installing the system is simple and calls for few tools. The one pictured above is an Ivy 50 gallon barrel that I installed at my home this week. Online it lists for $89 but the small city that I live in teamed up with them for a bulk order for a deep discount.

The installation only took about 2 hours. The steps were as follows:

  1. Grade the ground level under the rain gutter downspout.
  2. Place 4 cinder blocks where the barrel will reside.
  3. Place the barrel on the blocks and measure up on the downspout approximately 8 inches from the lip of the barrel lid and use a square to mark a line on the front and sides of the downspout.
  4. Cut it off at this line. You can use a hacksaw but I used a small Dremel saw with a metal-cutting blade. It’s prettier and easier.
  5. Install the diverter (not included in the kit but just a few bucks at Home Depot) on the end of the now cut-off downspout. I used self-tapping screws and a cordless drill with a #2 Phillips bit.
  6. Place the barrel on the cinder blocks so that the diverter is over the lid of the barrel. Secure the lid to the barrel with zip-ties.
  7. Install the plastic cap on one side of the barrel and the overflow tube on the other side. These access ports are just under the lid sticking out from the barrel.
  8. Screw the tap into the bottom front of the barrel being careful not to cross thread it.
  9. The barrel must be secured to the exterior wall of your home or braced up somehow to prevent it from falling over. In the designer’s wisdom the barrel is wider at the top than it is at the bottom. In the image below you can see how I used Tapcon screws to secure a metal angle bracket to the brick. I had to drill the existing holes in the bracket bigger to accommodate the screw on one side and the bungee cord on the other. If we get some really bad weather (like a hurricane) I will add some heavy wire to back up the bungee cord.

Angle bracket with Tapcon screw and bungee cord

Where you live and how much collected water that you use makes a huge impact on how you set up your rainwater harvesting system. A 50 gallon barrel will do me just fine here in South Texas. But if you live in, say, the Pacific Northwest you can expand your system. Just add another barrel and connect it to the side where you placed the plastic cap on the port in step 7.


Looking for more great content? Visit our partner sites:

The Green Frugal

Running Across Texas


As Featured On Ezine Articles

I offer article and blog-writing services. Interested? Hire Me!


Did you find this article helpful? Thanks for supporting this free site with a small donation!


Visit Kelly’s profile on Pinterest.


Widget is loading comments…

About the Author:

Photo of Kelly R. SmithKelly R. Smith is an Air Force veteran and was a commercial carpenter for 20 years before returning to night school at the University of Houston where he earned a Bachelor’s Degree in Computer Science. After working at NASA for a few years, he went on to develop software for the transportation, financial, and energy-trading industries. He has been writing, in one capacity or another, since he could hold a pencil. As a freelance writer now, he specializes in producing articles and blog content for a variety of clients. His personal blog is at I Can Fix Up My Home Blog where he muses on many different topics.

Lower Electric Bills with an A/C Misting System


Cool-N-Save A/C condenser misting paddle

Summertime is here and the living is easy. Except perhaps for that high electricity bill from the incessant cycling of the air conditioner. Sure, you’ve beefed up the insulation, sealed leaks and perhaps installed radiant barrier foil in the attic. But there’s more you can do; you may be able to lower your electric bills with an A/C misting system.

Can a Condenser Coil Mister Save the Day?

I have been intrigued by this concept for a while now and with the South Texas temperatures flirting with triple digits and rising utility rates I decided this was the year to implement it. I already understood the cooling power of evaporating water, having worked with cooling towers and chilled water systems while working as an Engineering Supervisor for Marriott.


But this is a different application although the basic science is roughly the same. The one I installed at my home yesterday is the Cool-N-Save basic kit. Their claim is that the mist will lower the temperature of the air around the coils by as much as 30°F. This means that your HVAC system will not have to work as hard, consequently becoming more efficient and saving you money. Have I saved money yet? I don’t know! I just installed it yesterday. But I do have historic data and I’ll update this post when I have some hard numbers.

Curious about the science? Heat flux, thermal flux, heat flux density, or heat flow rate intensity is a flow of energy per unit of area per unit of time. Call it what you will, heat flux is at its most efficient whenever the outdoor ambient air temperature is lower than the refrigerant flowing through inside the A/C coils. So the evaporative effect of the misting lowers the ambient temperature in the area around the condenser coils and bingo! Efficiency prevails.

How the Cool-N-Save Coil Mister Works

Cool-N-Save mister water filter

The basic kit comes with:

  • 1  Control valve and paddle
  • 3  2′ Misting arms (tubing from the control valve/paddle to the misting nozzles)
  • 3  Brass misting nozzles
  • 1  Cool Release water treatment filter (3 month life)
  • 1  20′ flexible water feed line
  • 1 Garden hose adapter

The only thing I added was a brass splitter with cut-off valves for my outdoor spigot so I can use the mister and garden hose concurrently.

A dedicated garden hose attaches to the supplied garden hose adapter whose tubing enters the filter. Another hose (cut from the 20′ line) connects the filter to the control valve on the paddle. The three misting arms connect to the control valve/paddle and dangle down three sides of the condenser respectively terminated by the misting nozzles. Use zip-ties in all the obvious places.

When the A/C cycles the fan in the condenser unit kicks off. This blows up the paddle and enables water flow to the misting nozzles. It’s that elementary, Watson. (Pardon the inevitable Sherlock Holmes reference.)

Regular readers of my energy efficiency  articles know that I stress incremental changes; it is generally many small to large changes, not just one huge one that will reap savings. An A/C misting system is my latest energy tweak. I’ll be back in touch with results.


Looking for more great content? Visit our partner sites:

The Green Frugal

Running Across Texas


As Featured On Ezine Articles

I offer article and blog-writing services. Interested? Hire Me!


Did you find this article helpful? Thanks for supporting this free site with a small donation!


Visit Kelly’s profile on Pinterest.


Widget is loading comments…


close

Enjoy this blog? Please spread the word :)

RSS
Follow by Email
Twitter
Follow Me
Tweet
Pinterest
Pinterest
Pinterest
Instagram
LinkedIn
Share