Mint is a perennial herb with very fragrant, toothed leaves and tiny purple, pink, or white flowers. It has a fruity, aromatic taste and offers many health benefits. There are many varieties so you have a wide range to select from. One thing is certain — mint, grown organically, is an herb garden and kitchen staple, much as basil is.
The Many Varieties of Mint
The number of mint flavors can be a bit overwhelming; I like to keep at least two of them growing. An odd thing is the way you can identify it other than the smell. If you look close, the stem is actually square. The oddities of nature, yes? Anyway, pick your favorites from this list:
Chocolate. Yes, it really does look and taste like the real thing. My favorite additive to go into my dark-roast coffee grounds in the morning. None of those artificial chemical flavors for me.
Apple/Pineapple.
Spearmint. Was this your favorite chewing gum flavor as a kid?
Pennyroyal.
Citrus Mint. Just the thing for iced tea on a summer afternoon.
Corsican. This is one of the strongest tasting of mints and it is also the smallest; growing tight-knit it makes a good ground cover in semi-shady areas. Unlike most mints it can be difficult to grow. It likes to be well-watered. It makes a good companion plant for things like chives and tomatoes.
Peppermint. For adding a bit of candy flavor without all the sugar.
First, consider that mint spreads rapidly. This means growing it in a container or enclosed within some kind of root barricade to rein in the horizontal runners and underground rhizomes.
Mint likes light soil with good drainage; its native habitat is along stream banks.
Most varieties prefer some shade; check the exact requirements of your favorite variety/s.
It likes a thin layer of compost or organic fertilizer every few months.
Keep the area covered with a layer of hardwood mulch to retain moisture. Do NOT use any colored mulch. Those color chemicals and dyes are not your friends, especially if you intend to consume the leaves.
Other than watering, a light top-dressing with compost, some mulch, and occasional organic fertilizer, these are easy plants to grow.
Prune them back regularly. the smaller, younger leaves are the most flavorful… but, where you let them flower, the butterflies will thank you!
By now you can see why growing mint in your garden or containers is a good idea. It’s healthy, tasty, nutritious, and importantly to many of us, easy to grow.
Looking for more great content? Visit our partner sites:
Kelly R. Smith is an Air Force veteran and was a commercial carpenter for 20 years before returning to night school at the University of Houston where he earned a Bachelor’s Degree in Computer Science. After working at NASA for a few years, he went on to develop software for the transportation, financial, and energy-trading industries. He has been writing, in one capacity or another, since he could hold a pencil. As a freelance writer now, he specializes in producing articles and blog content for a variety of clients. His personal blog is at I Can Fix Up My Home Blog where he muses on many different topics.
Drywall finishing, or taping and floating, is hardly rocket science. But it is more of an art and things can go wrong. The upside is that most of these things are easily corrected. The key thing is to prevent issues right from the get-go with this DIY project. Here are 7 common drywall-taping problems and how to deal with them.
Drywall Finishing Problems
Concave and crowned seams. The seams are where the drywall panels meet. There are tapered edges on the long side of the panel and square edges on the short side. Square seams are called butt-joints. Obviously tapered edges accommodate your drywall tape. Crowned seams happen when taping compound (mud) is applied too heavily and the center of the seam is left higher than the surface of the panels. This is more common on butt-joints. When light shines across the seams on your walls, they crowned seams are apparent. Catch these before painting, and sand them down with 120-grit or 150-grit paper or just use your widest floating knife to float it out wide. Concave seams are the opposite of crowned seams. To correct this just float the joint again.
Photographing. This happens when you apply glossy paint. The drywall and the joints and screws show up differently because they have different textures. To prevent this, either skim the entire surface with mud (drywall compound) or paint it with a sealer/primer. Applying a drywall texture with thinned-out joint compound will also help.
Bubbled tape. This happens when you have a poor bond between the tape and the mud. If the tape isn’t embedded well in the mud, it can easily loosen and form a bubble. It might be a round spot as small as 1/2 inch in diameter, or it may encompass the whole length of a seam. The solution? Smaller bubbles may be cut out with a utility knife and re-taped. For larger areas, you can remove the entire section of tape and embed new tape. Finally, apply a second and a third coat of mud. To avoid bubbled or loose tape to begin with, apply a thick enough layer of joint compound before you embed the tape and apply sufficient pressure with your taping knife to embed it properly. Or as I do, use mesh tape rather than paper; it’s much easier to work with.
Pitting. This looks like a number of small pits on the taped finished surface. They are small air bubbles that were either not properly filled or were exposed in the sanding process. Usually they are the result of over-mixing or under-mixing your mud or if insufficient pressure is applied when smoothing your mud. Much of your pitting can be covered up with these drywall texturing techniques.
Loose or cracked corner bead. When this happens, remove any cracked mud and re-apply. Be sure that there is a 1/2 inch gap between the bottom of the bead and the floor. If you use metal corner bead, reinforce the border with paper tape. This will reduce the chance of cracks developing.
Popped screws or nails. These don’t always show up until a few months or even years after the taping and floating, but they can show up before you paint your drywall. When you sand over screws or nails, your pole sander can apply a lot of pressure against the drywall panel. If the fastener hasn’t pulled the panel tight against your studs, the pressure can push the panel tight and pop the fasteners. This raises a bump on the surface or exposing the fastener head. Popped screws or nails are more likely with warped wood framing. Secure with new fasteners and re-float. I like to place screws or nails at 12 inch centers. Nails should be applied in pairs; one being a “helper” nail.
Shrinking or cracked drywall seams. Seams can develop drywall cracks during your taping process. This is most likely when your mud dries too quickly. This can happen because of direct high heat or sunlight. If your tape and mud are still solid, just re-tape the bad spots. Be sure that your seam is completely dry; use enough pressure to force the mud completely into the crack. If the tape is cracked or the compound is loose, you’ll have to remove the affected areas. Avoid this problem by keeping the heat low to extend your drying time. If the outdoor temperature is high, above 80°F, close the windows so the airflow won’t dry the compound too quickly.
These are the most common drywall-taping problems you are likely to encounter. The best approach is to take your time and prevent issues before they develop.
Looking for more great content? Visit our partner sites:
Kelly R. Smith is an Air Force veteran and was a commercial carpenter for 20 years before returning to night school at the University of Houston where he earned a Bachelor’s Degree in Computer Science. After working at NASA for a few years, he went on to develop software for the transportation, financial, and energy-trading industries. He has been writing, in one capacity or another, since he could hold a pencil. As a freelance writer now, he specializes in producing articles and blog content for a variety of clients. His personal blog is at I Can Fix Up My Home Blog where he muses on many different topics.
This is a very easy dish to make. Some people think they don’t like beets, but be forewarned, this is not that processed stuff that old Aunt Martha plops out on Thanksgiving and Christmas along with the turkey. As a bonus, beets are super-nutritious and can help to lower blood pressure.
Buy your beets in a bunch at the grocery store. They are actually the root of the plant and so will most likely have the green leaves attached. These are also edible. Or, throw them in your compost pile. You do have a compost pile, right? Compost is just as important as mulch and you’ve already paid for the food.
Roasted Beets Ingredient List
1 dozen (preferably organic) beets
1 cup water
1 large cinnamon stick, crumbled
1 large shallot, minced
Finely grated zest of 1 orange
1/4 cup white wine vinegar
1/4 cup chopped flat-leaf parsley
1/4 cup chopped tarragon
1/4 cup plus 2 tablespoons extra-virgin olive oil
2 – 4 oz. crumbled goat cheese (the pic above used about 3 oz. to give you an idea)
1/4 cup chopped chives
Preparation
Preheat the oven to 375°. Cut the leaves and the roots from the beets, wash them, and arrange them in a roasting pan (I use an 8″ X 8″ Pyrex) and add the cinnamon and water. Cover tightly with foil and bake for 1 hour.
While it’s baking, make the dressing by pouring the vinegar in a bowl, mixing in the minced shallot, orange zest, tarragon, parsley, chives, and oil.
Let the beets cool a bit and cut in 1/4″ slices. Some people might want to peel the beets but I prefer to leave it alone and get the added nutrition. Arrange them overlapping on a serving plate or platter.
Spoon the dressing over the beet slices and sprinkle the top with the goat cheese.
Eat.
Health Benefits of Beets
With all the good things going on with beets, it is a wonder that people don’t eat more of them. Consider:
Beets can lower your blood pressure. This is because they are high in healthy nitrates, which are converted to nitric oxide inside your body. Nitric oxide can help dilate blood vessels and lower your blood pressure.
Beets give your energy a boost. By dilating your blood vessels it delivers more oxygen to your muscles.
Lots of fiber. One cup of beets contains about 3.5 grams of fiber. Regularity is a good thing, even if we don’t talk about it much.
Many, many antioxidants. That is why beets have that vibrant red color. One in particular is betalain, higher in fighting off free radicals than vitamin C.
Good for your brain power. This, because of increased blood flow.
So there you have it. There’s no reason not to make roasted beets with herbs and orange for dinner today.
Looking for more great content? Visit our partner sites:
Kelly R. Smith is an Air Force veteran and was a commercial carpenter for 20 years before returning to night school at the University of Houston where he earned a Bachelor’s Degree in Computer Science. After working at NASA for a few years, he went on to develop software for the transportation, financial, and energy-trading industries. He has been writing, in one capacity or another, since he could hold a pencil. As a freelance writer now, he specializes in producing articles and blog content for a variety of clients. His personal blog is at I Can Fix Up My Home Blog where he muses on many different topics.
Ads we feature have been independently selected and reviewed. If you make a purchase using the links included, we may earn a commission, which helps support the site. Thank you for your support.
This article was updated on 01/28/22.
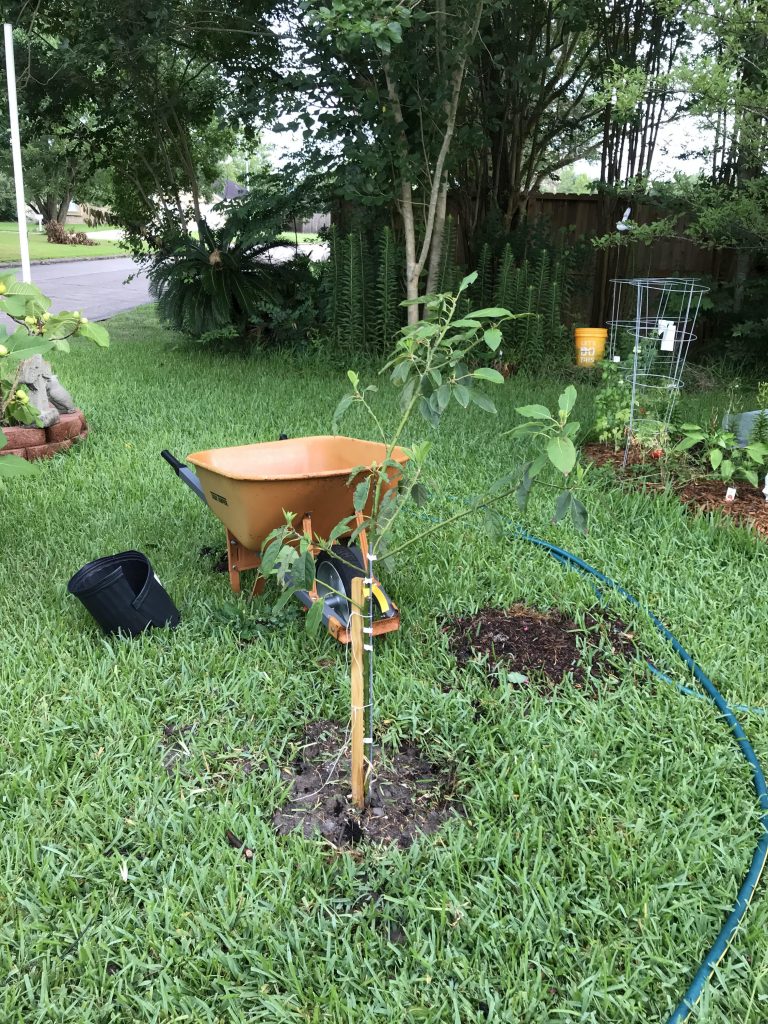
There’s only one drawback to fresh avocados that I can think of — the price. That’s why planting your own avocado tree is such a good idea. The image above is the Don Juan variety that I planted yesterday. I’m generally not a big fan of staking new trees but this time, as I was finishing my tree planting adventure, the wind was beginning to whip and a rainstorm was blowing in. This afternoon I can follow up with a top-dressing of compost and some hardwood mulch. Which species is right for you? Here is a list of cold-hardy Mexican avocado trees in alphabetical order.
When planting avocado trees, keep in mind that they like well-drained soil. They do not tolerate overly-wet soil well. As with your other trees and plants they prefer the pH of rain to tap water. It is always a good time to put in a rainwater harvesting system.
List of Avocado Tree Species
Brazos Belle. This one tolerates cold in the mid to low teens. The fruit is large and purple-black.
Brogdon. A mature tree can reach as high as 30 feet tall. Expect the crop to ripen ripen late from mid-July to mid-September.
Day. If you are into container gardening, this is a good choice. It will grow to 6 to 8 feet and will produce when it reaches 3 to4 feet high.
Don Juan. The Don can handle temperatures down to the mid to high teens. In height it can reach 20 to 25 feet when fully grown.
Fantastic. It’s considered to have one of the creamiest textures of the flesh. It is very thin-skinned and is very freeze-resistant.
Joey. This variety boasts a dark, purple-black skin and an egg-shaped fruit.It is one of the most prolific producers of any of these species. It is right behind the Fantastic in cold hardiness.
Lila. Lila bears medium-sized pear-shaped fruits. It is cold-hardy variety down to 15 degrees and when mature maxes out at 10-15 feet high.
Mexicola. This one is cold-hardy down to the low 20s. It’s known for its creamy, smooth taste which makes it a natural in dishes such as Tuscan kale salad.
Mexicola Grande. It is known for nutty flavor and has the best reputation for consistent fruit size if that is important to you as a home-owner. That would be low on my priority list but it is what it is.
Opal. No, not a precious stone or European car brand, but a medium-sized, pear-shaped avocado that many consider to have the “richest” flavor of them all. It is also the greenest of all the soft-skinned varieties so be aware of that when judging harvesting time.
Poncho. It is also called the ‘Pancho’ and bears a medium-large green fruit. It can tolerate cold down to the low 20s and is the latest of the producers from mid-August through October. In that respect, it pairs nicely with and early producer if you want fruit for a long period. And who doesn’t?
Pryor. The Pryor is cold-hardy down into the high teens and is also listed as one of the green-skinned varieties.
Wilma. It was probably not named after Wilma Flintstone but is one of the largest avocados on this list. It is known for its great flavor. It is a black-skinned variety and has been around longer than most on this list.
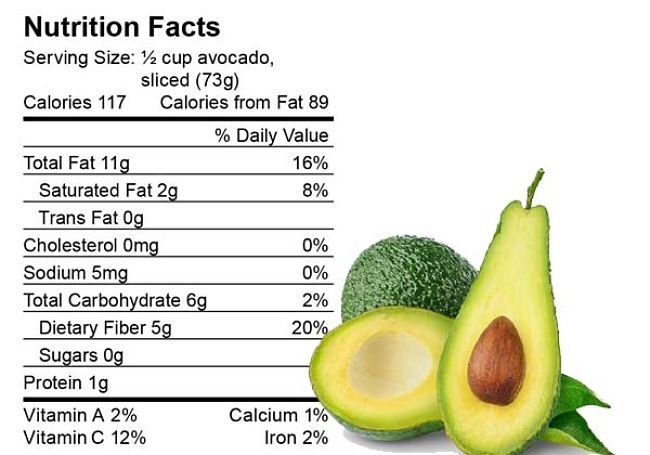
Avocado nutritional facts
Avocado Health Benefits
Although avocados are high in fat, don’t let that put you off. They contain the “good fat.” As far as health benefits go, the avocado is right up there with tart cherries. Check out these health benefits:
Healthy weight loss. They are high in fiber so they make you feel full.
Eye health. The nutrients lutein and zeaxanthin fight macular degeneration.
Helps to prevent type II diabetes. It does this by stabilizing blood sugar levels.
Increases nutrient absorption.
Bone strengthening. It does this by providing copper, folate, and vitamin K.
Well, there you have it. Choose your favorite one or two from this list of cold-hardy Mexican avocado trees; enjoy money savings, shade, and good health.
Kelly R. Smith is an Air Force veteran and was a commercial carpenter for 20 years before returning to night school at the University of Houston where he earned a Bachelor’s Degree in Computer Science. After working at NASA for a few years, he went on to develop software for the transportation, financial, and energy-trading industries. He has been writing, in one capacity or another, since he could hold a pencil. As a freelance writer now, he specializes in producing articles and blog content for a variety of clients. His personal blog is at the popular Considered Opinions Blog where he muses on many different topics.
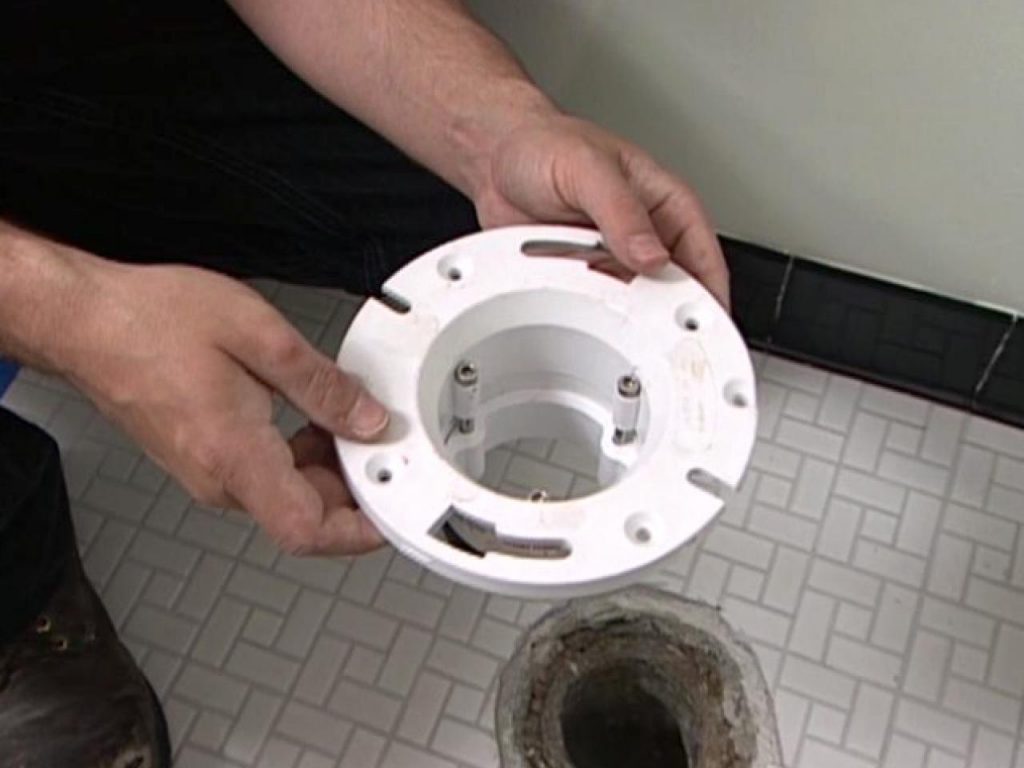
The toilet flange is the interface between your sewer line and your toilet. It serves a double purpose:
It is slotted to secure the bolts that hold your toilet down securely.
It accepts the toilet wax ring to form a waterproof barrier and a means of keeping those sewer gasses out of your bathroom.
Like anything else, they will go bad at some point. Flanges, and the sewer lines they go into, are available in two different materials — modern plastic and old-style cast iron. How you repair a toilet flange depends on what what material you are working with. The first thing you will have to do, you guessed it, is pull the toilet to diagnose the problem. While you are at it, it doesn’t matter if it is an old commode or a newer low-flow toilet, this is a good time to replace other parts like the tank-to-bowl gasket and the filling mechanism.
Repairing Plastic Toilet Flanges
Eared Reinforcement Ring. If you have a plywood subfloor that has some rot around the flange and one or more of the securing flange-to-subfloor screws won’t hold because of it, this may be your solution. The “ears” simply extend further. This is also a viable solution for concrete slabs if part has chipped away.
Two-Part Repair Ring. Some flanges are composed of plastic with the outer ring (with the bolt slots and screw holes) made of steel. Eventually, this steel will rust. A repair ring is a good solution. Two versions are available — hinged or two-part. Your choice.
Stainless Steel Repair Ring. Solid plastic flanges (as opposed to the steel ring above) work well until they happen to break or bend. The easy fix is to screw a repair ring over your plastic flange.
Repairing Cast Iron Toilet Flanges
Repair Brackets. Older cast iron flanges often break. This can occur on one or both sides. If the broken area contains a bolt slot, slipping a repair bracket under the cast iron lip will do the trick.
Repair Flange. If the flange is too badly damaged to use repair brackets, a repair flange is your best bet. This is a plastic flange that is inserted into the mouth of the old cast iron flange. You may need to clean up and break away remaining parts of the old flange with a hammer and cold chisel.
These tips on how to repair a toilet flange will cover most situations. In addition to the repair materials here, you may find additional ones on the market. New ones are being invented all the time, which is a good thing for us. In fact, plumbing innovations are popping up all the time, driven by style, materials, and the effort to conserve water.
Toilet trivia: When you heard some one say, “I’ve got to go spend a penny,” when going to the bathroom, did you ever wonder where that came from? Well, when public toilets became popular in the Victorian days, they cost a penny to use.
Looking for more great content? Visit our partner sites:
Kelly R. Smith is an Air Force veteran and was a commercial carpenter for 20 years before returning to night school at the University of Houston where he earned a Bachelor’s Degree in Computer Science. After working at NASA for a few years, he went on to develop software for the transportation, financial, and energy-trading industries. He has been writing, in one capacity or another, since he could hold a pencil. As a freelance writer now, he specializes in producing articles and blog content for a variety of clients. His personal blog is at I Can Fix Up My Home Blog where he muses on many different topics.
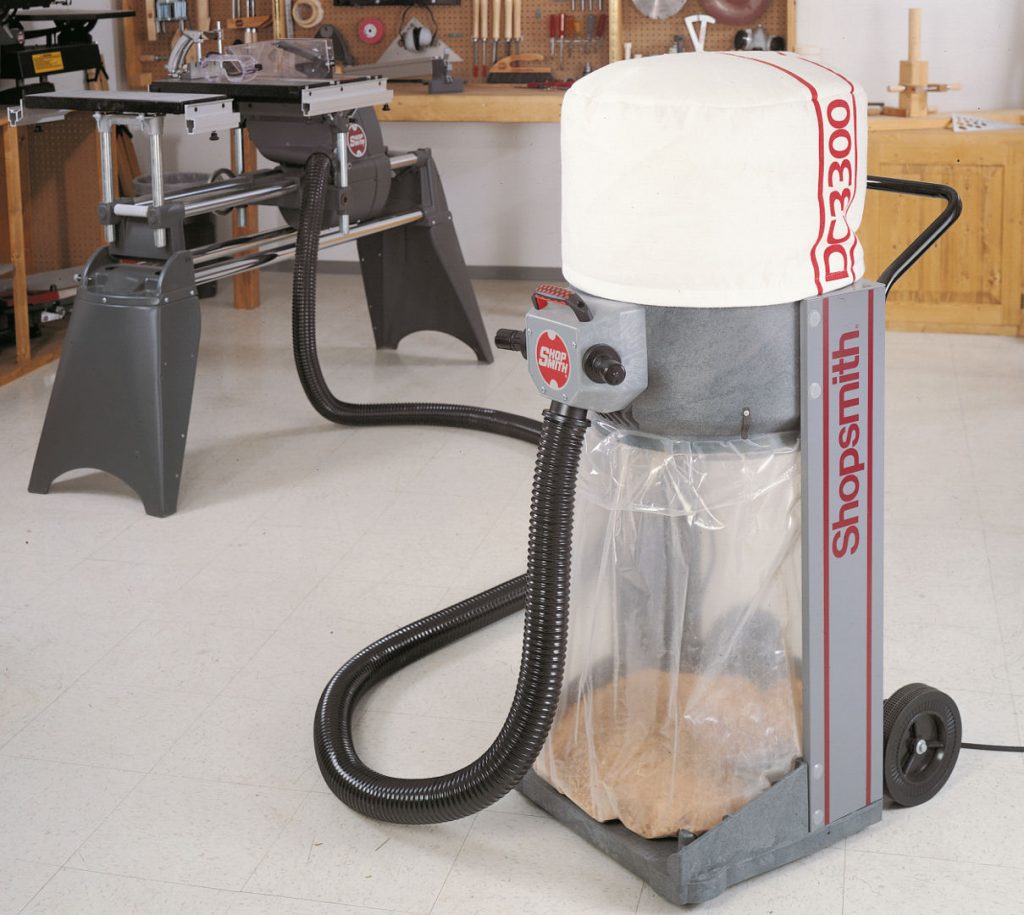
When most beginning woodworkers are setting up shop or experienced ones are upgrading, what first comes to mind? Tools, benches, and fixtures. But here’s a woodworking tip for you; it pays to first consider an investment in a wood shop dust collector system. Here are 10 of the most important reasons.
Sawdust is a royal pain. Shavings, dust, and chips accumulate very quickly. Fine dust fills the air until it settles somewhere, such as the surface of your current project that you are putting a finish coat on, applying putty to, or gluing up. And it goes without saying that you won’t make any points with your spouse when you inevitably track it into the house.
Sawdust is a definite fire hazard. It only takes one spark from your grinder to get things going. And if you are not storing your flammables properly you are compounding the problem. Even fine dust that sifts on top of lighting fixtures and electrical boxes has the potential to light up your day — and not in a good way!
Sawdust is a great candidate for recycling. Having the dust collector consolidate it while you work on your table saw, band saw, or other piece of equipment takes half the effort out of the process. It can be used to make sweeping compound (which you can use or barter). Hardwood is a great soil amendment for your garden because as it breaks down it feeds the soil with beneficial nutrients.
Fine sawdust is a health hazard without a dust collector. It can hover in the air for hours where it enters your sinuses and lungs. You can end up with allergy issues and congestion. The effects accumulate over time meaning that they can build up over the course of years even if you don’t notice a problem for a while. Exotic woods can be outright toxic. I had an x-ray several years ago and they picked up a spot in one lung. Turns out it was a “calcified nodule” which results when you breath something in and your lung isolates it by coating it, much as an oyster creates a pearl from a grain of sand over time. Was it from woodworking? Quite possible after 20 years as a carpenter.
Dust collection extends the life of your power tools. If chips or even dust is removed immediately, friction on moving parts is reduced greatly. When sanding, your paper will take longer to clog, saving time and money. It figures that sawdust from any wood containing moisture or sap will gum up a heated machine fairly quickly.
These are just 5 important benefits of a wood shop dust collection system. Yes, it is an expense but in the long run it will save you time, money, and your health.
Looking for more great content? Visit our partner sites:
Kelly R. Smith is an Air Force veteran and was a commercial carpenter for 20 years before returning to night school at the University of Houston where he earned a Bachelor’s Degree in Computer Science. After working at NASA for a few years, he went on to develop software for the transportation, financial, and energy-trading industries. He has been writing, in one capacity or another, since he could hold a pencil. As a freelance writer now, he specializes in producing articles and blog content for a variety of clients. His personal blog is at I Can Fix Up My Home Blog where he muses on many different topics.
Ads we feature have been independently selected and reviewed. If you make a purchase using the links included, we may earn commission, which helps support the site.
This article was updated on 03/26/21.
I made this tasty dish last weekend and it was a huge hit! All three of my basil plants are going gangbusters right now so if I’m not making pesto, spaghetti carbonara, or something else, I’m looking to be creative. I mention this because one of the keys to growing basil all season is to keep it trimmed back. If you let the flowers and seeds get out of hand you won’t be encouraging leaf growth.
This recipe is so easy and quick to make. I only spent about 45 minutes preparing it. It serves 4. Here’s how:
Creamy Parmesan Basil Chicken Ingredient List
4 large chicken breasts (Whole, sliced in half, or cut into strips)
1 box of pasta, your choice
3 tablespoons butter (not margarine)
4 large garlic cloves, minced
1 1/2 cups heavy cream
1/2 onion, finely minced (I prefer red onions but use what you like)
3-4 ounces roasted red peppers, thinly sliced
black pepper to taste
salt to taste
2 to 3 cups packed fresh basil leaves, cut up (quantity is a personal preference)
1/4 teaspoon crushed red pepper flakes
1 1/2 cups fresh grated Parmesan cheese
1/2 cup white wine or chicken stock
Preparation
In a large non-stick pan on medium high heat, melt 2 tablespoons of the butter. Season chicken with salt and pepper, then sear, 4 to 5 minutes on each side, until just cooked. Remove the chicken from the pan and set aside.
Start the pasta cooking while continuing with the sauce; cook until al dente.
Add the remaining 1 tablespoon of butter to the pan. Toss in the onion, garlic, peppers, paprika, red chili pepper flakes, salt, and pepper. Saute for about five minutes, just until onions and peppers become soft.
Reduce heat to medium. Add wine or chicken stock to de-glaze the pan. Adjust heat as needed to bring to a gentle simmer until reduced by half.
Lower the heat to medium low. Add the cream to the pan. Stir it until a creamy sauce forms. Add in the Parmesan cheese and stir until it is melted into sauce. Stir in the basil and simmer until just wilted, 1-2 minutes.
Add the chicken back to the pan and allow to warm up. It’s done! Serve over the pasta.
Panamanian-Style Ceviche Recipe. Ready to add some spice to your life? Most Latin countries have their own take on the exact ingredient list, but this is what I grew up with so it is the best. Lo siento mucho, Mexico y Colombia!
I offer article and blog-writing services. Interested? Hire Me!
Did you find this article helpful? Millions of readers rely on information on this blog and our main site to stay informed and find meaningful solutions. Please chip in as little as $3 to keep this site free for all.
Kelly R. Smith is an Air Force veteran and was a commercial carpenter for 20 years before returning to night school at the University of Houston where he earned a Bachelor’s Degree in Computer Science. After working at NASA for a few years, he went on to develop software for the transportation, financial, and energy-trading industries. He has been writing, in one capacity or another, since he could hold a pencil. As a freelance writer now, he specializes in producing articles and blog content for a variety of clients. His personal blog is at I Can Fix Up My Home Blog where he muses on many different topics.
Ads we feature have been independently selected and reviewed. If you make a purchase using the links included, we may earn a commission, which helps support the site. Thank you for your support.
This article was updated on 08/14/21.
I’m quickly approaching that age where I have to sign up for Medicare. I’m not the only one that is aware of this fact. Our names, addresses, and dates of birth are out there in the public domain and insurance companies have their eyes glued to the clock, waiting until we reach the ripe young age of 64.5. Medicare is big business. For about 4 months now I’ve been getting junk mail from various insurance companies soliciting my business. Worse than that are the phone calls; I get at least 10 per week. I usually tell them, “Don’t you know I’m on both the national and the Texas no-call lists?” They generally say, “Oh…” CLICK. No-call is one of those programs with no cojones or substance and they know it. There will be no consequences for ignoring one’s desire for privacy. No-call is analogous to that button at the crosswalk; it’s not hooked up to anything but it makes us feel better.
And then there are the ubiquitous TV commercials. The one that always gets a chuckle from me is when Joe Namath tells me, “They even provide this-n’-that for no extra charge!” Sure, nice marketing ploy, but after all, this is Capitalism at its best; The charge has already been built into the base rate. If it’s any consolation, it’s not as hosed as the model the Democrat Socialists want to morph the system into. In any event, I decided to do my own homework before I hold my nose and cast my lot with one of these enthusiastic insurance companies. And here’s what I found about the basics of Medicare in a nutshell.
What is Medicare?
Basic Medicare is a national health insurance program in the U.S., unveiled in 1966 under the auspices of the Social Security Administration (SSA). Today It’s administered by the Centers for Medicare and Medicaid Services (CMS). The prime objective is to provide health insurance for Americans 65 and older, but also is available for some younger people with disability status as determined by the Social Security Administration. People with end stage renal disease and amyotrophic lateral sclerosis may also sign up. Why were these two conditions designated out of the hundreds of worthy ones? Roll of the congressional dice, I suppose.
Like most government programs, misconceptions abound. When one can obfuscate, do so, ye civil service power-trippers. First, let’s be clear — Medicare isn’t free (for the most part), and the costs involved are often surprising to those who aren’t familiar with the program. Medicare enrollees cough up a variety of financial charges, including co-payments, coinsurance percentages, and monthly premiums. Although many thought Bernie Sanders‘ Medicare-for-all would be “free,” Berniecare was really just Obamacare with lipstick. And a bigger price tag. Beyond the basic Medicare Part A, there are 3 add-on parts, B, C, and D.
Medicare Parts
Medicare Part A. Medicare Part A is hospital health insurance offered by the federal government to U.S. citizens and legal immigrants who have permanently lived in the U.S. without a break for at least five years. You usually don’t have pay a monthly premium to get Medicare Part A (Hospital Insurance) coverage if you or your spouse paid Medicare taxes for a certain amount of time while working. In this case it’s called called “premium-free Part A.” People who don’t qualify for premium-free Part A can purchase Part A. If you do, you’ll pay up to a whopping $458 each month according to Medicare.gov. If you paid Medicare taxes for fewer than 30 quarters, the standard Part A premium will set you back $458. But if you paid into Medicare taxes for 30-39 quarters, then the standard Part A premium is $252. Keep in mind that if purchase Part A, you must also have Medicare Part B (Medical Insurance) and pay monthly premiums for both Part A and Part B.
Medicare Part B. Medicare Part B is medical insurance and is part of Original Medicare and covers medical services and supplies that are medically necessary to treat your health condition. This can include outpatient care, preventive services, ambulance services, and durable medical equipment. Specifically, doctor’s office visits, lab work, x-rays, and outpatient surgeries, and preventive services to keep you healthy, like cancer screenings and flu shots. In 2020 the standard premium amount is $144.60 per month for individuals who filed individual taxes up to $87,000 or less, and those that filed jointly for $174,000 or less.
Medicare Part C. According to the U.S. Department of Health and Human Services, “A Medicare Advantage Plan (like an HMO or PPO) is another Medicare health plan choice you may have as part of Medicare. Medicare Advantage Plans, sometimes called “Part C” or “MA Plans,” are offered by private companies approved by Medicare. If you join a Medicare Advantage Plan, the plan will provide all of your Part A (Hospital Insurance) and Part B (Medical Insurance) coverage. Medicare Advantage Plans may offer extra coverage, such as vision, hearing, dental, and/or health and wellness programs. Most include Medicare prescription drug coverage (Part D). Medicare pays a fixed amount for your care every month to the companies offering Medicare Advantage Plans. These companies must follow rules set by Medicare. However, each Medicare Advantage Plan can charge different out-of-pocket costs and have different rules for how you get services (like whether you need a referral to see a specialist or if you have to go to only doctors, facilities, or suppliers that belong to the plan for non‑emergency or non-urgent care). These rules can change each year.” I suspect this is the type of plan Joe Namath hypes in his commercial. Obviously the price will vary depending on services.
Medicare Part D. Part D offers prescription drug coverage. Generally, you should only opt for this if you do not have employer or union drug coverage. Medicare.gov says, “If you join a Medicare Prescription Drug Plan, you, your spouse, or your dependents may lose your employer or union health coverage.” How much does it cost? The short answer is — it depends. Most Medicare Prescription Drug Plans charge a monthly fee that varies by plan. You pay this in addition to the Medicare Part B Premium. If you join a Medicare Advantage Plan (Part C) or Medicare Cost Plan that includes Medicare prescription drug coverage, the plan’s monthly premium may include an amount for drug coverage.
How to Sign-Up for Medicare
This is easy to do on-line. I did it this morning and it took about 30 minutes. I could have done it faster but half the time I spent cross-checking my answers. It’s a government input site so there are no do-overs once they give you the chance to review and “Do you really want to continue?” OK, go to the Social Security website and click on mySocial Security. When it opens click on Create an Account. When that loads, click on Create New Account. Next, just keep following the meandering path you are led upon.
Did this article clear up some confusion on the basics of Medicare? I hope so. They don’t make it easy, do they?
Got a blog or website? Want more revenue? Monetize it!
I offer article and blog-writing services. Interested? Hire Me!
Did you find this article helpful? Millions of readers rely on information on this blog and our main site to stay informed and find meaningful solutions. Please chip in as little as $3 to keep this site free for all.
Kelly R. Smith is an Air Force veteran and was a commercial carpenter for 20 years before returning to night school at the University of Houston where he earned a Bachelor’s Degree in Computer Science. After working at NASA for a few years, he went on to develop software for the transportation, financial, and energy-trading industries. He has been writing, in one capacity or another, since he could hold a pencil. As a freelance writer now, he specializes in producing articles and blog content for a variety of clients. His personal blog is at Considered Opinions Blog where he muses on many different topics.
Ads we feature have been independently selected and reviewed. If you make a purchase using the links included, we may earn commission, which helps support the site.
Whether you’re a professional carpenter or a hobbyist woodworker in the evenings or on the weekends, one thing is certain. You can’t have too many woodworking tips. They might make completion of your project easier, or more precise, or just save time. In this sense, tips are a lot like woodworking jigs. Let’s take a look at some of these tips.
Make your own wood putty. Using wood putty is often inevitable. The problem with store-bought products is that it is difficult to get a good color match. The manufacturers can only replicate so many shades and the store can only dedicate so much shelf space. The solution for a perfect match at almost zero cost is surprisingly simple. Check out how to make homemade wood putty.
Keep your work bench clean with wax paper. We’ve all done it — glued up and begin clamping all or part of a project only to see glue oozing out and dripping on your work surface. Clean-up will not be fun. The solution? Put wax paper under your project before you start. It’s cheap and disposable.
Invest in a pneumatic nailer or two. There will be times when these tools come in handy. Say, if you are doing a repetitive task that requires fastening with nails, either 2″ ones or very small 23 – gauge pins this is much easier than the hammer-and-nail set approach. In fact, driving the smallest with a hammer is impractical. They bend; you curse. The solution is a battery-operated pin nailer.
Know your lumber grades. Every project is somewhat unique. Most people go shopping for lumber and base their selection on straightness, no warping, no checking, no knots, etc. They don’t also evaluate by National Hardwood Lumber Association lumber grades and so sometimes overbuy. For example, if only one side of the project is going to be visible, your best choice might be FAS 1F or F1F.
Select the right finish. Varnish or “polyurethane varnish” is only for interior use. It will not stand up to outdoor elements. Spar varnish on the other hand is excellent for for outdoor furniture, boats and exterior doors. It dries slowly and so it stays more supple. Because of this it accommodates the movement of the wood so it is not likely to crack and fail. Tung oil is also suitable for exterior use.
Draw a line on a long board with your combination square. Drill a 1/16″ hole in the middle of your combination square at the 1″ mark. Now you can set your square so that the hole lines up with where you want the line to be. Insert a sharpened pencil tip into the hole and draw down the length of the board.
Use the 3-4-5 method for squaring. There will be times when laying out large projects and it is not practical or accurate to use small tools. In this case you can use the 3-4-5 method for squaring. It’s quite simple and accurate as it’s based on the Pythagorean Theorem. Remember that from math class?
Hassle-free screw insertion. In many cases it is a good idea to pre-drill screw holes to minimize the chance of splitting the wood. However, the further the screw has to penetrate, the higher the possibility that the screw will stall or the slot (standard or Phillips) will strip out. My favorite solution is to rub the screw threads on a bar of soap first. This lubrication minimizes insertion issues.
Remove the plug from a holesaw with ease. The holesaw is a great invention. The drawback is getting that darn plug out after you cut the hole. Here’s a workaround. First, drill a pilot hole completely through the work piece with a twist bit the same size as the diameter of your holesaw’s drill bit. Next, insert your holesaw’s bit into that hole and cut more than halfway through the work piece. Next, pull out your holesaw, flip over your work piece, and saw the hole from this side, using the pilot hole to guide your second cut. After completing the cut and pulling out your holesaw, the plug will be sticking halfway out of the saw, giving you something to hold onto, making it a snap to remove.
Cutting small pieces on your tablesaw. This can be a major hassle at a minimum. Altogether too often the piece either flies away or splinters up. Save yourself the hassle. Set you blade just shy of the thickness of the wood so you don’t saw all the way through. Now just finish the cut using your chisel.
Looking for more great content? Visit our partner sites:
I offer article and blog-writing services. Interested? Hire Me!
Did you find this article helpful? Millions of readers rely on information on this blog and our main site to stay informed and find meaningful solutions. Please chip in as little as $3 to keep this site free for all.
Kelly R. Smith is an Air Force veteran and was a commercial carpenter for 20 years before returning to night school at the University of Houston where he earned a Bachelor’s Degree in Computer Science. After working at NASA for a few years, he went on to develop software for the transportation, financial, and energy-trading industries. He has been writing, in one capacity or another, since he could hold a pencil. As a freelance writer now, he specializes in producing articles and blog content for a variety of clients. His personal blog is at I Can Fix Up My Home Blog where he muses on many different topics.
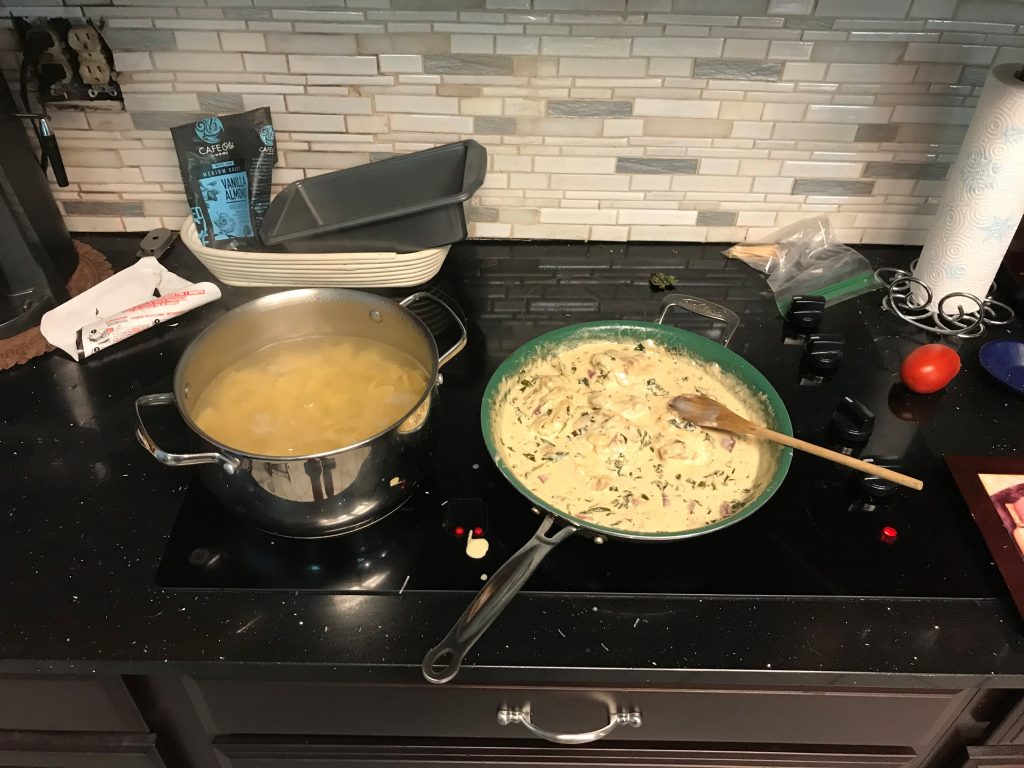
Loaf of bread with an oval Banneton proofing basket
It may seem strange that I called this particular recipe the Covid-19 Lock-down recipe but there’s a reason for it. Since we all began this pandemic adventure America has become a nation of bakers. Yeast is a rare commodity; I searched high and low for two weeks until I struck gold. Good whole wheat was almost as hard to come by.
Anyway, I like to experiment and this is what I came up with yesterday. It may seem an odd assortment of ingredients but it really worked. I used the oval Banneton proofing basket and a cookie sheet rather than a loaf pan.
Use organic ingredients whenever possible. You can also use this dough ingredient list when you are making homemade pizza.
Ingredient List for Covid-9 Bread
1 c Quick-cooking steel-cut oatmeal
1/2 c quinoa
Dash of Himalayan salt; I like because they don’t remove all the minerals like regular salt.
2 T Gluten; it’s optional but gluten is the “glue” that holds the loaf together.
1 T Cinnamon
3 c Very warm water
3-4 c Whole wheat flour; as much as you need to make the dough and knead it.
1/2 c Rice flour if you are using a proofing basket.
Just a thought: next time I’m going to try putting in some finely-sliced basil leaves; it’s going gang-busters in my garden right now.
Preparation Steps
Put the oatmeal and quinoa in your mixing bowl and just cover the mixture with water. Since the mixture will absorb water, check it periodically and add water as needed. About an hour will do the trick.
Add the 3 c warm water.
Mix in the yeast well.
Mix in the rest of the dry ingredients; the flour is last.
Stir in the flour well bit by bit until it is hard to turn over.
Turn the dough out on a floured surface. Sprinkle some flour on top of it so sticking to your hands is minimal.
Commence kneading, adding flour as needed (see what I did there?). I usually fold it over 20-30 times.
Proofing time! If you use a proofing basket, prepare it by spraying the inside lightly with water and sprinkle rice flour. Wheat flour will NOT work. Fit the dough in and cover with a damp dish towel. If you are using a mixing bowl, lightly coat it with olive oil or cooking spray so it won’t stick. Plop the dough in and cover with a damp dish towel.
Let it rise for 2-3 hours or whatever your brand of yeast recommends.
Put a pan of water on the oven rack; the steam will keep you loaf from drying out.
Preheat your oven to 450 degrees.
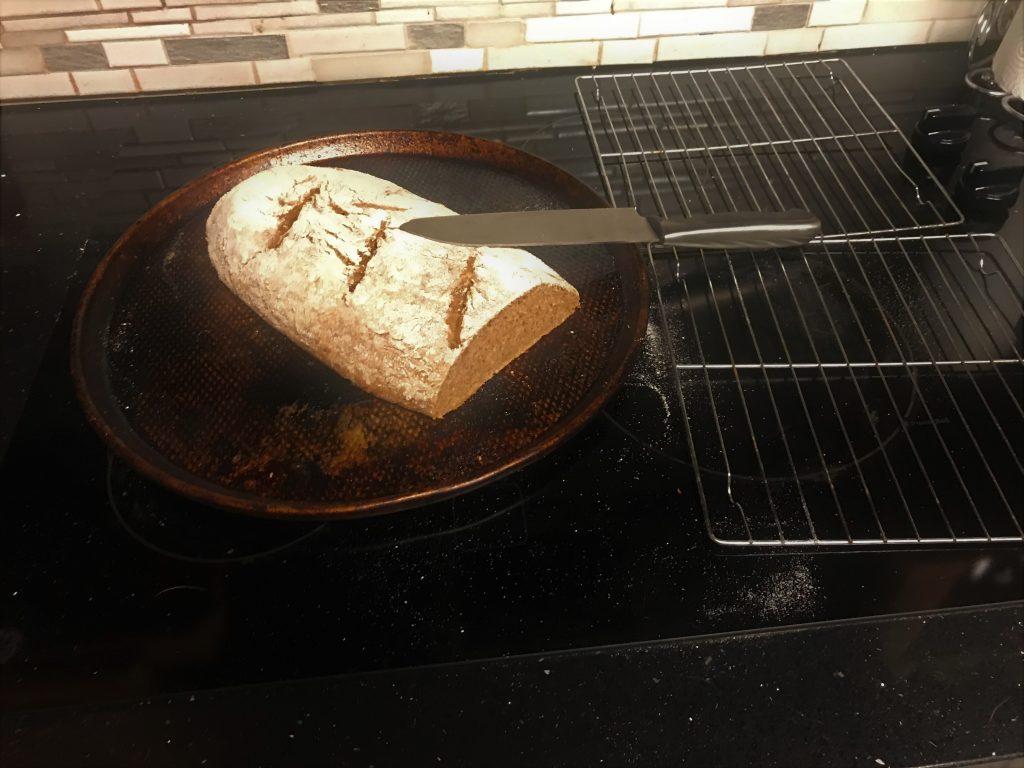
Turn your dough out onto either cooking-sprayed cookie sheet if you used a proofing basket or into a buttered loaf pan. Cut 3 thin slits across the top of the loaf; I used an X-acto knife.
Bake it! 25 minutes was perfect for me. Use the toothpick test to be sure.
Turn the loaf out onto cooling racks and let it rest for at least 10 minutes.
Enjoy!
Hot, fresh homemade bread
Looking for more great content? Visit our partner sites:
Kelly R. Smith is an Air Force veteran and was a commercial carpenter for 20 years before returning to night school at the University of Houston where he earned a Bachelor’s Degree in Computer Science. After working at NASA for a few years, he went on to develop software for the transportation, financial, and energy-trading industries. He has been writing, in one capacity or another, since he could hold a pencil. As a freelance writer now, he specializes in producing articles and blog content for a variety of clients. His personal blog is at I Can Fix Up My Home Blog where he muses on many different topics.


 Kelly R. Smith is an Air Force veteran and was a commercial carpenter for 20 years before returning to night school at the University of Houston where he earned a Bachelor’s Degree in Computer Science. After working at NASA for a few years, he went on to develop software for the transportation, financial, and energy-trading industries. He has been writing, in one capacity or another, since he could hold a pencil. As a freelance writer now, he specializes in producing articles and blog content for a variety of clients. His personal blog is at I Can Fix Up My Home Blog where he muses on many different topics.