Endless Crop of Green Onions, Chives

How to Propagate Organic Green Onions, Scallions, and Chives

Photo of Kelly R. Smith   by Kelly R. Smith

Green onions grown from cuttings
index sitemap advanced

Ads we feature have been independently selected and reviewed. If you make a purchase using the links included, we may earn a commission, which helps support the site. Thank you for your support.

Do you like to use green onions or scallions in your recipes? Do you like them as fresh as they can be? Do you prefer organic produce? Do you like to save money? Are you really big on convenience? If you answered yes to any of these questions then you need this gardening tip! It applies whether your vegetable or herb garden is outside or if you rely on hydroponic gardening for those fresh edibles all year round.

Green Onions, Scallions, and Chives, What’s the Difference?

To begin with, green onions and scallions are the same thing, different name. That one and chives look and taste quite similar, but they are different plants. They have different practical uses as well as different nutritional profiles.

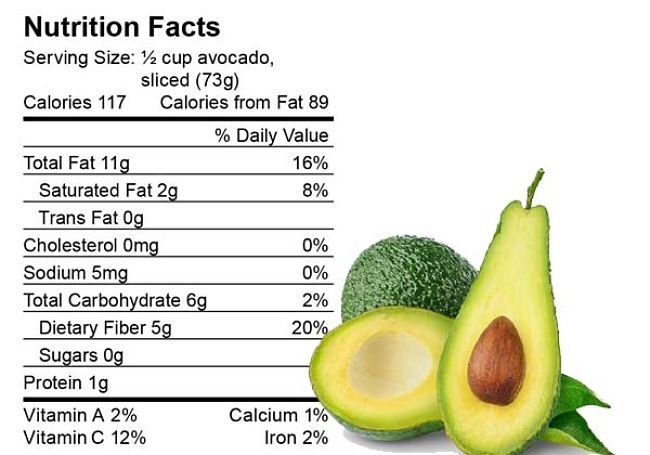
The primary difference from a botanical point of view is that green onions are a vegetable but chives are considered an herb like basil is. Surprisingly, chives also have a higher nutrient profile than green onions do. This makes sense because since herbs in general usually have a denser nutritional content.

Botany can be perplexing and befuddling for us mere mortals. For example, quinoa (Chenopodium quinoa, or goosefoot) is not in actuality a true cereal grain, but rather a “pseudo-cereal.”


How to Get Your “Free” Produce

You will be amazed at how simple this is! When most people (almost all, actually) cut off the root section, they throw it in the trash; they don’t even compost vegetable scraps including these gems. Composting is important, especially if you are a prepper, homesteader, or just living off the grid.

So, here’s the process. Cut off the root section as usual, leaving about 1/2 inch of the bulb on it. Plant it, root section down, about 2 inches deep. As you can see from the picture at the top of this article, a simple ceramic pot works for my needs. Yes, I’m ready to put some fresh hardwood mulch in there. A top-dressing of compost periodically is a good idea. The idea is to harvest the biggest one, plant its root section; it’s a two-minute operation, easy-peasy. Water daily. Check out the size of my home-grown organic scallion (I’m making Panamanian-style ceviche today).

A huge, home-grown organic green onion, or scallion


Well, that’s just about all there is to generating and enjoying an endless crop of green onions (scallions) and chives. Do it in your herb garden, kitchen window, or hydroponically. It’s all good in the culinary universe.

Further Reading


Looking for more great content? Visit our main page or partner sites:

I Can Fix Up My Home

The Green Frugal

Running Across Texas


As Featured On Ezine Articles

I offer article and blog-writing services. Interested? Hire Me!


Did you find this article helpful? Millions of readers rely on information on this blog and our main site to stay informed and find meaningful solutions. Please chip in as little as $3 to keep this site free for all.


Visit Kelly’s profile on Pinterest.

About the Author:

Photo of Kelly R. SmithKelly R. Smith is an Air Force veteran and was a commercial carpenter for 20 years before returning to night school at the University of Houston where he earned a Bachelor’s Degree in Computer Science. After working at NASA for a few years, he went on to develop software for the transportation, financial, and energy-trading industries. He has been writing, in one capacity or another, since he could hold a pencil. As a freelance writer now, he specializes in producing articles and blog content for a variety of clients. His personal blog is at I Can Fix Up My Home Blog where he muses on many different topics.

Ivation 6-Tray Food Dehydrator: a Product Review

by Kelly R. Smith

index sitemap advanced
Ivation 6-tray stainless steel food dehydrator

There are many ways to cook and preserve food. In recent years the increasing number of homesteaders and preppers have made canning and dehydrating popular again. Processing food with a food dehydrator is great for storing food in the home and keeping the nutritional value while reducing weight for campers, hikers, or just going on a road trip with family and friends.

I was motivated to buy the Ivation 6-tray dehydrator pictured above, I won’t lie, because I love beef jerky. Well, to be honest, my daughter is crazy for the jerky from Buc-ee’s. So I called her and asked, “What flavor?” She said, “Teriyaki beef jerky.” So I shopped. There are many out there but led me to choose this one was size, materials, and the fact that it’s commercial-grade. In for a dime, in for a dollar, I always say.

By the way, if you were wondering when looking at the picture above, the dehydrator is set up on one of the work benches in my wood shop. No sense in heating up the kitchen during the Texas summer.

Features of the Ivation Dehydrator

  • Six trays. These trays measure 13” X 12”. Plenty of room for processing an assortment of food.
  • Rear-mounted automatic fan. The fan circulates warm air with 600W of heating power. This ensures that the food is evenly dried from all angles.
  • Easy to clean. The 6 stainless steel trays as well as the drip tray are all removable. Just slide them out and wash as you would anything else in your kitchen.
  • Stainless steel body and trays. All parts are BPA-free, this means they are safe and durable.
  • Digital temperature and timer. The temperature range is 95ºF to 167ºF. You can set the timer to automatically shut off your unit at the time you specify. Set it in 30-minute increments for up to 24 hours.

Conclusion

Despite the fact that this Ivation 6-tray food dehydrator is a commercial-grade appliance, it is very easy to use; the controls are simple, it is easy to clean, and the heavy-duty fan is properly placed to do its job evenly. I recommend it.


Looking for more great content? Visit our partner sites:

The Green Frugal

Running Across Texas


As Featured On Ezine Articles

I offer article and blog-writing services. Interested? Hire Me!


Did you find this article helpful? Thanks for supporting this free site with a small donation!


Visit Kelly’s profile on Pinterest.


About the Author:

Photo of Kelly R. SmithKelly R. Smith is an Air Force veteran and was a commercial carpenter for 20 years before returning to night school at the University of Houston where he earned a Bachelor’s Degree in Computer Science. After working at NASA for a few years, he went on to develop software for the transportation, financial, and energy-trading industries. He has been writing, in one capacity or another, since he could hold a pencil. As a freelance writer now, he specializes in producing articles and blog content for a variety of clients. His personal blog is at I Can Fix Up My Home Blog where he muses on many different topics.

Indoor Gardening: Basic Hydroponic Tools and Equipment

index sitemap advanced
Indoor hydroponic gardening

It is no secret that commercial growers have been using hydroponic tools and equipment for indoor gardening for years. Like other businesses, these farmers need to generate revenue and provide a product to customers year-round. What if you want to become more self-sufficient during the COVID-19 lock-down? What about the average person that wants to do it on a smaller scale? The good news is that you can. Let’s look at what you need to get started.

Light for Photosynthesis

Dictionary.com defines photosynthesis thus, “the complex process by which carbon dioxide, water, and certain inorganic salts are converted into carbohydrates by green plants, algae, and certain bacteria, using energy from the sun and chlorophyll.”

Yeah, yeah, yeah; what you really need to know is that your plants need light to grow. Of course, sunlight is optimal; it provides the full spectrum of visible and non-visible light. It’s offered to us for free and is the best way to provide light for hydroponics. Many vegetable plants and herbs like mint and basil do best on at least six hours of direct light each day. Southern-facing windows and greenhouses have the potential to provide this amount of sunlight.

But what if that’s not in the cards? You’ll be best investing in grow lights. Look for ones from 4,000 to 6,000 kelvin to insure that they deliver both cool (blue) and warm (red) light.

Substitute Substrate for Soil

This is where the hydro part comes in. The water and nutrients circulate through the substrate which is a material such as pea gravel, sand, coconut fiber, peat moss, expanded clay pellets, etc.

Water

Clean water is critical. The water of choice is treated by reverse osmosis (RO). This purification process results in water that is 98% to 99% pure and your plants will thank you for it. You will also have to keep an eye on the water pH (a measure of alkalinity or acidity. For example, if you are growing tomatoes, they prefer a pH of 6.0 to 6.8 on a scale where 7.0 is considered neutral. Mint plants prefer 6.5 to 7.5. Growing beets? Shoot for 6.0 to 6.8. Knowing these numbers is important as you consider companion plants for your garden.

As far as fertilizer goes, you’ll want to buy a hydroponic premix because it will contain all the nutrients needed. I suppose you could cobble together your own but the expense/work ratio doesn’t make sense to me. Of course, it wouldn’t hurt to add foliar feeding every couple of weeks.

Types of Hydroponic Systems

As you might suspect, there is a range of systems to choose from.

  • Water culture. Uses a non-submersible air pump, air hose, floating platform, rope wicks, and grow tray.
  • Nutrient film. Uses non-submersible air pump, air hose, submersible pump, air stone, overflow tube, and grow tray.
  • Wick system. Uses non-submersible pump, air stone, air hose, rope wicks, and grow tray.
  • Ebb and flow. Submersible air pump, air hose, timer, overflow tube, and grow tray.
  • Aeroponic. Subersible pump, mist nozzles, air hose, and short-cycle timer.
  • Drip system. Non-submersible air pump, submersible pump, air hose, timer, drip lines, overflow tube, drip manifold, grow tray.

There are your basic hydroponic tools and equipment for indoor gardening. Whether you approach it as a hobby, as a serious farmer who is going off the grid, there are numerous benefits. The produce will be fresh, as organic as you make it, and available year-round.


Looking for more great content? Visit our partner sites:

The Green Frugal

Running Across Texas


As Featured On Ezine Articles

I offer article and blog-writing services. Interested? Hire Me!


Did you find this article helpful? Thanks for supporting this free site with a small donation!


Visit Kelly’s profile on Pinterest.


About the Author:

Photo of Kelly R. SmithKelly R. Smith is an Air Force veteran and was a commercial carpenter for 20 years before returning to night school at the University of Houston where he earned a Bachelor’s Degree in Computer Science. After working at NASA for a few years, he went on to develop software for the transportation, financial, and energy-trading industries. He has been writing, in one capacity or another, since he could hold a pencil. As a freelance writer now, he specializes in producing articles and blog content for a variety of clients. His personal blog is at I Can Fix Up My Home Blog where he muses on many different topics.

Cold-Hardy Mexican Avocado Trees

Grow Your Own nutritious Fruit And Beat High Grocery Store Costs

Photo of Kelly R. Smith   by Kelly R. Smith

A Don Juan avocado tree; freshly-planted
Don Juan avocado tree; freshly-planted
index sitemap advanced

Ads we feature have been independently selected and reviewed. If you make a purchase using the links included, we may earn a commission, which helps support the site. Thank you for your support.

This article was updated on 01/28/22.

There’s only one drawback to fresh avocados that I can think of — the price. That’s why planting your own avocado tree is such a good idea. The image above is the Don Juan variety that I planted yesterday. I’m generally not a big fan of staking new trees but this time, as I was finishing my tree planting adventure, the wind was beginning to whip and a rainstorm was blowing in. This afternoon I can follow up with a top-dressing of compost and some hardwood mulch. Which species is right for you? Here is a list of cold-hardy Mexican avocado trees in alphabetical order.

When planting avocado trees, keep in mind that they like well-drained soil. They do not tolerate overly-wet soil well. As with your other trees and plants they prefer the pH of rain to tap water. It is always a good time to put in a rainwater harvesting system.


List of Avocado Tree Species

  • Brazos Belle. This one tolerates cold in the mid to low teens. The fruit is large and purple-black.
  • Brogdon. A mature tree can reach as high as 30 feet tall. Expect the crop to ripen ripen late from mid-July to mid-September.
  • Day. If you are into container gardening, this is a good choice. It will grow to 6 to 8 feet and will produce when it reaches 3 to4 feet high.
  • Don Juan. The Don can handle temperatures down to the mid to high teens. In height it can reach 20 to 25 feet when fully grown.
  • Fantastic. It’s considered to have one of the creamiest textures of the flesh. It is very thin-skinned and is very freeze-resistant.
  • Joey. This variety boasts a dark, purple-black skin and an egg-shaped fruit.It is one of the most prolific producers of any of these species. It is right behind the Fantastic in cold hardiness.
  • Lila. Lila bears medium-sized pear-shaped fruits. It is cold-hardy variety down to 15 degrees and when mature maxes out at 10-15 feet high.
  • Mexicola. This one is cold-hardy down to the low 20s. It’s known for its creamy, smooth taste which makes it a natural in dishes such as Tuscan kale salad.
  • Mexicola Grande. It is known for nutty flavor and has the best reputation for consistent fruit size if that is important to you as a home-owner. That would be low on my priority list but it is what it is.
  • Opal. No, not a precious stone or European car brand, but a medium-sized, pear-shaped avocado that many consider to have the “richest” flavor of them all. It is also the greenest of all the soft-skinned varieties so be aware of that when judging harvesting time.
  • Poncho. It is also called the ‘Pancho’ and bears a medium-large green fruit. It can tolerate cold down to the low 20s and is the latest of the producers from mid-August through October. In that respect, it pairs nicely with and early producer if you want fruit for a long period. And who doesn’t?
  • Pryor. The Pryor is cold-hardy down into the high teens and is also listed as one of the green-skinned varieties.
  • Wilma. It was probably not named after Wilma Flintstone but is one of the largest avocados on this list. It is known for its great flavor. It is a black-skinned variety and has been around longer than most on this list.
Avocado nutritional facts

Avocado Health Benefits

Although avocados are high in fat, don’t let that put you off. They contain the “good fat.” As far as health benefits go, the avocado is right up there with tart cherries. Check out these health benefits:

  • Healthy weight loss. They are high in fiber so they make you feel full.
  • Eye health. The nutrients lutein and zeaxanthin fight macular degeneration.
  • Helps to prevent type II diabetes. It does this by stabilizing blood sugar levels.
  • Increases nutrient absorption.
  • Bone strengthening. It does this by providing copper, folate, and vitamin K.

Well, there you have it. Choose your favorite one or two from this list of cold-hardy Mexican avocado trees; enjoy money savings, shade, and good health.

Looking for more great content? Visit our partner sites:

The Green Frugal

Running Across Texas


As Featured On Ezine Articles

I offer article and blog-writing services. Interested? Hire Me!


Did you find this article helpful? Thanks for supporting this free site with a small donation!


Visit Kelly’s profile on Pinterest.

About the Author:

Photo of Kelly R. SmithKelly R. Smith is an Air Force veteran and was a commercial carpenter for 20 years before returning to night school at the University of Houston where he earned a Bachelor’s Degree in Computer Science. After working at NASA for a few years, he went on to develop software for the transportation, financial, and energy-trading industries. He has been writing, in one capacity or another, since he could hold a pencil. As a freelance writer now, he specializes in producing articles and blog content for a variety of clients. His personal blog is at the popular Considered Opinions Blog where he muses on many different topics.

close

Enjoy this blog? Please spread the word :)

RSS
Follow by Email
Twitter
Follow Me
Tweet
Pinterest
Pinterest
Pinterest
Instagram
LinkedIn
Share