Growing Mint: An Herb Garden Staple

index sitemap advanced
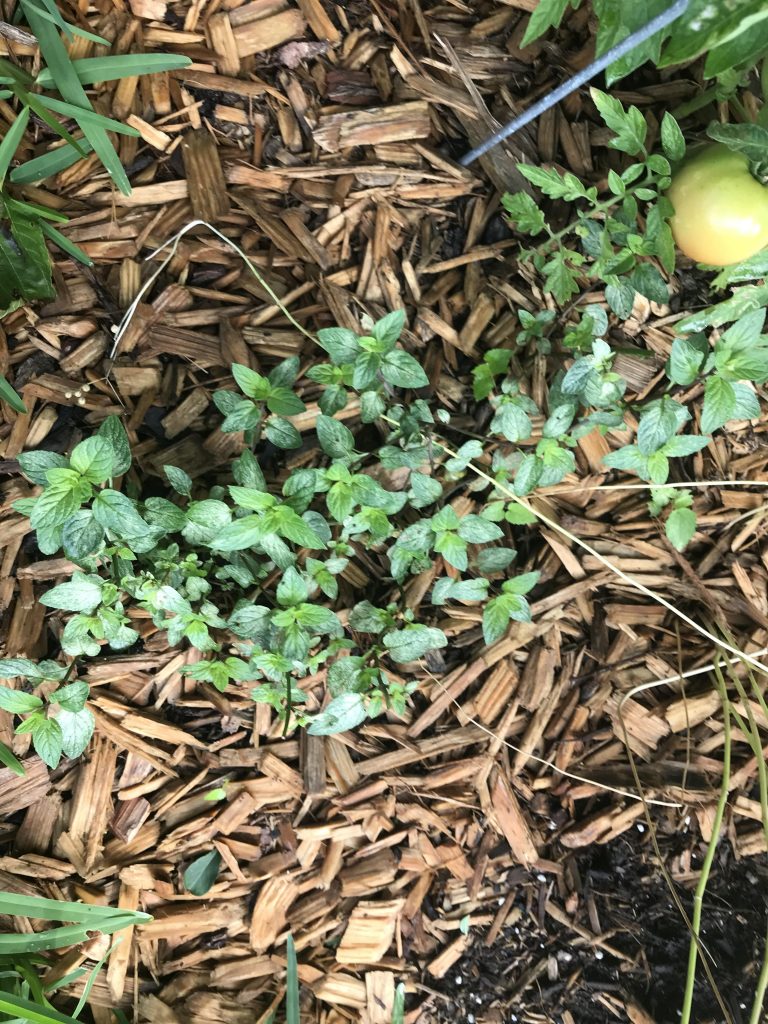
Chocolate mint in the garden next to tomato plant

Mint is a perennial herb with very fragrant, toothed leaves and tiny purple, pink, or white flowers. It has a fruity, aromatic taste and offers many health benefits. There are many varieties so you have a wide range to select from. One thing is certain — mint, grown organically, is an herb garden and kitchen staple, much as basil is.

The Many Varieties of Mint

The number of mint flavors can be a bit overwhelming; I like to keep at least two of them growing. An odd thing is the way you can identify it other than the smell. If you look close, the stem is actually square. The oddities of nature, yes? Anyway, pick your favorites from this list:

  • Chocolate. Yes, it really does look and taste like the real thing. My favorite additive to go into my dark-roast coffee grounds in the morning. None of those artificial chemical flavors for me.
  • Apple/Pineapple.
  • Spearmint. Was this your favorite chewing gum flavor as a kid?
  • Pennyroyal.
  • Citrus Mint. Just the thing for iced tea on a summer afternoon.
  • Corsican. This is one of the strongest tasting of mints and it is also the smallest; growing tight-knit it makes a good ground cover in semi-shady areas. Unlike most mints it can be difficult to grow. It likes to be well-watered. It makes a good companion plant for things like chives and tomatoes.
  • Peppermint. For adding a bit of candy flavor without all the sugar.
  • Banana.
  • Orange. Also good in tea and cold brew coffee.

Planting and Care of Mint

  • First, consider that mint spreads rapidly. This means growing it in a container or enclosed within some kind of root barricade to rein in the horizontal runners and underground rhizomes.
  • Mint likes light soil with good drainage; its native habitat is along stream banks.
  • Most varieties prefer some shade; check the exact requirements of your favorite variety/s.
  • It likes a thin layer of compost or organic fertilizer every few months.
  • Keep the area covered with a layer of hardwood mulch to retain moisture. Do NOT use any colored mulch. Those color chemicals and dyes are not your friends, especially if you intend to consume the leaves.
  • Other than watering, a light top-dressing with compost, some mulch, and occasional organic fertilizer, these are easy plants to grow.
  • Prune them back regularly. the smaller, younger leaves are the most flavorful… but, where you let them flower, the butterflies will thank you!

Nutritional Benefits

  • Aids in digestion.
  • Eases dizziness and nausea.
  • Helps with nasal congestion.
  • Boosts dental health.
  • Improves blood circulation.
  • Boosts immunity. That’s not a bad thing during the CORVID-19 pandemic.

By now you can see why growing mint in your garden or containers is a good idea. It’s healthy, tasty, nutritious, and importantly to many of us, easy to grow.

Looking for more great content? Visit our partner sites:

The Green Frugal

Running Across Texas


As Featured On Ezine Articles

I offer article and blog-writing services. Interested? Hire Me!


Did you find this article helpful? Thanks for supporting this free site with a small donation!


Visit Kelly’s profile on Pinterest.

About the Author:

Photo of Kelly R. SmithKelly R. Smith is an Air Force veteran and was a commercial carpenter for 20 years before returning to night school at the University of Houston where he earned a Bachelor’s Degree in Computer Science. After working at NASA for a few years, he went on to develop software for the transportation, financial, and energy-trading industries. He has been writing, in one capacity or another, since he could hold a pencil. As a freelance writer now, he specializes in producing articles and blog content for a variety of clients. His personal blog is at I Can Fix Up My Home Blog where he muses on many different topics.

Cold-Hardy Mexican Avocado Trees

Grow Your Own nutritious Fruit And Beat High Grocery Store Costs

Photo of Kelly R. Smith   by Kelly R. Smith

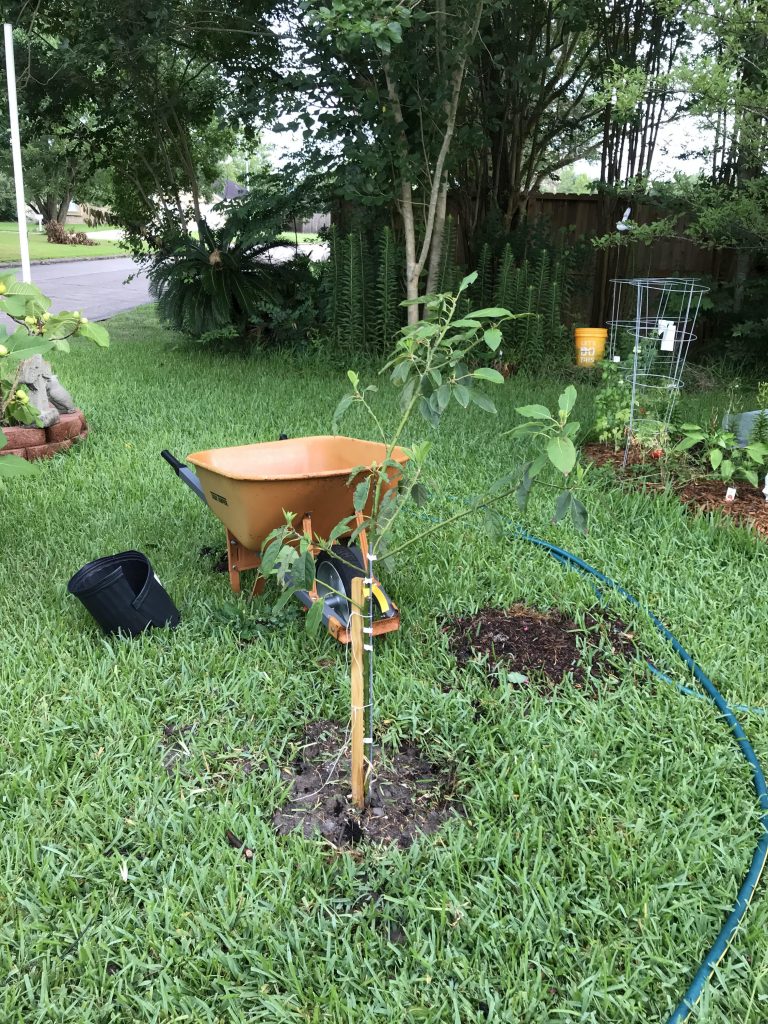
A Don Juan avocado tree; freshly-planted
Don Juan avocado tree; freshly-planted
index sitemap advanced

Ads we feature have been independently selected and reviewed. If you make a purchase using the links included, we may earn a commission, which helps support the site. Thank you for your support.

This article was updated on 01/28/22.

There’s only one drawback to fresh avocados that I can think of — the price. That’s why planting your own avocado tree is such a good idea. The image above is the Don Juan variety that I planted yesterday. I’m generally not a big fan of staking new trees but this time, as I was finishing my tree planting adventure, the wind was beginning to whip and a rainstorm was blowing in. This afternoon I can follow up with a top-dressing of compost and some hardwood mulch. Which species is right for you? Here is a list of cold-hardy Mexican avocado trees in alphabetical order.

When planting avocado trees, keep in mind that they like well-drained soil. They do not tolerate overly-wet soil well. As with your other trees and plants they prefer the pH of rain to tap water. It is always a good time to put in a rainwater harvesting system.


List of Avocado Tree Species

  • Brazos Belle. This one tolerates cold in the mid to low teens. The fruit is large and purple-black.
  • Brogdon. A mature tree can reach as high as 30 feet tall. Expect the crop to ripen ripen late from mid-July to mid-September.
  • Day. If you are into container gardening, this is a good choice. It will grow to 6 to 8 feet and will produce when it reaches 3 to4 feet high.
  • Don Juan. The Don can handle temperatures down to the mid to high teens. In height it can reach 20 to 25 feet when fully grown.
  • Fantastic. It’s considered to have one of the creamiest textures of the flesh. It is very thin-skinned and is very freeze-resistant.
  • Joey. This variety boasts a dark, purple-black skin and an egg-shaped fruit.It is one of the most prolific producers of any of these species. It is right behind the Fantastic in cold hardiness.
  • Lila. Lila bears medium-sized pear-shaped fruits. It is cold-hardy variety down to 15 degrees and when mature maxes out at 10-15 feet high.
  • Mexicola. This one is cold-hardy down to the low 20s. It’s known for its creamy, smooth taste which makes it a natural in dishes such as Tuscan kale salad.
  • Mexicola Grande. It is known for nutty flavor and has the best reputation for consistent fruit size if that is important to you as a home-owner. That would be low on my priority list but it is what it is.
  • Opal. No, not a precious stone or European car brand, but a medium-sized, pear-shaped avocado that many consider to have the “richest” flavor of them all. It is also the greenest of all the soft-skinned varieties so be aware of that when judging harvesting time.
  • Poncho. It is also called the ‘Pancho’ and bears a medium-large green fruit. It can tolerate cold down to the low 20s and is the latest of the producers from mid-August through October. In that respect, it pairs nicely with and early producer if you want fruit for a long period. And who doesn’t?
  • Pryor. The Pryor is cold-hardy down into the high teens and is also listed as one of the green-skinned varieties.
  • Wilma. It was probably not named after Wilma Flintstone but is one of the largest avocados on this list. It is known for its great flavor. It is a black-skinned variety and has been around longer than most on this list.
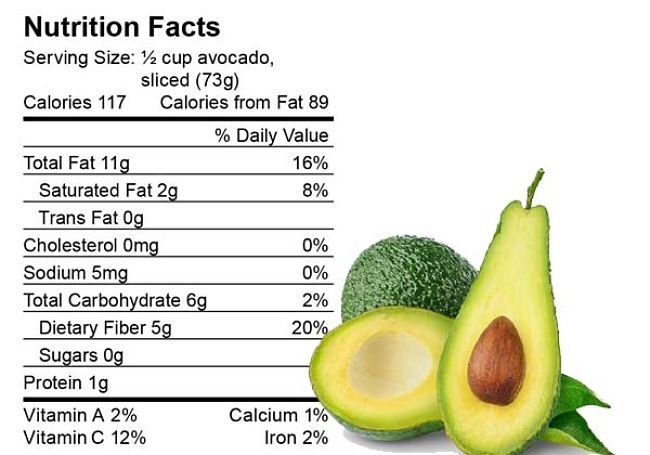
Avocado nutritional facts

Avocado Health Benefits

Although avocados are high in fat, don’t let that put you off. They contain the “good fat.” As far as health benefits go, the avocado is right up there with tart cherries. Check out these health benefits:

  • Healthy weight loss. They are high in fiber so they make you feel full.
  • Eye health. The nutrients lutein and zeaxanthin fight macular degeneration.
  • Helps to prevent type II diabetes. It does this by stabilizing blood sugar levels.
  • Increases nutrient absorption.
  • Bone strengthening. It does this by providing copper, folate, and vitamin K.

Well, there you have it. Choose your favorite one or two from this list of cold-hardy Mexican avocado trees; enjoy money savings, shade, and good health.

Looking for more great content? Visit our partner sites:

The Green Frugal

Running Across Texas


As Featured On Ezine Articles

I offer article and blog-writing services. Interested? Hire Me!


Did you find this article helpful? Thanks for supporting this free site with a small donation!


Visit Kelly’s profile on Pinterest.

About the Author:

Photo of Kelly R. SmithKelly R. Smith is an Air Force veteran and was a commercial carpenter for 20 years before returning to night school at the University of Houston where he earned a Bachelor’s Degree in Computer Science. After working at NASA for a few years, he went on to develop software for the transportation, financial, and energy-trading industries. He has been writing, in one capacity or another, since he could hold a pencil. As a freelance writer now, he specializes in producing articles and blog content for a variety of clients. His personal blog is at the popular Considered Opinions Blog where he muses on many different topics.

How to Build a Raised Garden Bed

index sitemap advanced
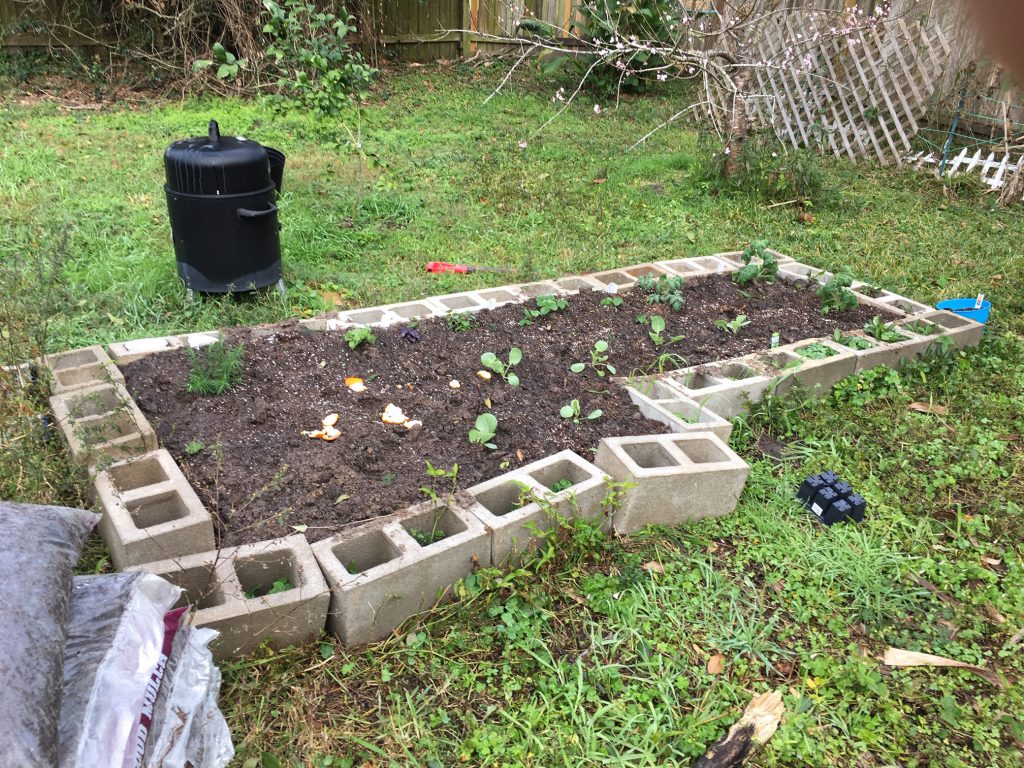
Raised Garden Bed
Raised Garden Bed

A raised garden bed (or raised bed garden if you prefer) is a great way to grow your own organic produce. It’s a simple weekend DIY project. The picture above shows the one I just built. It still needs a bit of tightening up but the basics are there.

Types of Raised Bed Gardens

The one I built was made using cinder blocks. The benefits are low cost of materials and the ability to expand easily. Kits are also available but they cost a bit more and not all are expandable. They can also be built using wood (cedar is a good choice) and stakes.

Height is also a consideration. The cinder block height works well for me but people with back problems do better with elevated garden kits. It’s all a matter of convenience and personal preference.

Preparing the Garden

A garden laid directly on the ground, like mine, will benefit from a layer of newspaper laid on the grass surface. This will inhibit grass and weeds from making their way up through the dirt.

On top of this goes your dirt with compost added in. It’s easy to mix using a hoe. What type of dirt? I have heard some gardeners swear by rose soil but in my experience regular garden soil works fine. If you already know what you are going to plant this is a good time to test the soil pH and adjust it using the appropriate soil amendments.

Planting Time!

You’ve got two choices–start your plants from seed or buy bedding plants. Seeds are less expensive but using plants will mean you can harvest sooner. I prefer plants. Just plant them at the recommended depth and water them in well.

Next add a couple of inches of mulch to the surface. There many varieties available. I prefer hardwood mulch because of the way it decomposes over time and feeds the soil. Whatever you do, do not use dyed mulch. That dye is chemical and you certainly don’t want roots to be taking it up!

Now toss out some organic fertilizer and some agricultural dried molasses. The molasses stimulates all the beneficial microbes and earthworms, both of which are important for the health of your soil. Microbes share a symbiotic relationship with plants. Worms will keep your soil aerated which helps in water distribution and root growth. Another consideration is spraying out some beneficial nematodes to control fleas and many other pests.

I hope you found this article on building a raised garden bed helpful. If so, please pass it along to your friends. Comments or ideas? Add them in the comment section below. Thanks for visiting and happy gardening!

About the Author:

Kelly R. Smith
Kelly R. Smith

Kelly R. Smith is an Air Force veteran and was a commercial carpenter for 20 years before returning to night school at the University of Houston where he earned a Bachelors Degree in Computer Science. After working at NASA for a few years, he went on to develop software for the transportation and financial and energy trading industries. He has been writing, in one capacity or another, since he could hold a pencil. As a freelance writer now, he specializes in producing articles and blog content for a variety of clients.


Looking for more great content? Visit our partner sites:

The Green Frugal

Running Across Texas


As Featured On Ezine Articles

I offer article and blog-writing services. Interested? Hire Me!


Did you find this article helpful? Thanks for supporting this free site with a small donation!


Visit Kelly’s profile on Pinterest.


Ryobi 20 in. 40-Volt Brushless Mower Review

index sitemap advanced
Ryobi 20 in. 40-Volt Brushless Mower

I have had one of these mowers for a little over a year now and I’m still impressed. Even though it is battery-operated it is every bit as powerful as the gasoline mowers that I have owned in the past.

I have a normal-sized front and back yard and only once did the battery run out of power before I got done. In other words, it offers plenty of endurance for typical home use. The grass was particularly high that day so I wasn’t surprised. The picture above shows the bag attached but I don’t use it. Instead I use the mulching option.

Why? It doesn’t make sense to deal with disposing of grass clippings. I’ve been on an organic program for both my lawn and fruit trees for about 10 years or so and the mulched clippings decompose and feed the soil. It’s a win-win.

Advantages of The Ryobi Electric Mower

At $299, it is priced competitively with gas mowers.

It offers bag collection or mulching options.

By not using gas or oil, it saves money in the long run.

One battery and charger are provided in the purchase price.

It is quiet so you won’t disturb neighbors and hearing protection is not required.

All in all, the Ryobi 40V mower is recommended. I would rank it a solid 9 on a 0-10 scale. It cuts just as well as any other mower I have owned and I estimate that I have saved at least $120 in gas costs so far. In time the mower should pay for itself.


Looking for more great content? Visit our partner sites:

The Green Frugal

Running Across Texas


As Featured On Ezine Articles

I offer article and blog-writing services. Interested? Hire Me!


Did you find this article helpful? Thanks for supporting this free site with a small donation!


Visit Kelly’s profile on Pinterest.


About the author:

Photo of Kelly R. SmithKelly was a commercial carpenter for 20 years before returning to night school at the University of Houston where he earned a Bachelor’s Degree in Computer Science. After working at NASA for a few years, he went on to develop software for the transportation and financial and energy trading industries. He has been writing, in one capacity or another, since he could hold a pencil. As a freelance writer now, he specializes in producing articles and blog content for a variety of clients. His personal blog is at I Can Fix Up My Home Blog where he muses on many different topics.

close

Enjoy this blog? Please spread the word :)

RSS
Follow by Email
Twitter
Follow Me
Tweet
Pinterest
Pinterest
Pinterest
Instagram
LinkedIn
Share