Ads we feature have been independently selected and reviewed. If you make a purchase using the links included, we may earn a commission, which helps support the site. Thank you for your support.
Laminate flooring has become the flooring material of choice for many homeowners in the past several years. There are many good reasons for this. Notably, it needs very little maintenance (unlike having to remove carpet stains), it is incredibly durable, and it comes in a vast array of colors/styles.
Since being introduced to the US back in 1982, laminate flooring sales have seen a growth of up to twenty per cent per year. This article is a step by step guide on how to install laminate flooring and underlayment in your home.
Whatever you do, don’t buy cheap planks, but do look for a laminate flooring sale; wait for one if you can. Look for a brand name like Bruce, Armstrong, Pergo, Quickstep, or Mannington. Not a good time to buy cheap knock-off brands.
Likewise, when purchasing underlayment, go for quality. Buy a thicker type with the vapor barrier attached (whether you think you need a barrier or not, I say always hedge your bets). Some manufacturers recommend 3 in 1 underlayment. Regardless, ask about the acoustical qualities. Quiet Walk and Whisper Walk are both excellent brands. I used Quiet Walk in my home.
Determine Square Footage
In order to know how much laminate flooring and underlayment pad to buy you’ll need the square footage. To get this simply measure the area’s footage right to left and then forward and back. Multiply those figures together and that is your square footage.
It’s prudent to add at least 10% to that figure to allow for scraps. It is also a good idea to buy extra and stash it somewhere for unanticipated repairs down the road.
Prepare Your Floor
If you’ve got another type of flooring, this is the time to get rid of it. Pull up your old carpet and padding. Remove all of the tack strips around the room’s perimeter. You may need to scrape the floor to get rid of any padding sticking to it.
Vacuum the floor well. Don’t attempt to sweep if you pulled up carpet and padding; a dust cloud will ensue. If there are any noticeable dips, level them out. On a concrete slab, thinset may be skimmed on it.
On a plywood or OSB subfloor, use a non-shrinking wood putty.
Baseboard and Door Jambs
Remove the baseboards. You may be able to save these if you’re careful. Waste not, want not. Now use the coping saw or flush-cut saw to cut off the bottoms of door jambs, case openings, etc. This will probably be 1/4” to 3/8” dependent on the combined thickness of the floor planks and underlayment pad.
Time to Install the Underlayment and Laminate Flooring!
The first thing to do is roll out the underlayment pad with the vapor barrier faced up. Connect the pieces together with wide, clear, plastic tape. Some scrapping-in is OK as long as you are generous with the clear tape.
Laminate flooring is a type of “floating floor”, meaning that it is all connected to itself but not secured to the subfloor. With this in mind, leave 1/4” clearance at each wall. On the initial wall where you start, using spacers that you can pull out before installing the baseboards is handy. The reason for floating is to allow for expansion and contraction.
Getting Started and Running With It!
In some cases, starting with a full-width plank on one wall works. But a better approach is to find the center of the room and work back so that you get even borders. If your primary visual point in the room is a doorway, which is the visual focal point, of course this is where you want equal borders and then the chips fall where they may. How your laminate planks connect depends on the brand you buy but they are all rather simple; most simply snap together. Remember to stagger the joints.
Laminate Installation Tips the Instructions Wont Tell You
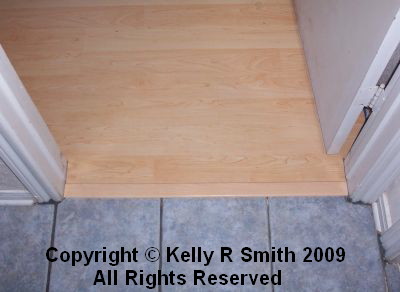
Things will get tricky as you go through doorways; the manufacturer’s instructions most likely won’t tell you about this because it impedes sales to DIY’ers. Here I've compiled some tips they don't mention: laminate flooring FAQ.
In some circumstances you will find yourself in a tight spot and the best solution is to use your utility knife to trim the snapping connections on the adjoining planks so that they can slide together. In this case, use a few drops of wood glue to keep them together.
Finishing up — Install the Baseboards
Once you’re done with installing the laminate flooring planks you can get on your baseboards. If you’ve been careful with the removal you can reuse them. Otherwise, decide on which type of baseboard you want to install.
Keep in mind; only nail into the framing bottom plate and studs. Keep your planks floating! Do you have any floating laminate floor installation tips I haven’t mentioned in this article? Share them in the comment section below!
Did you find this article helpful? Millions of readers rely on information on this site and our blog to stay informed and find meaningful solutions. Please chip in as little as $3 to keep this site free for all.
About the Author:
Kelly R. Smith is an Air Force veteran and was a commercial carpenter for 20 years before returning to night school at the University of Houston where he earned a Bachelor’s Degree in Computer Science. After working at NASA for a few years, he went on to develop software for the transportation, financial, and energy-trading industries. He has been writing, in one capacity or another, since he could hold a pencil. As a freelance writer now, he specializes in producing articles and blog content for a variety of clients. His personal blog is at Considered Opinions Blog where he muses on many different topics.
Do you need an article or blog post written? I offer these services at reasonable rates. Contact me for a quote!