11 Types of Woodworking Joints

Carpentry Joinery for Strength and Aesthetic Appeal
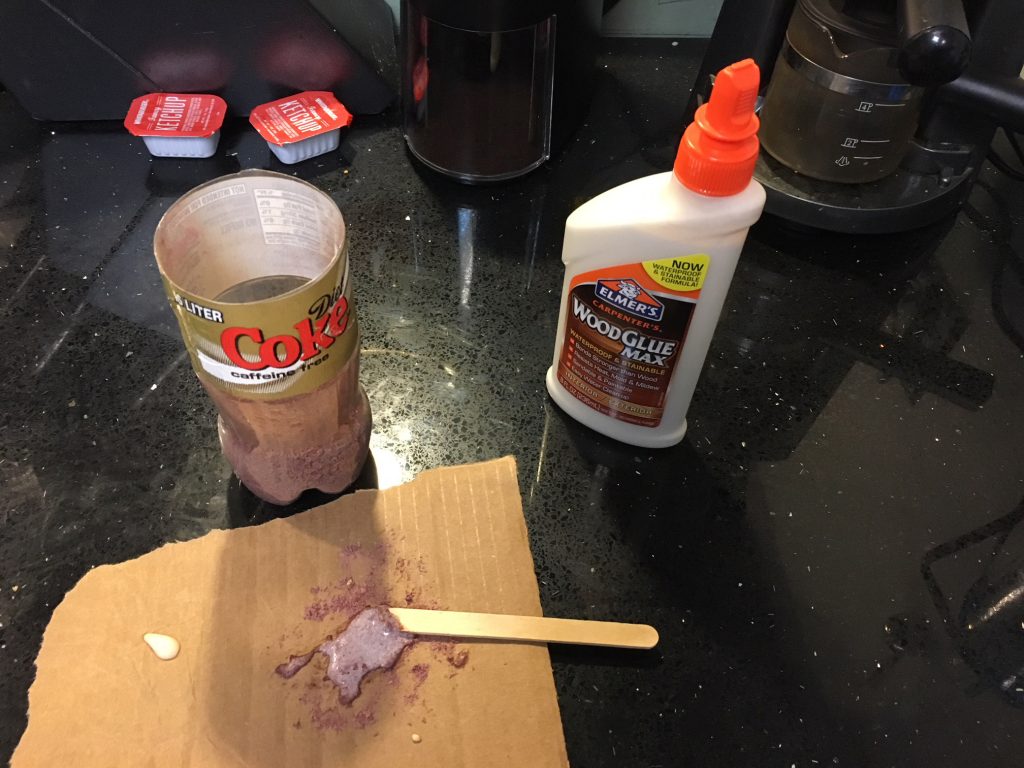
Photo of Kelly R. Smith   by Kelly R. Smith

Homemade woodworking putty
index sitemap advanced

Ads we feature have been independently selected and reviewed. If you make a purchase using the links included, we may earn a commission, which helps support the site. Thank you for your support.

There are many types of woodworking joints to choose from. Which to use on your current carpentry project? In my opinion, there are three main considerations.

  • Joint strength is the most important. Some things you build will be more subject to wear and tear than others.
  • Do you have the right shop tools and skills? Some joints, like the dovetail joint, can be made with a jig or with hand tools. Skills? You can always learn them.
  • Aesthetics, or the beauty of a particular joint should be considered after you have satisfied the first to points.

Types of Woodworking Joints

  • Pocket Hole Joinery. This is basically a butt joint with pocket hole screws.; it’s very popular for furniture building and repair. Two drilling steps are called for. First, counterbore the pocket hole itself. This is where the screw head is contained. Second, drill a pilot hole so the centerline is the same as the pocket hole. This allows the screw to go through one piece and into the adjoining piece. You use two different sized drill bits for this operation in most cases although step-bits are sometimes used. Kreg is the most popular brand of jig for this joint.
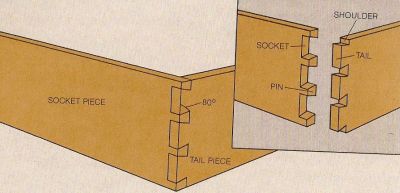
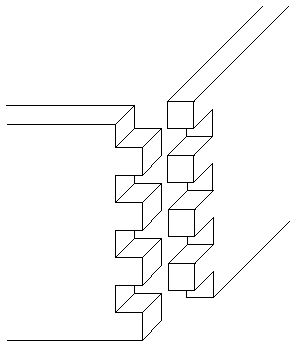
A dovetail joint
A dovetail joint

  • Dovetail Joint. This is a very strong woodworking joint. It’s known for tensile strength (resistance from pulling apart). The woodworking dovetail joint is often used to connect the sides of a drawer to the front. A number of pins are cut to extend from the end of one board and lock with a number of tails cut into the end of another board. These pins tails have a trapezoidal shape and can be cut by hand or with a jig. I use a Porter Cable dovetail jig. Once glued up, your joint is permanent without any mechanical fasteners. See the video below where I show you how to make glue that matches your project wood perfectly.
How to make homemade wood putty
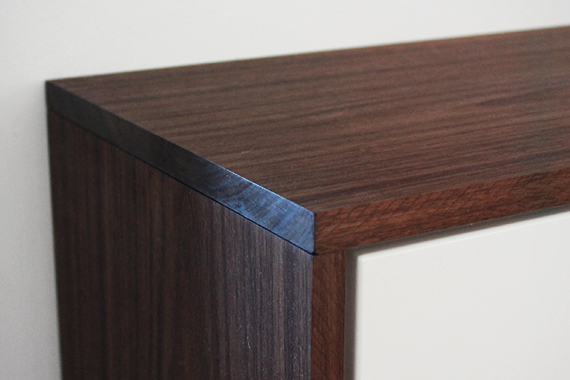
A woodworking butt joint
  • Butt Joint. The Butt Joint is a simple woodworking joint. It joins two pieces of stock by just butting them together. The butt joint is the simplest joint to make so in that respect it might be the correct choice if you don’t have many tools at your disposal. It is also the weakest wood joint unless you use some form of reinforcement (like dowels, which can add a decorative touch). Otherwise, it depends upon glue alone to hold it together. Because of the orientation of the pieces, you have an end grain to long grain gluing surface. The resulting wood joint is weak, as you might expect because glue alone doesn’t provide much lateral strength.
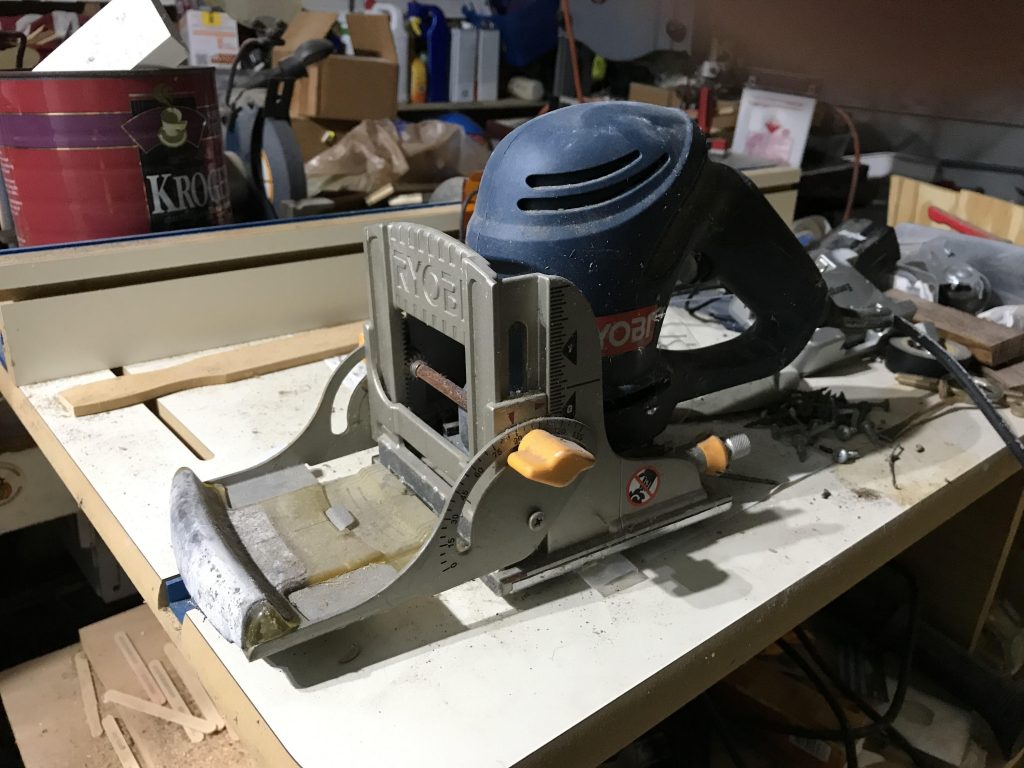
  • Biscuit Joint. A biscuit joint is nothing more than a reinforced Butt joint. The biscuit is an oval-shaped piece. Typically, a biscuit is made of dried and compressed wood, such as beech. You install it in matching mortises in both pieces of the wood joint. Most people use a biscuit joiner to make the mortises. Accuracy is important for the mortises. You design the biscuit joint to allow flexibility in glue-up.
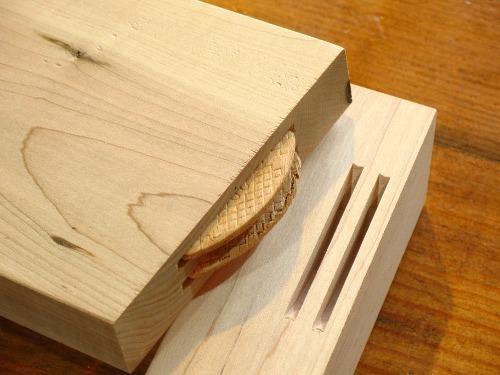
A double biscuit joint ready for glue-up
Biscuit joiner for woodworking
  • Bridle Joint. This is similar to a mortise and tenon; just cut a tenon on the end of one piece and a mortise into the other piece to receive it. Cut the tenon and the mortise to the full width of the tenon piece. The result is only three gluing surfaces so it is imperative to use a very high-quality woodworking glue. A mechanical fastener or some sort of through-pin is required.
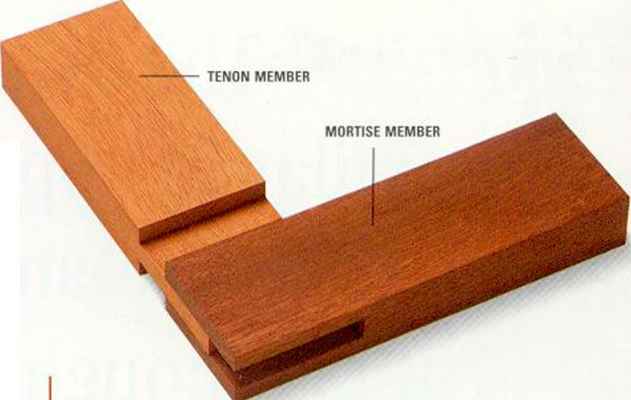
A bridal joint
A bridal joint
Finger joint or box joint
  • Finger or Box Joint. This one is much like a dovetail joint except that the pins are square and not angled. It is easy to make if you know how to use a table saw or a wood router with a jig. The Porter Cable 4216 12″ Deluxe Dovetail Jig Combination Kit comes with a box joint template. This finger/box joint was invented as a better way to construct simple boxes for produce from field to market. That, my friends, is capitalist ingenuity in action.
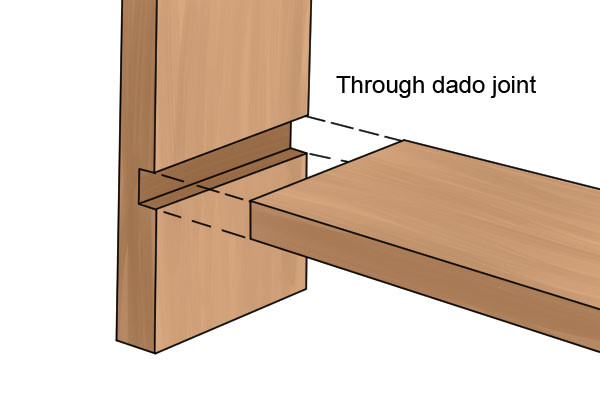
A dado joint
A dado joint
  • Dado Joint. OK, funny name but a dado is simply a slot cut into the surface of a piece of wood. When seen in a cross-section, the dado has three distinct sides. Cut a dado perpendicular to the grain of the wood. Technically, it’s different from a groove, which is cut parallel to the grain. This joint is a good choice for bookcase shelves.
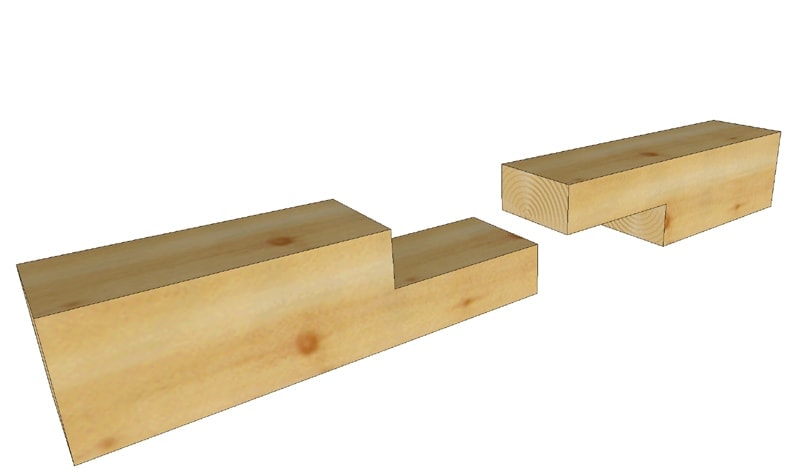
A typical lap joint
A typical lap joint
  • Half Lap Joint. With the half lap joint, remove material from each piece such that the finished joint results in the thickness of the thickest piece. But in the majority of half lap joints, both pieces are of the same thickness. Just remove half the thickness of each piece.
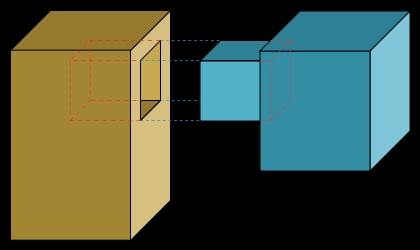
A mortise and tenon joint
  • Mortise and Tenon Joint. This is a very strong woodworking joint. In the majority of situations its used to join two pieces at a 90° angle. One end of a piece fits into a square hole in the other piece. The end of the first piece is the tenon; the hole in the second piece is the mortise. The tenon is glued in but if you require additional strength, you can also pin it. This is sometimes done for decorative reasons. It is a generally accepted practice to make the tenon about a 1/3 the thickness of the piece. The mortise can be cut by removing as much wood as possible with a plunge router then cleaning up the edges with a chisel.
A rabbet joint
A rabbet joint
  • Rabbet Joint. This a recess that’s cut into the edge of a board. Seen in a cross-section, the rabbet is two-sided and open to the end of the surface. It can be used in the back edge of a cabinet to allow the back to fit flush with the sides. It can also be used to insertion of a glass pane in a picture frame.
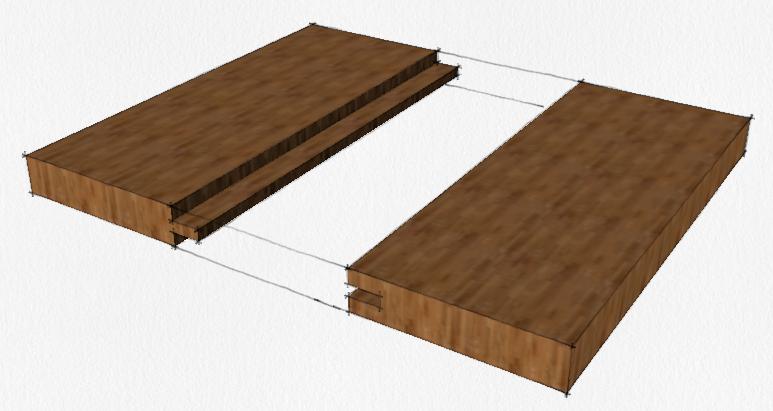
Tongue and groove joint
  • Tongue and Groove Joint. This is another very strong joint because of all the open grain on both pieces of wood. It’s used in many applications. For example, to make wide tabletops out of solid wood. Other uses include wood flooring, parquetry, paneling, etc. You can cut the tongue and groove in a number of ways. An effective way to make this joint is on a router table.

Knowing these 11 types of woodworking joints, you’ll most likely find one or more to fit the needs of your woodworking project.

Related Content


Looking for more great content? Visit our main page or partner sites:

I Can Fix Up My Home

The Green Frugal

Running Across Texas


As Featured On Ezine Articles

I offer article and blog-writing services. Interested? Contact me for a quote!


Did you find this article helpful? Millions of readers rely on information on this blog and our main site to stay informed and find meaningful solutions. Please chip in as little as $3 to keep this site free for all.


Visit Kelly’s profile on Pinterest.

About the Author:

Photo of Kelly R. SmithKelly R. Smith is an Air Force veteran and was a commercial carpenter for 20 years before returning to night school at the University of Houston where he earned a Bachelor’s Degree in Computer Science. After working at NASA for a few years, he went on to develop software for the transportation, financial, and energy-trading industries. He has been writing, in one capacity or another, since he could hold a pencil. As a freelance writer now, he specializes in producing articles and blog content for a variety of clients. His personal blog is at Considered Opinions Blog where he muses on many different topics.

Repair a Sink Faucet

How to Replace Faucet Cartridges, Washers, O-Rings, and Diaphragms

Photo of Kelly R. Smith   by Kelly R. Smith

A pedestal sink with typical faucet
index sitemap advanced

Ads we feature have been independently selected and reviewed. If you make a purchase using the links included, we may earn a commission, which helps support the site. Thank you for your support.

Sink faucets are found in laundry rooms, kitchens, bathrooms, and elsewhere. Because they’re just there, they usually aren’t given a thought until they fail. Some say that indoor running water is the single most impressive event that altered domestic society resulting in our present state of comfort.

In all homes, sink faucets, like toilets, will eventually fail. When this happens to you, first determine what kind of faucet you need to repair and replace cartridges, washers, O-rings, and diaphragms. This is why you should keep all documentation that comes with any appliance or part.

Faucets are an essential and fundamental part of our homes as well as businesses and the hotel industry. But when things do go south, as we know they will, the primary concept to understand is that there are a wide array of sink faucets available. Without identifying the faucet manufacturer and model, repairing a sink faucet is impossible.


Repairing Different Types of Faucets

Compression Faucets — This type is always doubled handled; look for this first in your identification process. These are fairly simple, while still functional and reliable; an internal washer raises to allow the water to flow. For this reason, they are also called washer-type faucets or stem faucets.

  • Repair tip: For a dripping spout, replace your stem washer.
  • Repair tip: For a leaking handle, replace your stem-packing and/or O-ring.

Diaphragm Faucets — These are also double handled.

  • Repair tip: If only your handle is leaking, replace your O-ring.
  • Repair tip: If your handle and spout are leaking, replace your diaphragm.

Disc Faucets — This type may have either one or two handles. It uses a pair of plastic or ceramic discs that regulates both the temperature and volume of water that reaches you, the customer.

  • Repair tip: When it begins to act up, replace the seals and ensure that your inlet ports are unclogged. The discs themselves are sturdy, so rarely an issue.

Rotating Ball Faucets — Now we’re dealing with one that is always a single-handled faucet. It gets the name because of the design of a slotted plastic or brass ball that perches on top of a spring-loaded plastic seat. The handle causes the ball to rotate; this is what adjusts your temperature as well as your flow volume.

  • Repair tip: If your handle is leaking, replace your O-rings and adjusting your adjusting ring. If the spout and handle are leaking, replace your diaphragm.
  • Repair tip: If only your spout is leaking, replace your springs and seats as a set.

Cartridge Faucets — This model is a single lever faucet; it utilizes a cartridge that controls your water flow.

  • Repair tip: Because of its simplicity, repair is easy. First try replacing your O-rings. If it is still acting up, change your cartridge. Always take the old one to the plumbing store to make sure you come home with the correct replacement.

Tools and Materials for Plumbing Repair

  • Slip-joint pliers. Two are better than one for many plumbing projects.
  • Teflon tape. Use either the paste or the tape; I find the tape easier to work with.
  • Screwdrivers. Keep an assortment on hand, as we all should.
  • Rags and a small plastic bucket. Because spills are going to happen.
  • A set of nut-drivers. Many plumbing applications use automotive style connections.


There’s your basics on repairing bathroom or kitchen sink faucets. The main frustration I find is that there so many brands and models that you will often have to do a disassembly before trekking to Home Depot or Lowes or ordering from Further Reading


Looking for more great content? Visit our main page or partner sites:

I Can Fix Up My Home

The Green Frugal

Running Across Texas


As Featured On Ezine Articles

I offer article and blog-writing services. Interested? Contact me for a quote!


Did you find this article helpful? Millions of readers rely on information on this blog and our main site to stay informed and find meaningful solutions. Please chip in as little as $3 to keep this site free for all.


Visit Kelly’s profile on Pinterest.

About the Author:

Photo of Kelly R. SmithKelly R. Smith is an Air Force veteran and was a commercial carpenter for 20 years before returning to night school at the University of Houston where he earned a Bachelor’s Degree in Computer Science. After working at NASA for a few years, he went on to develop software for the transportation, financial, and energy-trading industries. He has been writing, in one capacity or another, since he could hold a pencil. As a freelance writer now, he specializes in producing articles and blog content for a variety of clients. His personal blog is at Considered Opinions Blog where he muses on many different topics.

Woodworking Design: Estimating Lumber

A Material List (Cut List) Tells You the Material You Need; This is How to Buy It

Photo of Kelly R. Smith   by Kelly R. Smith

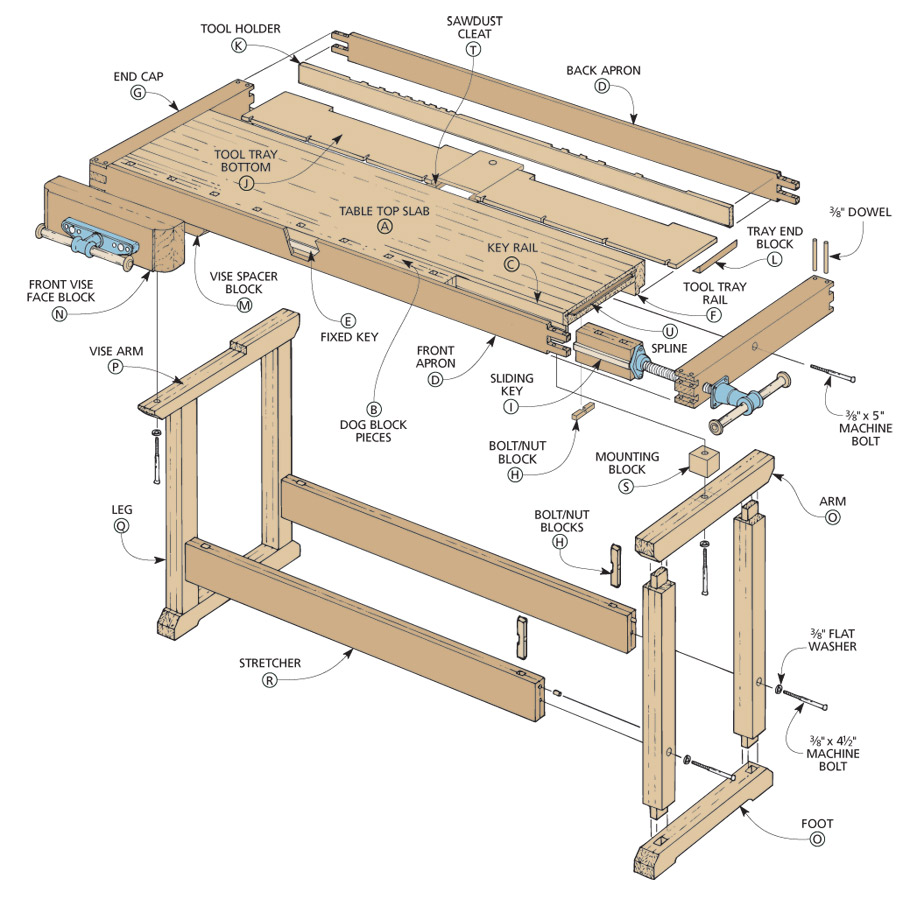
A woodworking project plan for a table
index sitemap advanced

Ads we feature have been independently selected and reviewed. If you make a purchase using the links included, we may earn a commission, which helps support the site. Thank you for your support.

So you’ve conceptualized your next woodworking project and it’s time to plan. Most woodworkers go one of two ways, depending on the situation:

  • You are working from a cut list from a plan that you acquired from a woodworking project book or magazine.
  • You are making a custom project and it makes more sense to ferret out your dimensions as you go along. This was the case with my recessed medicine cabinet project. Since every home and bathroom is framed differently, it was insightful to go long on the instructive photos and short on actual dimensions when posting the plans.

Understanding Lumber Grades

Are you a frugal and common sense woodworker? I hope so; the money you can save on one part of your project (usually the unseen parts) can be used to great effect of the decorative parts. That being said, I abhor particle board in furniture construction. Chinese knock-off furniture, we ain’t.

Knowing lumber grades, and shopping accordingly, will stretch your budget and ensure that you work with the appropriate materials. The lumber grades are defined by the National Hardwood Lumber Association, and have been for over 100 years.

Step one, of course, is choosing the appropriate grade. Step two is checking for bark pockets, splitting, checking, bug damage, warping, and more. Take the time to pick through the stock. Don’t take the mis-step of ordering online, going to your Home Depot or Lowes and just let them load it up for you. COVID-19 pandemic or not, this is a hands-on job.


Understanding Lumber Dimensions

Dimension lumber (2 x 4s, 4 x 4s, etc.) is usually softwood stock. Hardwood lumber is at times milled to dimensional sizes, however it is more commonly encountered in random widths and lengths. It is marketed as roughsawn lumber and in variable surfacing options accompanied by these letter and number codes:

  • S2S: Surfaced on two sides.
  • S3S: Surfaced on two sides with one straight-line ripped.
  • S4S: Surfaced on four sides, meaning that the two wide faces are planed and the two edges have been straight-line ripped.
Lumber thickness guide


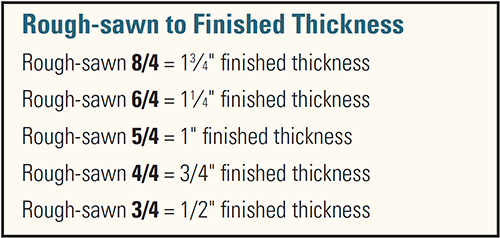
Rough lumber is sold in multiples of 1/4″ thicknesses. This means that 4/4 lumber (read as four-quarter lumber) is one inch thick. You will also encounter 5/4, 6/4, and 8/4 thicknesses. Regardless, with any rough lumber thickness, the rule of thumb is to subtract 1/4″ to determine the “finished” lumber thickness following the surfacing procedure.

Calculating lumber board feet

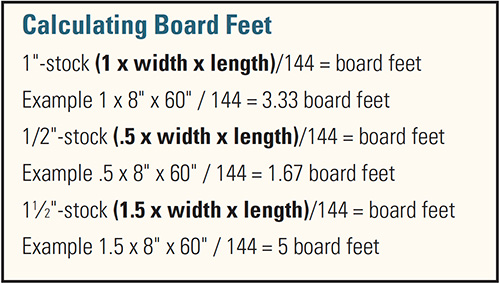
Lumber stock is generally offered by the board foot (BF), which is actually a volume measurement. Think of it this way — one board foot of lumber is 1″ thick, 12″ wide, and 12″ long (essentially 144 square inches of 1″-thick lumber). So a 1″-thick board, 6″ wide and 36″ long would be 1.5 board feet of stock. The formula for determining the BF of a specific piece is: (Thickness x Width x Length)/144; QED. See the formula chart above for examples of calculating BF. Note: 3/4″ surfaced lumber is considered 1″ when calculating board feet because it is originally derived from 4/4 rough-sawn lumber. Confused yet? Don’t be.

Buying Lumber

Calculating just how many board feet of lumber you need for any given project is only your first step. Next, you will need to peruse your material list for pieces that have specific length requirements. As an example, if you have coffee table legs that need to be 14″ long or 90″ long bed rails, you should select stock long enough to make those components. Then an excellent guideline is to add 20 to 30 percent more to your estimate for waste (defects, poor grain pattern, building mistakes, etc.). So if your project requires 10BF, procure 13BF instead. Buying a bit of extra lumber is always a good idea, and experience will prove the truth of it. Keep in mind that at times you will need to resort to your biscuit joiner to save the expense of ordering a special width of lumber.

Following these lumber estimating guidelines for your woodworking projects will save you time, money, and extra trips to the lumber yard or local home improvement store.

Further Reading


Looking for more great content? Visit our main page or partner sites:

I Can Fix Up My Home

The Green Frugal

Running Across Texas


As Featured On Ezine Articles

I offer article and blog-writing services. Interested? Hire Me!


Did you find this article helpful? Millions of readers rely on information on this blog and our main site to stay informed and find meaningful solutions. Please chip in as little as $3 to keep this site free for all.


Visit Kelly’s profile on Pinterest.

About the Author:

Photo of Kelly R. SmithKelly R. Smith is an Air Force veteran and was a commercial carpenter for 20 years before returning to night school at the University of Houston where he earned a Bachelor’s Degree in Computer Science. After working at NASA for a few years, he went on to develop software for the transportation, financial, and energy-trading industries. He has been writing, in one capacity or another, since he could hold a pencil. As a freelance writer now, he specializes in producing articles and blog content for a variety of clients. His personal blog is at I Can Fix Up My Home Blog where he muses on many different topics.

Valentine’s Day Outdoor Space Ideas

Romantic Gestures That Keep on Giving (Unlike Cut Flowers)


Photo of Kelly R. Smith   by Kelly R. Smith
Lilies blooming in the flower bed
index sitemap advanced

This post was updated on 01/19/22.

Ads we feature have been independently selected and reviewed. If you make a purchase using the links included, we may earn a commission, which helps support the site.

Valentine’s Day is a perfect example of a holiday that inspires us to redesign spaces inside and outside our homes. Designing an outdoor space for a Valentine’s Day gift or parties and celebrations can be a lasting surprise for someone that you care about pleasing. Many gardeners remind us that Valentine’s Day is the time to trim our rose bushes so that choice makes perfect sense.

Any climate-appropriate plants are a great way to improve the look of your yard, flower bed, garden, or outdoor living space. Here are a few plant, seating, and lighting ideas that can help you design the space of your dreams at this time of year when nature is just busting out. Just think of it as the opportunity to tackle that list of new year’s DIY projects!

Choosing the Perfect Flower

Almost every woman that I’ve ever met loves to get flowers on Valentine’s Day, and some would far rather receive something living that will bloom on more than just that one day. After all, why limit yourself to a wilting bouquet when you can have cut flowers on a regular basis?


Many of us don’t mind caring for the flower or floral arrangement minimally, either, especially during the mild spring and fall months. Annuals, such as the coriopsis below, are very hardy and come back year after year once established. Our bird friends help to distribute the thistle seeds so keep those bird feeders full.

Coriopsis flowers in full bloom

It goes without saying that the perfect flower species should be designed to suit your climate, sunlight requirements, and of course, soil conditions. If you are unsure of this type of information, talk to someone in a garden center, nursery, or plant retailer for more details. If your community is lucky enough to have a Master Gardener group, they are very knowledgeable about local plants and are generally very free with their information. Most even conduct indigenous plant and tree sales in the spring.

One useful tip is to find out her favorite color, and keep in mind how much time and energy will need to be devoted to caring for the plant. Design your outdoor Valentine’s Day surprise with this basic information in mind, so that you can be sure that your significant other will appreciate what you have created.

Find accents and accessories for the space in the favorite color if you cannot find in-season plants that are blooming for this special occasion, such as lighting, flags, decorations, water features (ponds, fountains), and similar items designed for outdoor use. These all are animal-friendly and count towards your nature-conservation efforts.

Choosing Outdoor Seating Arrangements

If the space is large enough, why not consider adding seating to your outdoor space to create the romantic environment this day is known for inspiring.

A great garden bench is a wonderful idea, so that two can sit comfortably, but be sure that any seating arrangement you choose is intended for use outdoors, including fabric choices. Marketing claims are not always what they seem. If you have a homeowners association, check to ensure that your project falls under their (often unreasonable) guidelines. A garden bench with storage such as the one shown below, doubles as a spot to keep your gardening tools.

High-quality and functional furniture will ensure that your gift lasts much longer, and the durable and beautiful addition will add monetary and aesthetic value to your home. We can’t say enough about home equity, can we?

Your seating needs to strike a balance; make it comfortable without presenting health risks. Select fabrics that are specifically designed and treated for outdoor use, so that the fabric does not mildew or mold after the first hint of condensation or dew.


Choosing Exterior Lighting

You may or may not be spending a significant amount of time in your space outdoors after the sun sets, but adding exterior lighting changes that parameter and gives you that opportunity should you desire to sit, entertain, and relax after the sun has gone down. A simple lantern, LED spotlight, or a couple of Tiki torches for the space is ideal for most arrangements.

The right combination and choice of illumination will add that perfect touch of light for a romantic rendezvous, this Valentine’s Day and into the foreseeable future. Certain lighting resembles candlelight, which is the most popular lighting for romance, so you can’t go wrong with a hint of light that doesn’t cost you an abundance of time, energy, or money to purchase or install.

Finally, if you really want to go big when you consider Valentine’s Day outdoor space ideas, think about a relaxing backyard deck. Springtime and income tax returns are coming; hint, hint.


Did you find this article helpful? Millions of readers rely on information on this blog and our main site to stay informed and find meaningful solutions. Please chip in as little as $3 to keep this site free for all.


Visit Kelly’s profile on Pinterest.

About the Author:

Photo of Kelly R. SmithKelly R. Smith is an Air Force veteran and was a commercial carpenter for 20 years before returning to night school at the University of Houston where he earned a Bachelor’s Degree in Computer Science. After working at NASA for a few years, he went on to develop software for the transportation, financial, and energy-trading industries. He has been writing, in one capacity or another, since he could hold a pencil. As a freelance writer now, he specializes in producing articles and blog content for a variety of clients. His personal blog is at Considered Opinions Blog where he muses on many different topics.

Build a Bay Window Seat with Storage

Take Advantage of That Breakfast Nook or Kitchen Window

Photo of Kelly R. Smith   by Kelly R. Smith
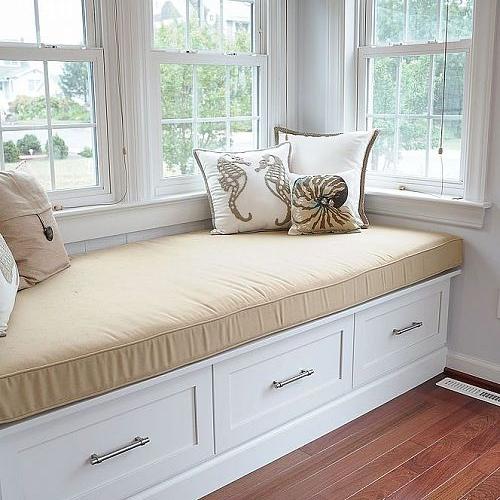
A bay window seat with storage drawers
index sitemap advanced

Ads we feature have been independently selected and reviewed. If you make a purchase using the links included, we may earn commission, which helps support the site.

A bay window seat, with or without cushions, can function as storage space, bookshelves, and a place to relax while enjoying a view of nature and landscaping.

One thing that most homes have in common is a lack of storage units. And oftentimes, the space in front of windows is under-utilized. Why not kill two birds with one stone and install an attractive bay window seat that doubles as storage space?

Designing the Window Seat

It’s a given that the dimensions of the window are not going to change, so that’s a good starting point. The seat shouldn’t be any higher than the bottom of the window; that would be impracticable. The one variable is the bottom strip of window trim or casing. The seat can come up to the bottom of the trim or the trim can be removed to gain a couple more inches in height. Whichever route you take, be sure to winterize this area while you are working there.

On the other hand, if the window bottom is over 18 inches or so off the floor, the window will have no impact on the seat. 18 inches is an acceptable height for a seat, although going a few inches either way to allow for individual tastes is certainly an option. We are not one-size-fits-all, so to speak.

The basic design in most cases is simply a rectangular box, although V-shapes happen as well, with or without doors similar to the ones found on kitchen cabinets. For storage purposes, the two common styles are front access (kitchen cabinet style), and hinged top.

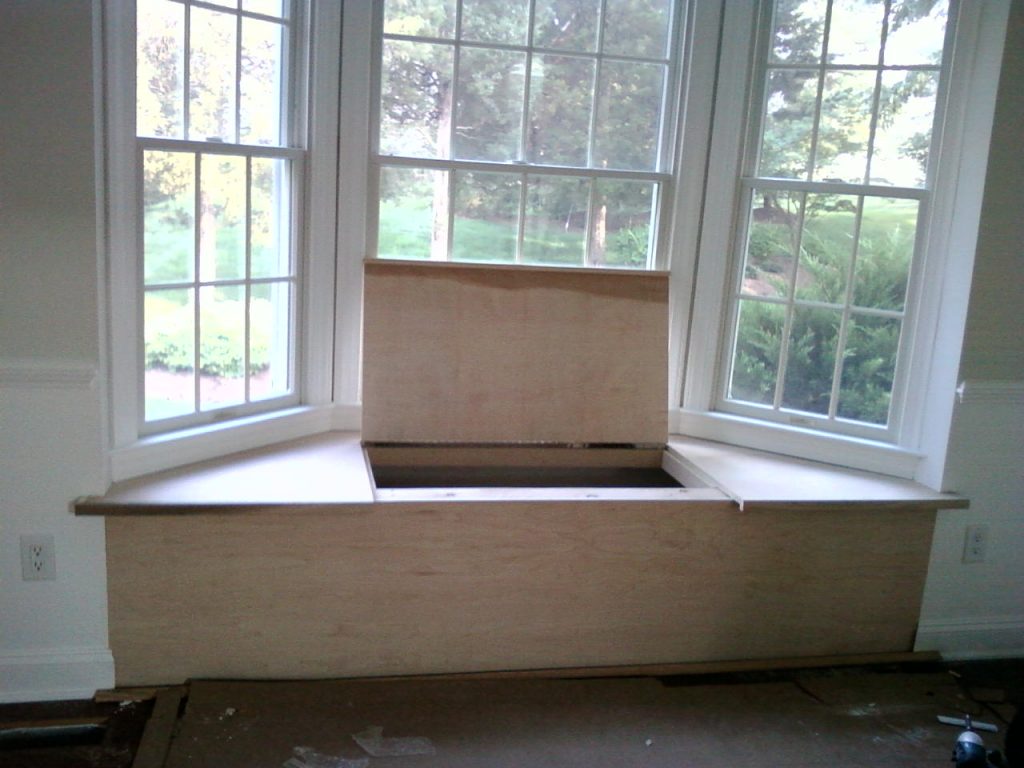
A bay window seat, with a hinged top, under construction

To take the green and sustainable building approach, just use salvaged cabinets if some are available that fit the space. This is a great time to learn about restoring vintage kitchen cabinets.

Hinged Seat Storage or Front Access

A hinged seat can work well for storing items that aren’t used on a regular basis. The issue is that by design, things are stacked on top of others. Think a hope chest or an old-style trunk. Another consideration is that extra material and woodworking hardware will be required. This includes hinges at a minimum.

Front access can be either an open design or closed with cabinet doors. An open design is the best way to go if the space is going to be used as a book case or for a knickknack display area as an alternative to alcove shelving.


Most loved on @amazonhome

If cabinet doors are installed and the window is in the kitchen, why not use the space for storing dishes, cookware, and small kitchen appliances?

Basic Window Seat Construction

As mentioned above, the structure is basically a box, or some sort of V-shape if that is what you are working with. The most basic way to build it is to construct a basic frame and sheath it with plywood that has a finished side. If the seat is to be attached to the wall, the top rear support is a ledger board screwed to the wood framing studs.

The baseboard should be cut away or removed and a framing member matching the ledger board should be attached to the wall at the floor. The remainder of the unit is to be build off these two framing members. Adequate bracing should be added to the seat area appropriate for the size of the seat. When deciding on the depth, allow a bit extra if the seat will be used for napping. See this article for more information on residential wood stud framing. Finally, add cushions or pillows and relax.

I hope this article on building a bay window seat with storage in your kitchen, breakfast nook, or another room has given you some good ideas for your own project. For more information please check out the articles listed below and check the search box at the top of this page.

More Articles to Enjoy


Did you find this article helpful? Millions of readers rely on information on this blog and our main site to stay informed and find meaningful solutions. Please chip in as little as $3 to keep this site free for all.


Visit Kelly’s profile on Pinterest.

About the Author:

Photo of Kelly R. SmithKelly R. Smith is an Air Force veteran and was a commercial carpenter for 20 years before returning to night school at the University of Houston where he earned a Bachelor’s Degree in Computer Science. After working at NASA for a few years, he went on to develop software for the transportation, financial, and energy-trading industries. He has been writing, in one capacity or another, since he could hold a pencil. As a freelance writer now, he specializes in producing articles and blog content for a variety of clients. His personal blog is at I Can Fix Up My Home Blog where he muses on many different topics.

Window Blind DIY Wand Replacement

Why Settle for Replacement Blind Components? Put Your Woodworking Skills to Work.

by Kelly R. Smith

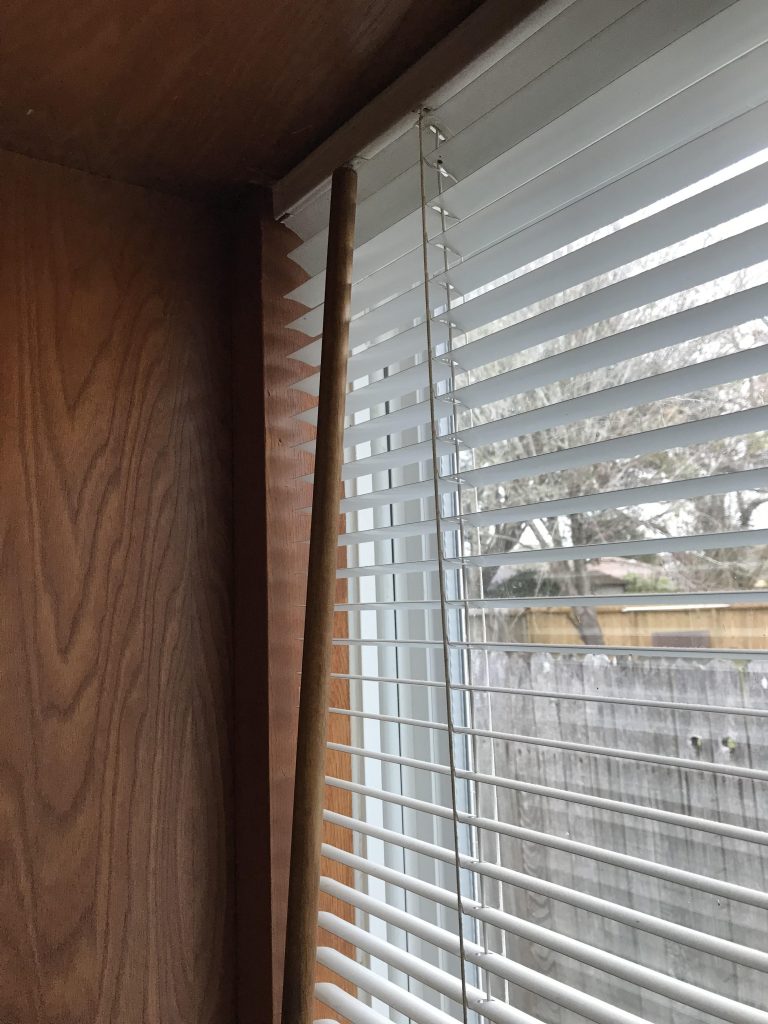
DIY Venetian blinds wand crafting and replacement
index sitemap advanced

Ads we feature have been independently selected and reviewed. If you make a purchase using the links included, we may earn commission, which helps support the site.

Things like window blind wands get a lot of use. Not rough use usually but they are usually made very cheaply and are bound to break at some point. You’ve got two choices. First and easiest is to buy a replacement blind wand. My preferred choice is to make my own. That way I know it is sturdy and I can match the finish to the window casing. So, consider this short tutorial just another woodworking tip.

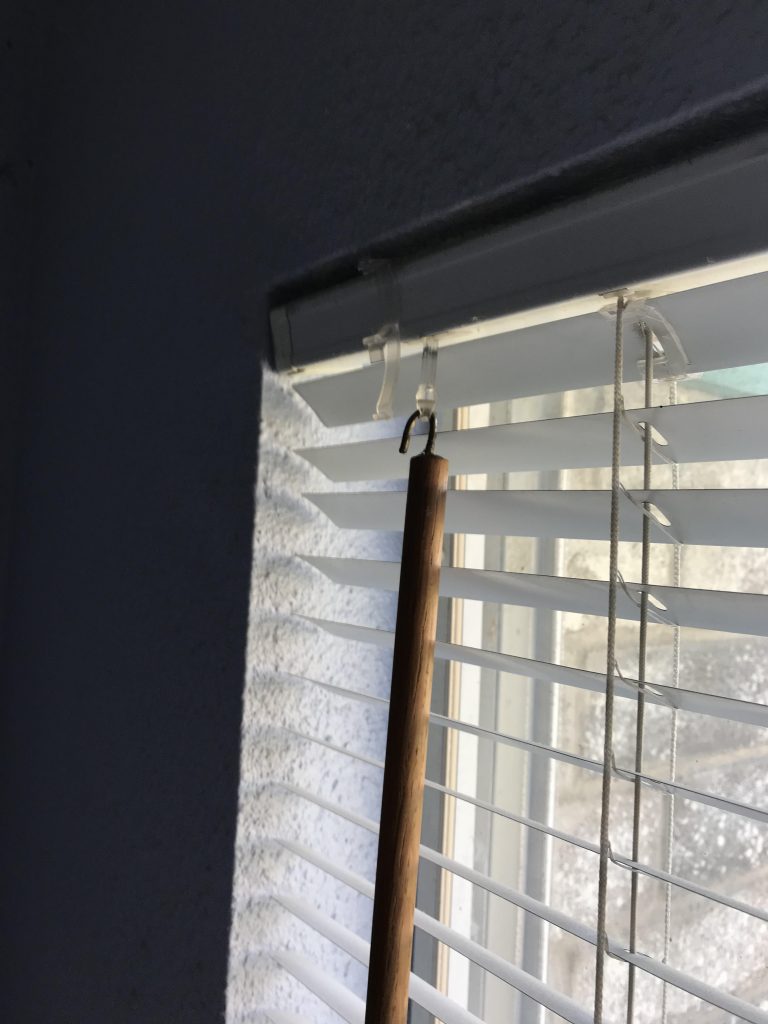
The wand usually connects to the blind assembly via a small plastic nub with a hole in it. The wand has a hook on the end that fits through the hole. I have worked two possible scenarios.

  • The plastic nub is intact.
  • The plastic nub broke.

Use a Wooden Dowel for the New Wand

Dowels are available in all hardware stores as far as I know. At Home Depot they are available in pine and oak, in various diameters. I usually go for the pine; it is cheaper and I’m going to stain it anyway. These dowels are smooth finished so all you need to do is cut it to your desired length and sand the ends and smooth out the sharp end edges.

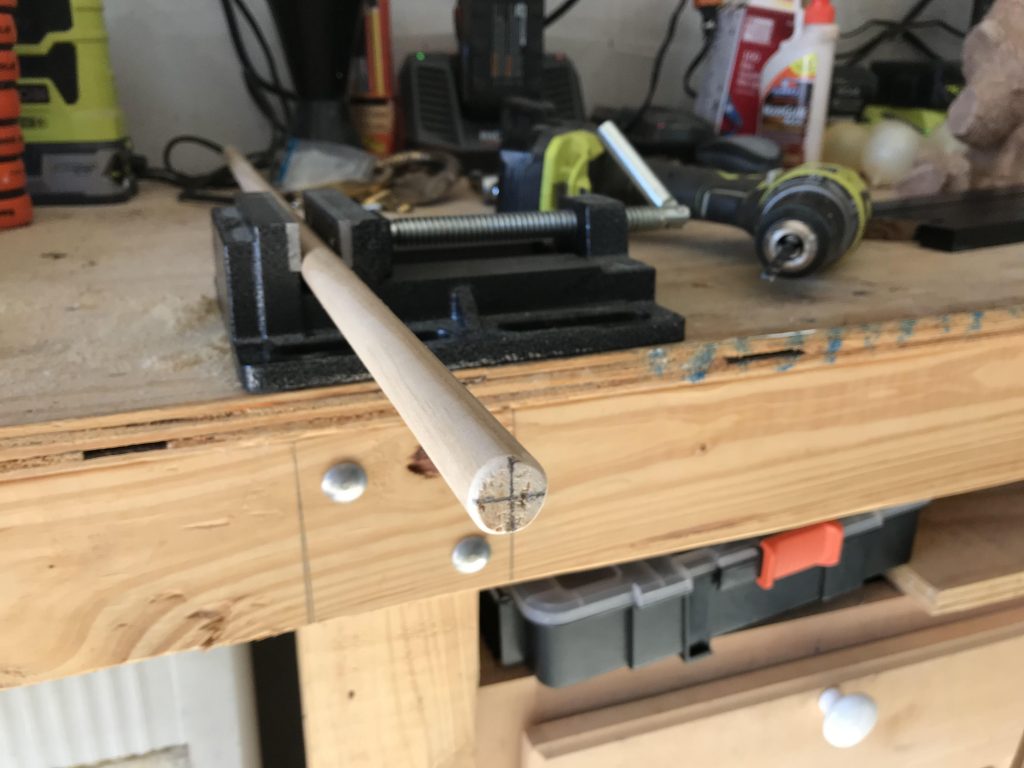
To work on the dowel, I use a Bessey drill press vise with a rag wrapped around the dowel so as not to mar it. The crosshairs on the end of the dowel are for drilling the connection hole.

Dowel in the Bessey drill press vise


Finishing and Attaching the Connector

When the plastic nub is intact, you just need a cup hook or simply make a hook out of wire (like a metal coat hanger) using needle-nosed pliers. If the plastic nub is broken off you will need to drill a hole in the end of the dowel and glue it into the nub. I used Locktite GO 2 Repair Xtreme. While the glue is setting up I kept everything together with a piece of electrical tape. This is why I didn’t use polyurethane Gorilla Grip glue; the foaming, expansive curing action would push things apart. Regular wood joinery techniques don’t really apply here.

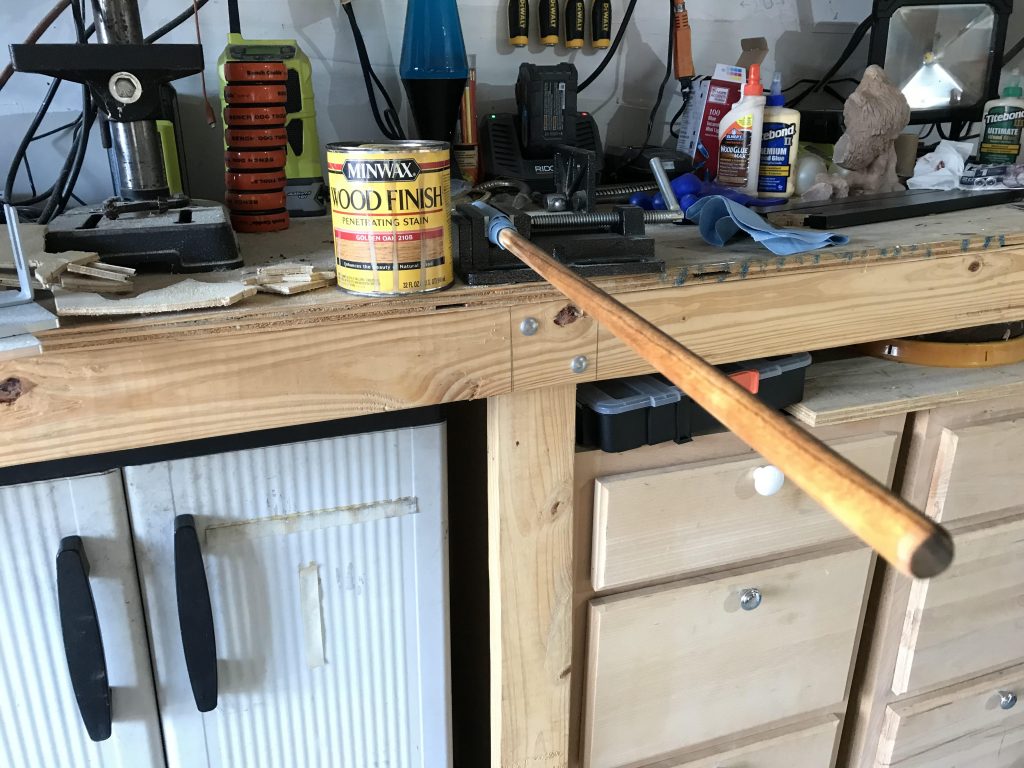
Use the finish of your choice. Here I used Minwax Penetrating Stain. Later, after a couple of days I’ll apply a high-quality furniture wax.

Finishing with Minwax Penetrating Stain


Blinds wand with a hook connector

That’s about all there is a window blind DIY wand replacement. It doesn’t even have to be broken. It is a good way to give your window dressing a custom look on a budget and a little spare time.

Others are Reading:


Did you find this article helpful? Millions of readers rely on information on this blog and our main site to stay informed and find meaningful solutions. Please chip in as little as $3 to keep this site free for all.


Visit Kelly’s profile on Pinterest.

About the Author:

Photo of Kelly R. SmithKelly R. Smith is an Air Force veteran and was a commercial carpenter for 20 years before returning to night school at the University of Houston where he earned a Bachelor’s Degree in Computer Science. After working at NASA for a few years, he went on to develop software for the transportation, financial, and energy-trading industries. He has been writing, in one capacity or another, since he could hold a pencil. As a freelance writer now, he specializes in producing articles and blog content for a variety of clients. His personal blog is at I Can Fix Up My Home Blog where he muses on many different topics.
My Workshop Tape Storage Hack

by Kelly R. Smith


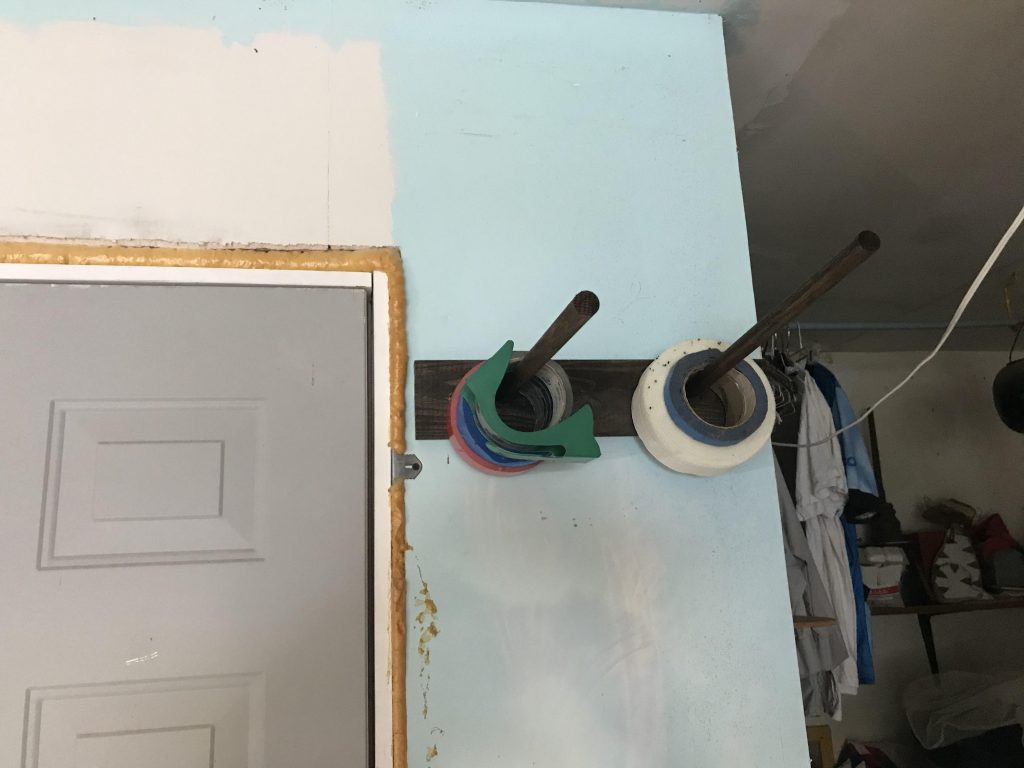
Workshop tape storage rack
index sitemap advanced

After Hurricane Harvey and the subsequent flood, I, like everybody else in my subdivision, faced rebuilding. As far as my wood shop goes, it was a blessing and a curse. I lost a lot of tools but, having erred on the side of caution, we had full flood insurance. As I re-built the shop I resolved to be more organized right from scratch.

It’s an ongoing process, isn’t it? Just last week I needed some duct tape so I began my search. I usually keep tape in it’s category area, e.g. electrical tape in the electrical drawer, drywall tape with the tape and float area, painter’s blue tape with the painting stuff.


But what about duct tape? I’m a proud owner of several types of tin snips but I certainly don’t have a “duct” area. I spent about 20 years as an acoustical ceiling installer so I worked with a lot of duct men but didn’t mess with it myself. As clumsy as I am, I’m not safe around sheet metal. So, I spent more time looking for that elusive roll than I did actually using it. Enough is enough. So I built that tape rack you see in the picture above. To build one of your own you will need:

  • 1 piece of 1″ X 4″ about 20″ long. Shorter won’t do or you won’t hit 2 studs when you install it.
  • 2 17″ lengths of 3/4″ dowel.
  • 2 long drywall screws (2″, coarse threads).
  • Glue.
  • Finish of your choice; I used stain; the board is pine but the dowels are oak and the results don’t have to be pretty but they should match in color. As a general rule I don’t stain oak, but…
  • 3/4″ hole saw.
  • Drill press or hand-held drill.
  • Cordless drill with a #2 Phillips screw tip.
  • Flush-cut saw. I love Japanese hand tools, don’t you?
  • Belt sander or sanding block.

Assembly

  1. Drill your holes. It doesn’t show very well in the picture above but I placed a chunk of scrap wood on one side of my drill press table so the holes would be at an angle, but this is optional.
  2. Glue the dowels into the holes. Since the holes are at an angle, a portion will be sticking out of the back.
  3. Let the glue dry overnight.
  4. Use a flush-cut saw to cut off the excess dowel, then clean it up with your belt sander.
  5. Pre-drill your screw holes on 16″ centers. I also hit the hole openings with a bigger drill bit for about 3/16″ so the screw heads end up flush with the surface of the wood.
  6. Add the finish of your choice and let it dry.
  7. Locate your studs and install.

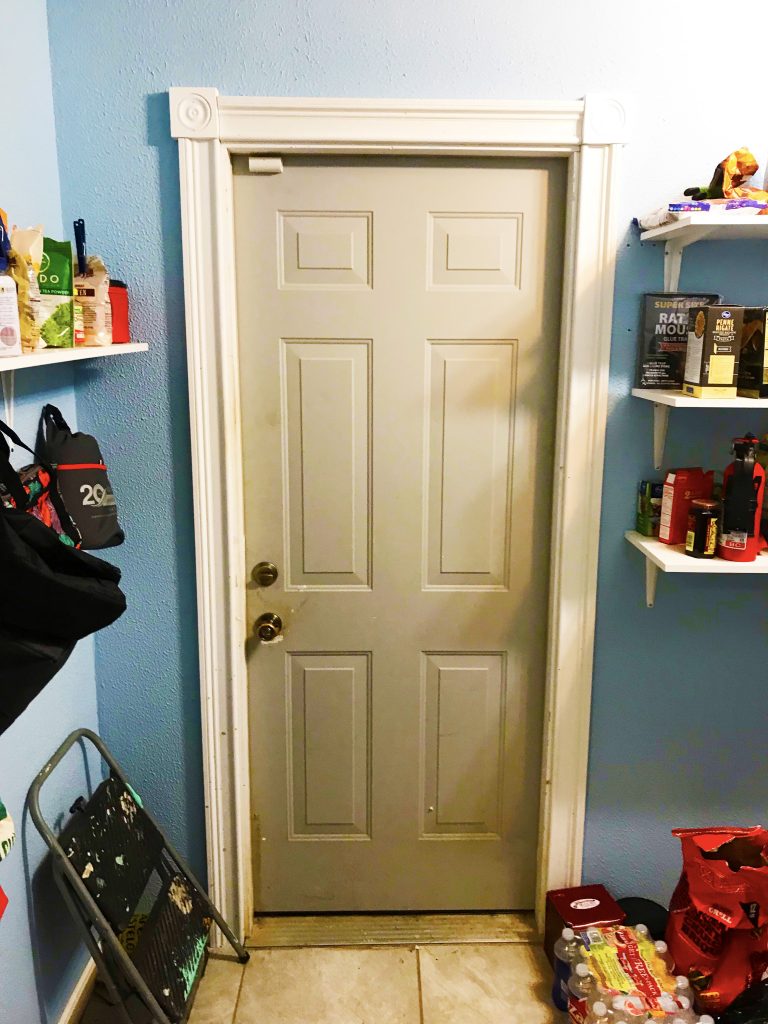
If you’re wondering about that wall I installed this tape rack on, it is the exterior of our food pantry that I build by “stealing” a bit of garage space. It never ceases to amaze me why the builders never included enough kitchen storage space. Want to build your own? Here are step-by-step food pantry plans. It’s an easy DIY project. Who doesn’t want more convenience and home equity?

DIY walk-in kitchen pantry

That’s all there is my workshop tape storage hack. It’s just one more storage and shop organization issue solved. The expense is minimal and you might even have most of the materials on hand already.

Trending Articles You’ll Enjoy


Looking for more great content? Visit our main site I Can Fix Up My Home or our partner sites:

The Green Frugal

Running Across Texas


As Featured On Ezine Articles

I offer article and blog-writing services. Interested? Contact me for a quote!


Did you find this article helpful? Millions of readers rely on information on this blog and our main site to stay informed and find meaningful solutions. Please chip in as little as $3 to keep this site free for all.


About the Author:

Photo of Kelly R. SmithKelly R. Smith is an Air Force veteran and was a commercial carpenter for 20 years before returning to night school at the University of Houston where he earned a Bachelor’s Degree in Computer Science. After working at NASA for a few years, he went on to develop software for the transportation, financial, and energy-trading industries. He has been writing, in one capacity or another, since he could hold a pencil. As a freelance writer now, he specializes in producing articles and blog content for a variety of clients. His personal blog is at I Can Fix Up My Home Blog where he muses on many different topics.
Cooling Paint Could Cut Emissions From Buildings

Reducing Carbon Dioxide Via Scheduled Building Maintenance

by Kelly R. Smith

index sitemap advanced
Commercial building with a painted exterior

The World Green Building Council tells us that combined, buildings and construction account for, “39% of energy-related carbon dioxide (CO2) emissions when upstream power generation is included.”1 In a previous post, I discussed how HVAC units2 (heating and cooling) systems are responsible for the lion’s share of this and a proposal to capture that carbon dioxide to generate hydrocarbons. This article discusses using paint to minimize CO2 in the first place.

The Quest: Finding an Effective Paint

Researchers have been attempting to come up with products to raise the efficiency of cooling and heating for years. Many types of reflective paint have been developed for the exteriors of both homes and office buildings that would reflect away sunlight resulting in a reduction the temperatures on the interior.

Up to this point, none of these reflective paint products have been successful in deflecting enough of the Sun’s rays that would result in the building’s temperature lower than the ambient conditions. That may be changing.

Researchers in the US say they have developed a white paint with strong cooling properties. Prof Xiulin Ruan, from Purdue University in Indiana says, “In one experiment where we put a painted surface outside under direct sunlight, the surface cooled 1.7C below the ambient temperature and during night time it even cooled up to 10C below the ambient temperature. This is a significant amount of cooling power that can offset the majority of the air conditioning needs for typical buildings.”

The Tech Behind the Paint

The researchers found that the key is adding calcium carbonate. By utilizing a high concentration of this chalky substance, differing the particle sizes, they developed a paint that reflected an astounding 95.5% of sunlight.

Prof Xiulin Ruan said, “Sunlight is a broad spectrum of light wavelengths. We know that each particle size can only scatter one wavelength effectively so we decided to use different particle sizes to scatter all the wavelengths. This is an important contributor eventually resulting in this very high reflectance.”

The paint may have a broad range of applications, in particular data centers, which require large amounts of cooling power. Because this particular paint doesn’t contain metal, it is not likely to interfere with various electromagnetic signals. This makes it ideal for cooling telecommunications equipment.

Of course, it goes without saying that there will be a number of steps to go complete before this product can be put on the market, because like any other product, it needs to be tested for its reliability and efficiency in the long term. The researchers remain optimistic; they have already filed patents and there is already a strong interest from major manufacturers. Cooling paint that can cut emissions from buildings of all types will lower costs across the board.

References

  1. World Green Building Council, Global Status Report 2017, https://www.worldgbc.org/news-media/global-status-report-2017
  2. Kelly R. Smith, I Can Fix Up My Home Blog, Can Climate Change Be Minimized Using Air Conditioners?, http://www.icanfixupmyhome.com/WPBlog1/2020/07/29/can-climate-change-be-minimized-using-air-conditioners/

Looking for more great content? Visit our main site I Can Fix Up My Home or our partner sites:

The Green Frugal

Running Across Texas


As Featured On Ezine Articles

I offer article and blog-writing services. Interested? Contact me for a quote!


Visit Kelly’s profile on Pinterest.

About the Author:

Photo of Kelly R. SmithKelly R. Smith is an Air Force veteran and was a commercial carpenter for 20 years before returning to night school at the University of Houston where he earned a Bachelor’s Degree in Computer Science. After working at NASA for a few years, he went on to develop software for the transportation, financial, and energy-trading industries. He has been writing, in one capacity or another, since he could hold a pencil. As a freelance writer now, he specializes in producing articles and blog content for a variety of clients. His personal blog is at I Can Fix Up My Home Blog where he muses on many different topics.

Your Stove: Gas for Efficiency or Electric for Better Air Quality?

by Kelly R. Smith

index sitemap advanced
Cooking dinner on a gas stove range

Does your home have a gas stove for energy-efficiency or an electric one for better air quality? If you have a gas line to your home you’ve got a choice but if you don’t, you are locked into the electrical stove version — unless you want to pay to have a natural gas line installed. Each type of appliance has its pros and cons.

The Pros of Natural Gas vs. Electricity

The primary benefit of natural gas appliances, and stoves/ranges in particular is that they are more energy-efficient (on an operating cost basis). Why? Simply put, it takes gas, or some other fuel source, to generate electricity. That is an extra production step. On the other hand, electrical power is much better for your health, especially if you are prone to asthma issues.

Natural Gas Contributes to Indoor Air Pollution

Burning gas to cook food on any stove produces particulate pollutants, the worst of which is nitrogen dioxide, or NO2,, and sometimes also carbon monoxide. You know what they say about closed garages with the car engine running.

This is why the air around your stove or any other gas-fueled appliance such as a water heater or downflow gas furnace should be vented to the outdoors. Even brief exposure to air containing elevated concentrations of NO can result in coughing and wheezing for people with asthma or other respiratory issues. Prolonged exposure to this gas can result in the development of those conditions, according to the EPA1 who says, “NO2 along with other NOx reacts with other chemicals in the air to form both particulate matter and ozone. Both of these are also harmful when inhaled due to effects on the respiratory system.”


How to Protect Yourself and Your Family from Gas Appliances


References

  1. EPA (Environmental Protection Agency), Nitrogen Dioxide (NO2) Pollution, https://www.epa.gov/no2-pollution/basic-information-about-no2

Looking for more great content? Visit our main site I Can Fix Up My Home or our partner sites:

The Green Frugal

Running Across Texas


As Featured On Ezine Articles

I offer article and blog-writing services. Interested? Contact me for a quote!


Visit Kelly’s profile on Pinterest.

About the Author:

Photo of Kelly R. SmithKelly R. Smith is an Air Force veteran and was a commercial carpenter for 20 years before returning to night school at the University of Houston where he earned a Bachelor’s Degree in Computer Science. After working at NASA for a few years, he went on to develop software for the transportation, financial, and energy-trading industries. He has been writing, in one capacity or another, since he could hold a pencil. As a freelance writer now, he specializes in producing articles and blog content for a variety of clients. His personal blog is at I Can Fix Up My Home Blog where he muses on many different topics.
Home Office Build-Out Tips

by Kelly R. Smith

index sitemap advanced
A home office
A home office

Recent estimates report that 33% of Americans are self-employed in some capacity. Now, the report didn’t break it down into full-time or part-time details, but it means one thing for certain — lots of home offices! You might need one for the first time because of being locked down thanks to the COVID-19 pandemic. Whether you’re remodeling a bedroom into your office, or remodeling your current one, you can use these home office refurbishment tips.

Office Interior Lighting

All interior lighting is not the same. In the office, in particular, it falls into three distinct categories: general, task, and accent lighting. How much of each you use depends on your needs. General lighting is often implemented with overhead fluorescent fixtures. Most home offices just use task lighting.

Task lighting is used to focus on your work area to avoid eye strain. Good choices here are undercabinet fixtures, or track, monorail, or Y lighting systems with halogen or LED bulbs. Accent lighting usually illuminates artwork. This is taken care of with ceiling-mounted fixtures.

Buy Ergonomic Furniture

This is important for your comfort and long-term health. The two most critical pieces are an ergonomic office chair and computer desk. Adjustable standing desks are getting to be more popular. Before shopping, know what you need. Draw a detailed plan noting where things should be situated. Size is important; be sure everything will fit into your space.

Although it might be tempting to do so, I wouldn’t recommend placing the fax, copier, and printer where you can just reach over to make a quick paper grab. Why? Because you need to get out of your chair now and then to get the blood flowing! My Garmin 235 GPS watch actually lets me know when I’ve had too much butt-time.

Flooring – Choose Wisely

You’ve got many choices when it comes to flooring. Carpet is the best choice for sound control and it is forgiving; you’ll be spending a lot of time on your feet. The downside is that occasionally you’ll have to hire carpet cleaners or rent a machine at the store. If you’ve got a lot of carpet in your home, go ahead and buy a carpet cleaning machine. It will quickly pay for itself. Who knows how nasty those grocery store ones are.

Are you after a a more contemporary look? You might consider hardwood or laminate flooring. When it comes to sprucing up your home office, consider that you’ll be spending more time in there than you would a conventional office (Netflix). Plan accordingly.

Upgrade Your Office walls

Your office walls are important. You should choose a color that you like, of course, but it should also be a color that is soothing enough to allow you to focus on your work. Small office? Here are some paint illusions to make the space seem larger.

I hope these home office build-out tips have inspired you and given you some food for thought. Always check the latest IRS guidelines to maximize your deductions. It’s like getting a pay raise! Please participate in the poll on the right-hand sidebar of this article. Thanks!


Looking for more great content? Visit our main site I Can Fix Up My Home or our partner sites:

The Green Frugal

Running Across Texas


As Featured On Ezine Articles

I offer article and blog-writing services. Interested? Hire Me!


About the Author:

Photo of Kelly R. SmithKelly R. Smith is an Air Force veteran and was a commercial carpenter for 20 years before returning to night school at the University of Houston where he earned a Bachelor’s Degree in Computer Science. After working at NASA for a few years, he went on to develop software for the transportation, financial, and energy-trading industries. He has been writing, in one capacity or another, since he could hold a pencil. As a freelance writer now, he specializes in producing articles and blog content for a variety of clients. His personal blog is at I Can Fix Up My Home Blog where he muses on many different topics.

close

Enjoy this blog? Please spread the word :)

RSS
Follow by Email
Twitter
Follow Me
Tweet
Pinterest
Pinterest
Pinterest
Instagram
LinkedIn
Share