How to Frame a Basement
Turn it Into a Game Room, Home Theater, or Craft Shop
© 2008 by Kelly Smith All rights reserved; content may not be copied, rewritten, or republished without author’s written permission. Author’s Google profile

Your basement represents an opportunity to use all the square footage in your home and increase your home equity by turning it into a game room, home theater, or craft shop. Begin by framing the walls.
First, ensure that your basement is fully waterproofed. You must be sure that there’s no water entering your basement through the floor or the walls. If it is, this is the time to take care of it. Even if it is not, this is a good time to do it as a preventative measure.
Basement Waterproofing when Needed
If your basement needs waterproofing, check
Angie’s List or another service that offers unbiased ratings and reviews on service companies in your area that specialize in waterproofing that will come to your house to make an examination with a moisture meter.
If you find you need moisture proofing, the technician should be able to offer that service or suggest a basement waterproofing company in your region. When the whole basement gets the go-ahead, read on and learn how to frame a basement wall.
If you’ve already got wood framing skills, the learning curve here will be pretty flat. Some area’s building code require you to pull a permit for this job.
Tools and Materials for This DIY Project
Quality tools are always important.
Tools definately fall into the “you get what you pay for” category.
- Framing hammer
- Pneumatic or airless nail gun
- Tape measure
- Chalk line
- Utility knife
- Chopsaw, radial arm saw, or table saw.
- Framing square
- 2” X 4” lumber
- 4” level
- Remington, Ramset or Hilti Powder actuated tool with powder loads and nails or cut (masonry) nails
- Nails for framing
- Safety glasses
Metal (Steel) Framing as an Alternative to Stick (Wood) Framing
Using metal as opposed to wood has several advantages.
- It doesn’t warp as wood tends to. If you order and have your wood studs delivered instead of picking your own out, you never know what you are going to get. Sure, you might be able to send bad ones back, but what a hassle, and it disturbs the flow of work.
- Steel studs come with "keyways" for running plumbing and wiring. No drilling required.
- Termites won’t eat galvanized steel.
- You can use tophat on concrete walls, saving a couple of inches if that is important.
If you do go with metal, use self-tapping framing screws to attach studs to track.
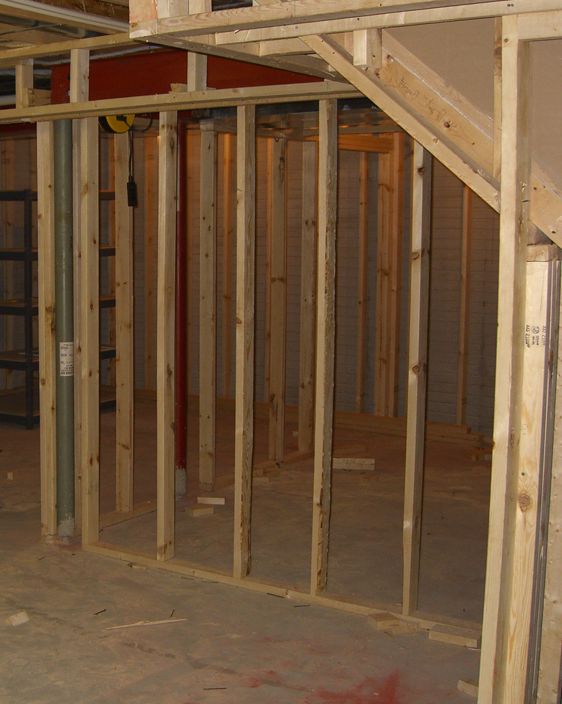
Anatomy of Wood Framing
You’ll frame your walls using 2” X 4” lumber or furring strips (for the exterior walls). Be sure to select only the straightest and truest boards. You’ll find there are three components to your wall — bottom plate (it’s horizontal,it’s on the floor, it contacts your concrete or cinder block basement wall), top plate (the bottom plate’s complement, which is nailed to the bottom of your ceiling joists).
Finally there’s your studs (they’re vertical, toenailed at the bottom plate and top plate).
Secure the Top and Bottom Plates
Note: Always consult your local structural building code with respect to basement wall framing. Some municipalities spell out how the top and bottom plates are attached. Some codes require that the walls be allowed to float.
There are two basic ways to frame a wall. The first is to build the wall on the ground, stand it up, and plumb and brace it. This works well on a concrete slab or plywood subfloor, but in a cramped basement it’s easier to build it in place.


Secure your bottom plate to the floor. Use either a powder actuated nail gun, driving nails via a .22 cal blank or use a framing hammer with concrete nails (also called cut nails). The powder gun is the best choice. Make sure you wear your safety glasses.
Now you can nail the top plate. There are two ways to accomplish this: hammer it up or use a nail gun. Be sure to check your local building code; some municipalities require that the top plate “floats”.

A nail gun is the best choice because hammering in the upside down position will wear you out!
Use 2 nails on every ceiling joist. You’ll need to cut your 2” X 4”s to make
them break in the
middle of a joist.
Install the Wall Studs
Next, starting in any corner, stand a stud up to the concrete wall between your top plate and
your bottom plate. Toe-nail it to your top plate. Now do your bottom plate. Next, nail the next
stud to that stud, pressing the 2” side of your first stud against the 4” side of your second.
Now nail a third stud so that its 2” side is also touching the 4” side of the first stud
and its 4”
side is contacting the 4” side of the second stud. The object here is to make sure the resulting
intersection of the studs matches the intersection formed by the bottom and top plates (90 degrees).
This is so your drywall will have corner nailing surfaces.
Layout and Fill in the Studs
Do the stud layout now. Starting with your tape measure on the floor in the corner, extend it
along the bottom plate and mark the plate every 16”. This will be the center of the stud. Continue
around the basement.
It doesn’t matter what you end up with in each opposing corner; what counts is that you start with 16”. Go back to the corner you began at and cut the stud so that it fits snug but it’s not bowing. Toe nail it at the bottom, plumb it with a 4’ level and toe nail it at the top.
Now you can hook your tape measure to that stud and mark the others on 16” (on both the bottom and top plate) and the rest of the studs should also be plumb. Your tape measure has hash marks on 16” increments to make this job easy.
* Old Carpenter’s trick: when you make your mark, also draw an X to the left of your
mark if you’re moving from right to left, and on the right if you’re moving the other way. Why?
To remind you that the mark is the edge of the stud, not the center. Trust me on this.
Lay Out Your Electrical Outlets (Receptacles)
Do you already have electrical outlets everywhere you need them on the perimeter walls? Most
likely not if your basement is currently unfinished. Even if you have them they might need to
be relocated so they can be secured to the framing studs.
Unless you are very familiar with electrical work, it is highly recommended that you consult with
a licensed Journeyman Electrician. Your
local electrical building code probably requires this.
Building Your Interior Partitions
Interior basement walls are easier to build on the ground and stand up if they are very short.
Your work will be easier if you frame the walls that are perpendicular to the ceiling joists first
and then the ones that are parallel. This way you can brace the parallel ones to the perpendicular ones.
On longer walls, add 2” X 4” nailers between the joists.
If you frame a short wall laying down, measure the floor to ceiling at several spots so that you can take the shortest height for the wall and use spacing shims where you need to.
Before you stand it up, strike a chalk line on the floor so you know where the wall goes. Use the 3-4-5 squaring method to ensure that you are perpendicular with the exterior walls where applicable.
If you are going to be running any plumbing as you frame a basement, think about using PEX rather than copper or steel. It’s easy and economical. Again, you might need a plumbing permit to add new plumbing.