7 Common Drywall-Taping Problems

index sitemap advanced
Drywall in new home construction

Drywall finishing, or taping and floating, is hardly rocket science. But it is more of an art and things can go wrong. The upside is that most of these things are easily corrected. The key thing is to prevent issues right from the get-go with this DIY project. Here are 7 common drywall-taping problems and how to deal with them.

Drywall Finishing Problems

  • Concave and crowned seams. The seams are where the drywall panels meet. There are tapered edges on the long side of the panel and square edges on the short side. Square seams are called butt-joints. Obviously tapered edges accommodate your drywall tape. Crowned seams happen when taping compound (mud) is applied too heavily and the center of the seam is left higher than the surface of the panels. This is more common on butt-joints. When light shines across the seams on your walls, they crowned seams are apparent. Catch these before painting, and sand them down with 120-grit or 150-grit paper or just use your widest floating knife to float it out wide. Concave seams are the opposite of crowned seams. To correct this just float the joint again.
  • Photographing. This happens when you apply glossy paint. The drywall and the joints and screws show up differently because they have different textures. To prevent this, either skim the entire surface with mud (drywall compound) or paint it with a sealer/primer. Applying a drywall texture with thinned-out joint compound will also help.
  • Bubbled tape. This happens when you have a poor bond between the tape and the mud. If the tape isn’t embedded well in the mud, it can easily loosen and form a bubble. It might be a round spot as small as 1/2 inch in diameter, or it may encompass the whole length of a seam. The solution? Smaller bubbles may be cut out with a utility knife and re-taped. For larger areas, you can remove the entire section of tape and embed new tape. Finally, apply a second and a third coat of mud. To avoid bubbled or loose tape to begin with, apply a thick enough layer of joint compound before you embed the tape and apply sufficient pressure with your taping knife to embed it properly. Or as I do, use mesh tape rather than paper; it’s much easier to work with.
  • Pitting. This looks like a number of small pits on the taped finished surface. They are small air bubbles that were either not properly filled or were exposed in the sanding process. Usually they are the result of over-mixing or under-mixing your mud or if insufficient pressure is applied when smoothing your mud. Much of your pitting can be covered up with these drywall texturing techniques.
  • Loose or cracked corner bead. When this happens, remove any cracked mud and re-apply. Be sure that there is a 1/2 inch gap between the bottom of the bead and the floor. If you use metal corner bead, reinforce the border with paper tape. This will reduce the chance of cracks developing.
  • Popped screws or nails. These don’t always show up until a few months or even years after the taping and floating, but they can show up before you paint your drywall. When you sand over screws or nails, your pole sander can apply a lot of pressure against the drywall panel. If the fastener hasn’t pulled the panel tight against your studs, the pressure can push the panel tight and pop the fasteners. This raises a bump on the surface or exposing the fastener head. Popped screws or nails are more likely with warped wood framing. Secure with new fasteners and re-float. I like to place screws or nails at 12 inch centers. Nails should be applied in pairs; one being a “helper” nail.
  • Shrinking or cracked drywall seams. Seams can develop drywall cracks during your taping process. This is most likely when your mud dries too quickly. This can happen because of direct high heat or sunlight. If your tape and mud are still solid, just re-tape the bad spots. Be sure that your seam is completely dry; use enough pressure to force the mud completely into the crack. If the tape is cracked or the compound is loose, you’ll have to remove the affected areas. Avoid this problem by keeping the heat low to extend your drying time. If the outdoor temperature is high, above 80°F, close the windows so the airflow won’t dry the compound too quickly.

These are the most common drywall-taping problems you are likely to encounter. The best approach is to take your time and prevent issues before they develop.

Looking for more great content? Visit our partner sites:

The Green Frugal

Running Across Texas


As Featured On Ezine Articles

I offer article and blog-writing services. Interested? Hire Me!


Did you find this article helpful? Thanks for supporting this free site with a small donation!


Visit Kelly’s profile on Pinterest.

About the Author:

Photo of Kelly R. SmithKelly R. Smith is an Air Force veteran and was a commercial carpenter for 20 years before returning to night school at the University of Houston where he earned a Bachelor’s Degree in Computer Science. After working at NASA for a few years, he went on to develop software for the transportation, financial, and energy-trading industries. He has been writing, in one capacity or another, since he could hold a pencil. As a freelance writer now, he specializes in producing articles and blog content for a variety of clients. His personal blog is at I Can Fix Up My Home Blog where he muses on many different topics.

How to Repair a Toilet Flange

index sitemap advanced
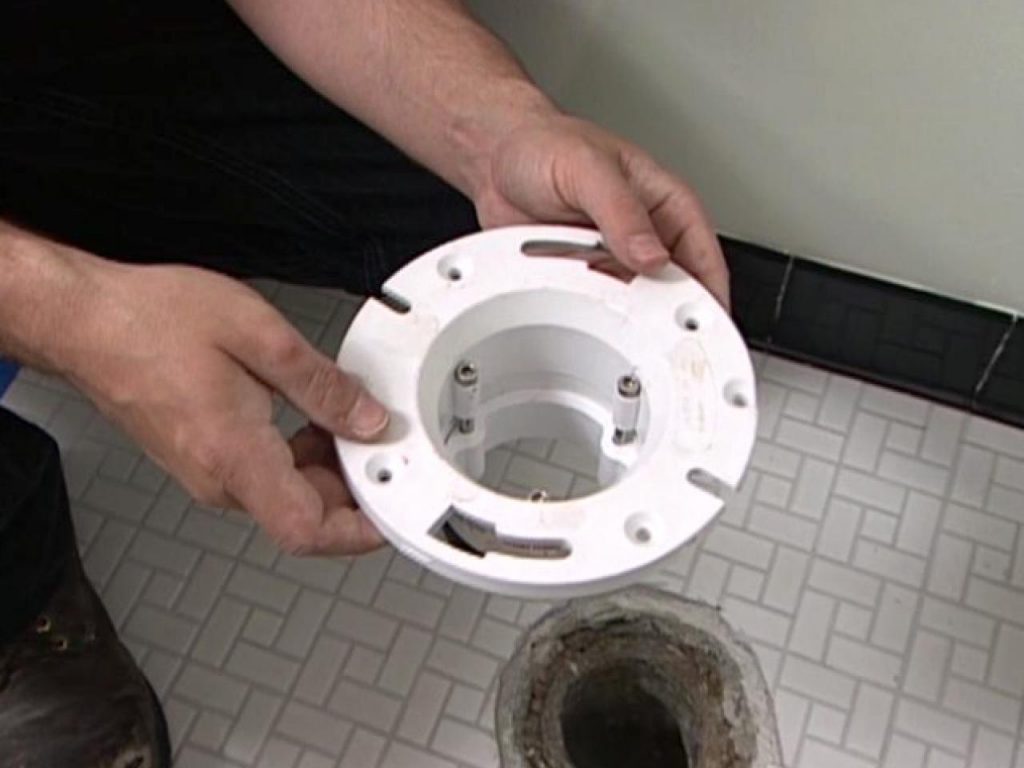
A toilet flange being set

The toilet flange is the interface between your sewer line and your toilet. It serves a double purpose:

  • It is slotted to secure the bolts that hold your toilet down securely.
  • It accepts the toilet wax ring to form a waterproof barrier and a means of keeping those sewer gasses out of your bathroom.

Like anything else, they will go bad at some point. Flanges, and the sewer lines they go into, are available in two different materials — modern plastic and old-style cast iron. How you repair a toilet flange depends on what what material you are working with. The first thing you will have to do, you guessed it, is pull the toilet to diagnose the problem. While you are at it, it doesn’t matter if it is an old commode or a newer low-flow toilet, this is a good time to replace other parts like the tank-to-bowl gasket and the filling mechanism.

Repairing Plastic Toilet Flanges

  • Eared Reinforcement Ring. If you have a plywood subfloor that has some rot around the flange and one or more of the securing flange-to-subfloor screws won’t hold because of it, this may be your solution. The “ears” simply extend further. This is also a viable solution for concrete slabs if part has chipped away.
  • Two-Part Repair Ring. Some flanges are composed of plastic with the outer ring (with the bolt slots and screw holes) made of steel. Eventually, this steel will rust. A repair ring is a good solution. Two versions are available — hinged or two-part. Your choice.
  • Stainless Steel Repair Ring. Solid plastic flanges (as opposed to the steel ring above) work well until they happen to break or bend. The easy fix is to screw a repair ring over your plastic flange.

Repairing Cast Iron Toilet Flanges

  • Repair Brackets. Older cast iron flanges often break. This can occur on one or both sides. If the broken area contains a bolt slot, slipping a repair bracket under the cast iron lip will do the trick.
  • Repair Flange. If the flange is too badly damaged to use repair brackets, a repair flange is your best bet. This is a plastic flange that is inserted into the mouth of the old cast iron flange. You may need to clean up and break away remaining parts of the old flange with a hammer and cold chisel.

These tips on how to repair a toilet flange will cover most situations. In addition to the repair materials here, you may find additional ones on the market. New ones are being invented all the time, which is a good thing for us. In fact, plumbing innovations are popping up all the time, driven by style, materials, and the effort to conserve water.

Toilet trivia: When you heard some one say, “I’ve got to go spend a penny,” when going to the bathroom, did you ever wonder where that came from? Well, when public toilets became popular in the Victorian days, they cost a penny to use.

Looking for more great content? Visit our partner sites:

The Green Frugal

Running Across Texas


As Featured On Ezine Articles

I offer article and blog-writing services. Interested? Hire Me!


Did you find this article helpful? Thanks for supporting this free site with a small donation!


Visit Kelly’s profile on Pinterest.

About the Author:

Photo of Kelly R. SmithKelly R. Smith is an Air Force veteran and was a commercial carpenter for 20 years before returning to night school at the University of Houston where he earned a Bachelor’s Degree in Computer Science. After working at NASA for a few years, he went on to develop software for the transportation, financial, and energy-trading industries. He has been writing, in one capacity or another, since he could hold a pencil. As a freelance writer now, he specializes in producing articles and blog content for a variety of clients. His personal blog is at I Can Fix Up My Home Blog where he muses on many different topics.

Beat the Heat this Summer and Cold this Winter with Radiant Barrier

by Kelly R. Smith

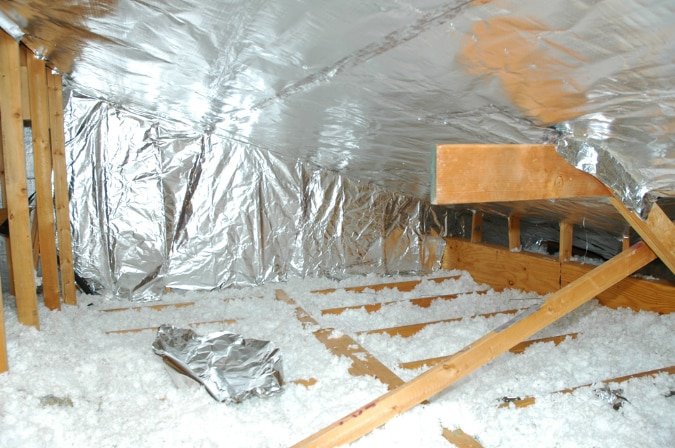
Radiant barrier staple-up foil and loose fill insulation
index sitemap advanced

This article was updated on 12/14/20.

Ads we feature have been independently selected and reviewed. If you make a purchase using the links included, we may earn commission, which helps support the site.

The cost to air-condition you home in the summer and heat your home in the winter is absolutely insane, even if you have your HVAC sized perfectly. But what can you do? For one thing, you can install a spray-on and/or aluminum foil radiant barrier.

These are the two major distinct heat-reduction methods on the market today. And they really work. NASA uses it, as do other commercial and residential properties. And, although it is touted for summer savings, it works in the winter as well. Think of a thermos bottle. It doesn’t care if the contents are hot or cold; it just does a splendid job of insulating.

Which is Best: Spray or Foil?

This is really up to you; it really depends on your situation. But, and this is a huge but, spray-on is more versatile. It’s simply a powder mixed with paint so you can use any color latex paint you want and roll it or spray it on your walls, interior or exterior but white is recommended.

When I sprayed my attic, I used the bottom inch or two in the bucket that my Graco airless paint sprayer didn’t pick up to roll on my garage walls. And what a difference that has made! The garage is my woodworking shop and it is now much more comfortable.

How Much does Radiant Barrier Cost?

Uhmm, that’s a good question. There is no denying it; it can be expensive. When I did my home (about 12 years ago) it was $0.50 USD per square foot for foil and about $40.00 USD per gallon for the pre-mixed spray-on product. I did the labor myself. You think that’s bad? Check out your last electricity bill. Multiply it by 12. It’s all relative in the grand scheme of things.

How Does this Insulation Technology Work?

The spray-on method generally combines microscopic porcelain beads with aluminum flakes which are mixed into a latex paint base to reflect the heat. The foil is typically an aluminum product with tiny perforations to allow the material to breathe. The 2-ply versions are recommended because that provides a “dead” area that insulates much like fiberglass batt insulation does.

Common Questions About Radiant Barriers

Is it too expensive? No! This is one of the cheapest things you can do to lower the burden on your central air conditioner over the long term. Of course the initial cost may seem steep, but after it pays for itself you keep saving. Smart investment. I installed mine over ten years ago and our electric bill has been about 35% lower since then. You can’t control the rates but you can control consumption.

Is it hard to install? No! If you go with the foil, you basically need a tape measure, a utility knife, and a stapler. If you use the spray you will need to buy or rent a paint sprayer with the proper size spray tip. The only hard part is getting in tight spots. So, as I found out, patience is required, especially if you don’t have a helper available.

Are there any precautions? Yes. If you use spray-on, you must use a high quality respirator (not a COVID-19 type dust mask) when spraying or boxing the paint and powder, as well as when you spray. You don’t want to inhale any of that.

When is the best time to install it? Generally speaking, I recommend spring or fall. Attics get too hot in the summer months, at least here in South Texas. For example, I installed ours in March and it was already hot. Winter is good but I prefer not to do this kind of work with work gloves.

Concerns about Cell Phone Reception

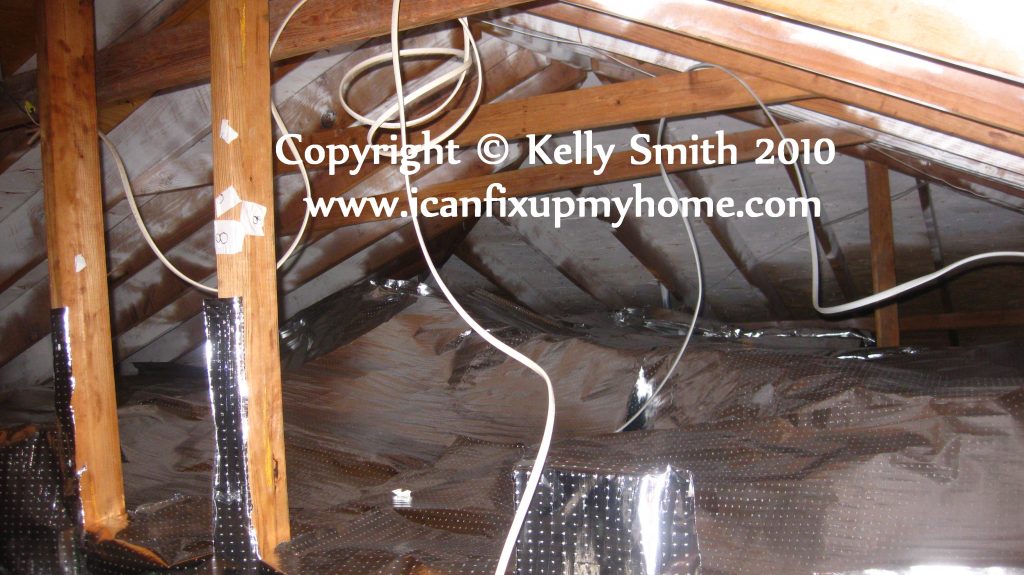
Radiant barrier foil and spray for double-effectiveness

Well, this is everybody’s favorite question in our hooked-up and connected world. This question is still way out there as far as the responses go. From my spray radiant barrier experience, I can say that there was little or no change.

But, as far as the foil staple-up barrier is concerned (which I did not do in my home), I’ve found that the yes/no response from others is about equal. Logic dictates that it would make a difference from cell interception arriving vertically, but horizontally? Who knows? In any event, I know people that use cell phone signal boosters with great results.

When I added the foil to the attic floor over the rafters and the fiberglass batt insulation I did notice some cell reception degradation. But then I upgraded my cable modem/WiFi and the signal was perhaps better than it ever was.

So is radiant barrier insulation right for your home? From my experience I would say yes, absolutely. It lowers utility bills in the fiercest summer heat and the most shivering of winter weather. It will pay for itself over time if you are there for the long term and if you put your home on the market it’s a great selling point. Win-win.


Recommended Reading

Looking for more great content? Visit our main site I Can Fix Up My Home or our partner sites:

The Green Frugal

Running Across Texas


As Featured On Ezine Articles

I offer article and blog-writing services. Interested? Contact me for a quote!


Did you find this article helpful? Millions of readers rely on information on this blog and our main site to stay informed and find meaningful solutions. Please chip in as little as $3 to keep this site free for all.


Visit Kelly’s profile on Pinterest.

About the Author:

Photo of Kelly R. SmithKelly R. Smith is an Air Force veteran and was a commercial carpenter for 20 years before returning to night school at the University of Houston where he earned a Bachelor’s Degree in Computer Science. After working at NASA for a few years, he went on to develop software for the transportation, financial, and energy-trading industries. He has been writing, in one capacity or another, since he could hold a pencil. As a freelance writer now, he specializes in producing articles and blog content for a variety of clients. His personal blog is at I Can Fix Up My Home Blog where he muses on many different topics.

Trim Nailers & Finish Nailers

A Guide to Choosing the Right Wood Trim Finishing Tools

Photo of Kelly R. Smith   by Kelly R. Smith

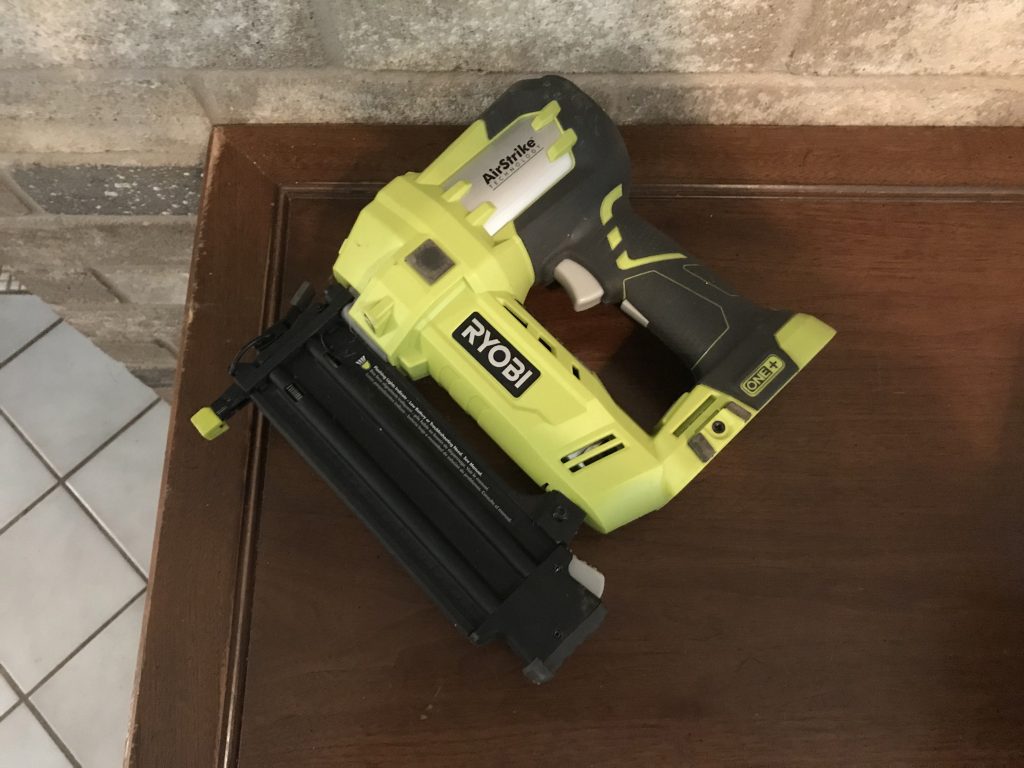
Ryobi 18-gauge brad nailer
index sitemap advanced

Ads we feature have been independently selected and reviewed. If you make a purchase using the links included, we may earn commission, which helps support the site.

This article was updated on 02/28/21.

Whether you call them finish nailers or trim nailers, the end result is the same. These guns deliver nails of various sizes (tool-dependent) with the help of an air compressor or an airless system. The Ryobi AirStrike brad nailer pictured above is battery-powered. I use it for projects like door trim and baseboard.

Why use a nailer vs the old hammer and nail set method? For me the answer is two-fold. First, It is just faster and easier with less chance of marring the soft or hardwood surface. Secondly, you get to a point as your nail size diminishes where you just can’t hammer it without it bending. For example, brads are almost impossible (at least for me).

Which Pneumatic-Trim-Nailer is Right for You?

Ideally, you would own the entire spectrum of nail-size guns. But in reality, unless you make a living as a trim carpenter or cabinet-maker, you’ll most likely have to compromise and pick one or two. First, choose whether you want to drag a compressor hose or periodically re-charge batteries. For my purposes, being highly mobile is key so I do batteries. So what about sizes? Actually, I’ve stuck to all rechargeable Ryobi 18-Volt battery tools, even the electric mower (40-Volts).

  • Brad Nailers. These 18-gauge nails are up to 2 inches long. Since the nails are thinner in the cross section, they leave a smaller hole and are so they are less likely to split narrow wood trim and molding. This could be your choice for stop and cove moldings or baseboard shoe molding, or crown molding trim.
  • Pin Nailers. These 23-gauge nails come in both the headless and the slight-headed models; they are just what the doctor ordered for attaching delicate trim pieces; this makes them a hands-down favorite among certain hobbyists. The hole they leave are almost small enough to disregard under a coat of paint, or blend with the grain of a piece of wood. However, they don’t offer a lot of shear or withdrawal strength so these fasteners are best used for wood-to-wood connections and it’s really advisable to strengthen your connection with wood glue.
  • 15- and 16-Gauge Nailers. These two tools fire nails up to 2-1/2 inches long, and they are considered as the most versatile for interior carpentry applications. They also have a lot of overlap in terms of application which makes them good go-to tools for the DIY folks. Both are widely used for installing baseboard, chair rail, door and window casing, crown molding, as well as prehung door frames.

This overview of trim nailers and finish nailers should help you to decide where to invest your money, depending on your goals.

Further Reading

Looking for more great content? Visit our main page or partner sites:

I Can Fix Up My Home

The Green Frugal

Running Across Texas


As Featured On Ezine Articles

I offer article and blog-writing services. Interested? Hire Me!


Did you find this article helpful? Millions of readers rely on information on this blog and our main site to stay informed and find meaningful solutions. Please chip in as little as $3 to keep this site free for all.


Visit Kelly’s profile on Pinterest.

About the Author:

Photo of Kelly R. SmithKelly R. Smith is an Air Force veteran and was a commercial carpenter for 20 years before returning to night school at the University of Houston where he earned a Bachelor’s Degree in Computer Science. After working at NASA for a few years, he went on to develop software for the transportation, financial, and energy-trading industries. He has been writing, in one capacity or another, since he could hold a pencil. As a freelance writer now, he specializes in producing articles and blog content for a variety of clients. His personal blog is at I Can Fix Up My Home Blog where he muses on many different topics.


Tankless Water Heater Maintenance Tips

Routine Appliance Care Saves Money and Extends Service Life

Photo of Kelly R. Smith   by Kelly R. Smith

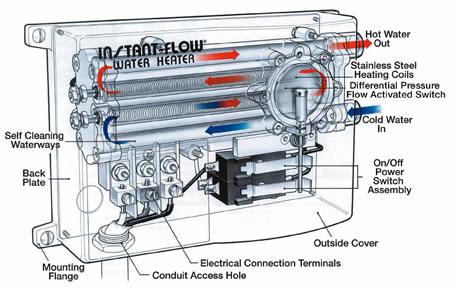
Typical tankless water heater anatomy
index sitemap advanced

This article was updated on 04/15/21.

Ads we feature have been independently selected and reviewed. If you make a purchase using the links included, we may earn a commission, which helps support the site. Thank you for your support.

Tankless water heaters have long been a staple in Europe and Asia and are becoming more common in the US. There are many good reasons for this; the primary one is economic. Unlike a typical tank water heater, it only delivers hot water upon demand. Why store it in a bulky tank when you don’t have to? It’s one more way to increase your home’s energy efficiency.

It’s not a complete panacea though. Like any other appliance it requires periodic maintenance to operate effectively. Here are the top tankless water heater maintenance tips that the homeowner can do; make it a periodic DIY project. These generic instructions will work for most units but be sure to check your manual for any proprietary details.

Clean the Air Filter

  • Turn off and unplug the heater or isolate power by flipping the circuit breaker.
  • Find the air filter; remove it.
  • Inspect it carefully; a dirty filter will reduce performance.
  • Clean it with a soft-bristled brush using a mild solution of dish soap and warm water.
  • Rinse it well with clean water and dry it using a lint-free towel, and reinstall.

Clean the In-Line Water Filter

  • Find the in-line water filter at the cold-water inlet.
  • Close the cold-water supply valve to turn off the water supply to the unit.
  • Remove the filter.
  • Clean the filter by tapping it to dislodge sediment, run it under clean, clear water, and wipe it with a cotton swab.
  • Reinstall the filter.
  • Reopen the cold-water supply valve.
  • Check for leaks; tighten as needed.

Flush the Heater

  • Close the shutoff valves on both the hot and cold water lines.
  • Connect a hose from the outlet of a circulation pump to the cold-water service valve. Connect a drain hose to the hot-water service valve.
  • Pour 4 gallons of undiluted food-grade white vinegar into a clean 5-gallon bucket. Place both the drain hose from the hot water service valve and the pump supply hose (connected to the pump’s inlet) into the vinegar bucket.
  • Open the service valves on the hot and cold-water lines.
  • Turn on your pump allowing the vinegar to circulate throughout the heater at a rate of 4 gallons per minute.
  • Let it run an hour and then flush the system with clean, cold water to remove the vinegar and any loose minerals. To do this step, first remove the free end of your drain hose from your bucket, and then run it either to a convenient drain or to the outside. Next, close the cold-water service valve, open the cold-water supply valve, and then let the water flow through your heater for a minimum of five minutes. Next, close the cold-water supply valve, and clean the in-line water filter at the cold-water inlet on the heater to remove any loose deposits the filter picked up during the above process. Again, clean the filter by tapping it, running it under clean water and wiping it with a cotton swab. Finally, replace the filter.
  • Close your hot-water service valve, and then open both the cold and hot-water supply valves.
  • Disconnect all of the hoses, restore power to the heater, and turn it on.

These steps for tankless water heater maintenance should help you to keep your unit running efficiently and save you money by not having to hire a contractor. If you agree, please share with your friends and social media.


Looking for more great content? Visit our partner sites:

The Green Frugal

Running Across Texas


As Featured On Ezine Articles

I offer article and blog-writing services. Interested? Hire Me!


Did you find this article helpful? Thanks for supporting this free site with a small donation!


Visit Kelly’s profile on Pinterest.


About the Author:

Photo of Kelly R. SmithKelly R. Smith is an Air Force veteran and was a commercial carpenter for 20 years before returning to night school at the University of Houston where he earned a Bachelor’s Degree in Computer Science. After working at NASA for a few years, he went on to develop software for the transportation, financial, and energy-trading industries. He has been writing, in one capacity or another, since he could hold a pencil. As a freelance writer now, he specializes in producing articles and blog content for a variety of clients. His personal blog is at Considered Opinions Blog where he muses on many different topics.


10 DIY New Year Projects to Tackle

index sitemap advanced

The clock is ticking down to the new year. That means many things but here are two to consider. Since spring will soon be here it’s time to start planning new year projects. After all, it is a time of new beginnings. Also, right around the temporal corner is income tax refund time to fund those new projects. This may be good news for many–under President Trump’s tax bill, the marriage penalty is mostly gone and the standard deduction is vastly improved.

With those considerations in mind, consider these 10 home improvement and personal improvement projects.

Start Exercising More

A healthy runner is a happy runner.

Pick your sport. For me that means running. Worried about the cold weather? Don’t. It’s not a problem with these cold weather running tips. Other activities are good candidates and one bit of good news is that many are quite inexpensive. Walking and running really only requires comfortable clothing and the right shoes. Cycling is great but requires a heavier investment. Swimming is good if you have access to a pool or open water such as a lake or a beach.

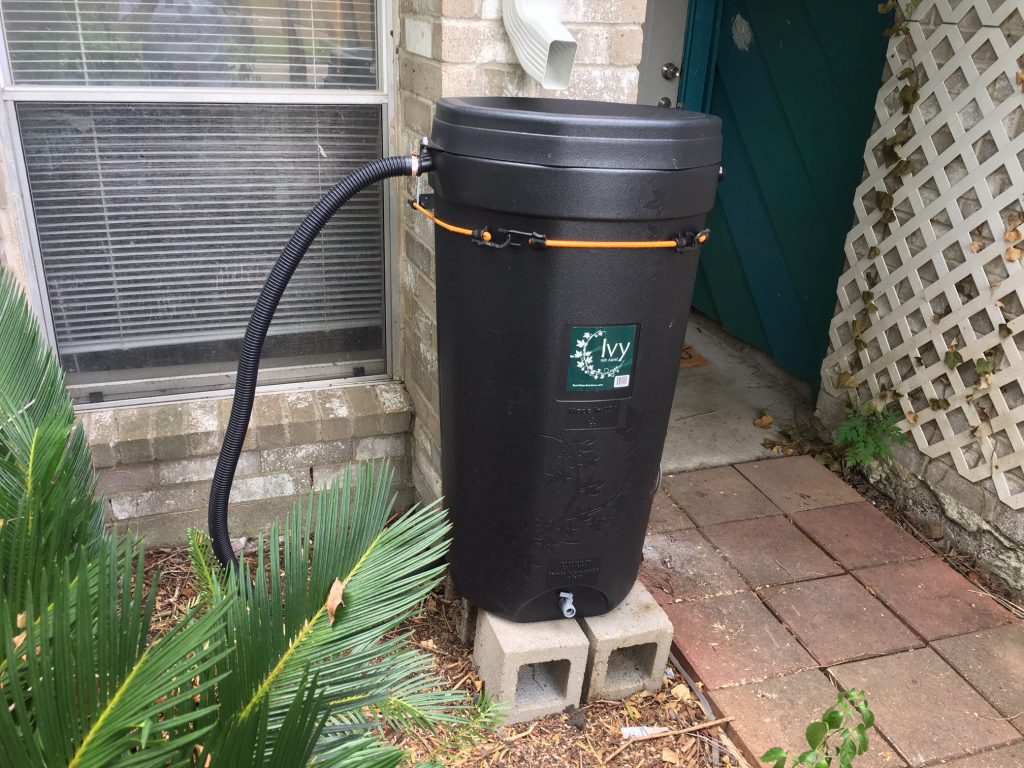
Install a Rainwater Collection Barrel

A Rainwater Harvesting Barrel

Rainwater collection or rainwater harvesting as it is sometimes called is becoming increasingly popular. The idea is simple; as you can see in the above photo, you just install the barrel under the downspout from your rain gutter. A screen on the top keeps leaves and other debris out. The black overflow tube at the top can be directed wherever you like and the spigot at the bottom is threaded to accept a garden hose. It works on the gravity feed principle and provides water for your garden or flower bed. Need more water? Link the overflow tube to another barrel. Using this water not only saves money on your water bill, but plants prefer the pH of rain as opposed to tap water.

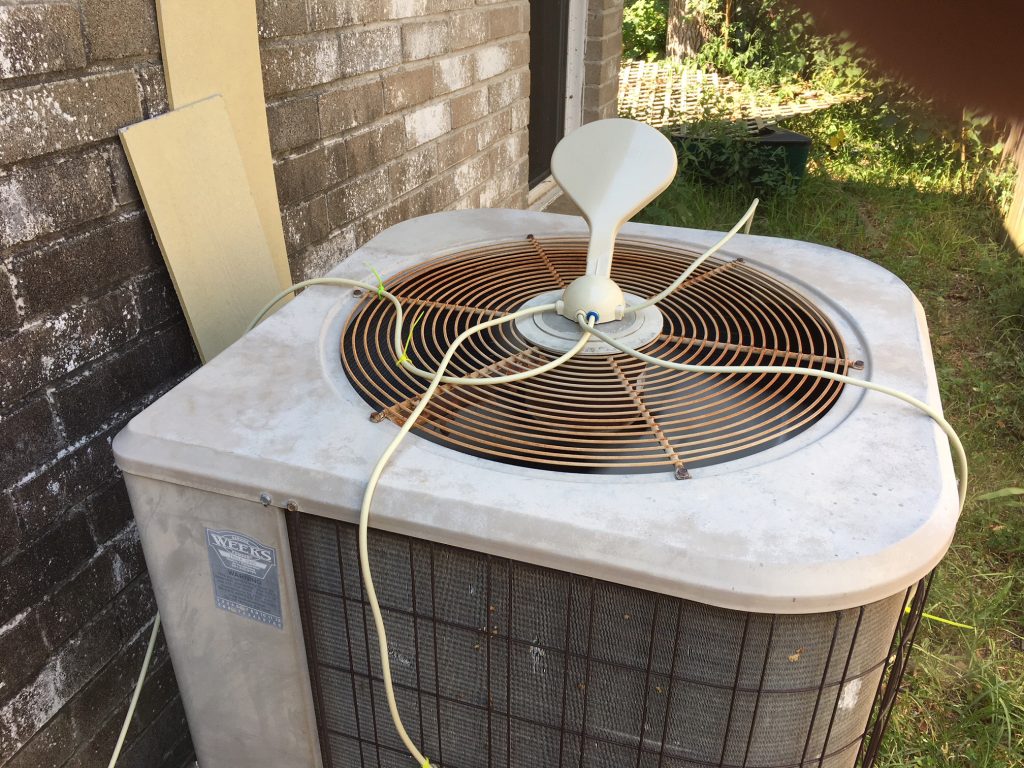
Install an A/C Condenser Coil Misting System

Cool-N-Save A/C condenser misting paddle

This simple innovation will really save on your electrical bill during the summer heat. When the compressor kicks on, the upward breeze from the fan lifts the paddle. This opens the valve allowing cool water to flow to the four misting nozzles. This lowers the ambient air temperature which reduces the amount of work the condenser coils must do. This inexpensive tweak saves money and installation requires only about 30 minutes and some basic hand tools.

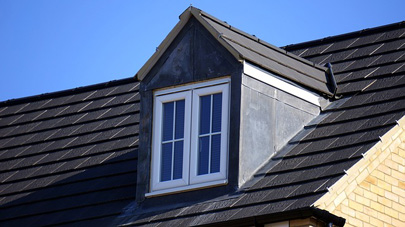
Make Needed Roofing Repairs

A new roof with a dormer

Having a solid, secure roof is critical. They can really take a beating during the winter. They should be inspected, and repaired if needed, twice a year. Minor repairs such as replacing individual shingles or flashing can be done on an individual DIY basis. For more extensive work, hire a roofing contractor.

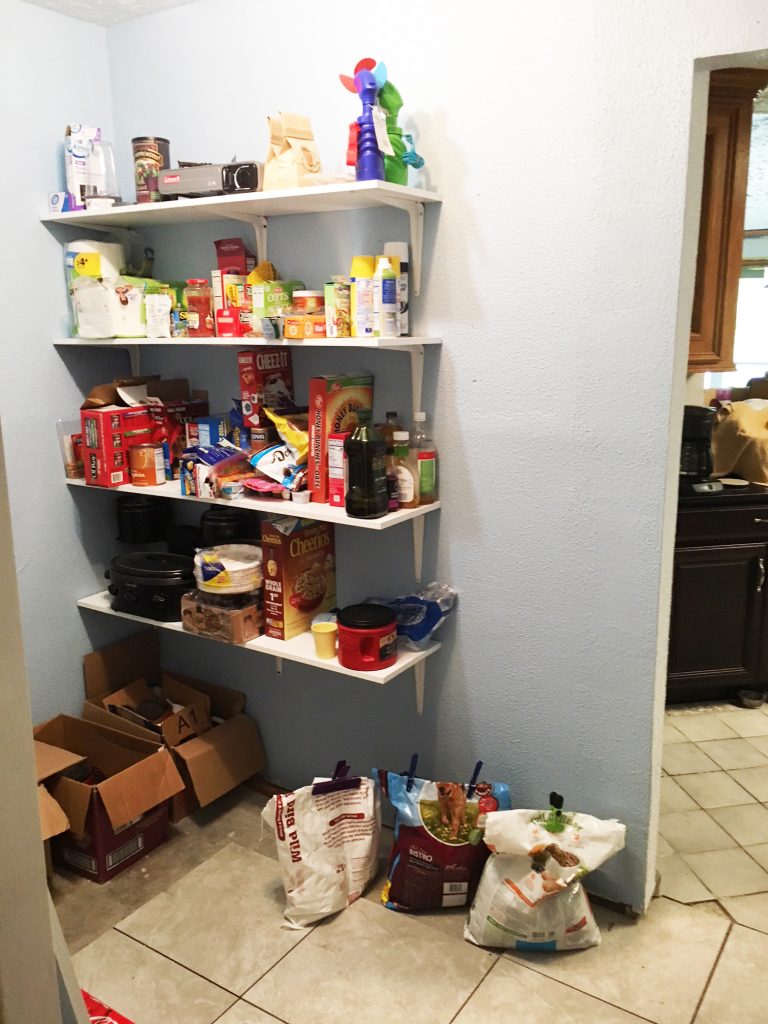
Build a Walk-In Kitchen Pantry

A Walk-In Kitchen Pantry

If your home is anything like ours, there’s just not enough storage space in the kitchen. My solution? I built a walk-in kitchen pantry. As you can see in the photo, the back door in the kitchen opened into the garage. I just “stole” some space from the garage and installed the walls (with insulation), turned the existing door into a case opening, and added an energy-efficient door into the rest of the garage. If you are comfortable with framing, hanging drywall, and laying ceramic tile, this is a great weekend DIY project. Follow the link for details.

I certainly hope these DIY New Years projects have inspired you. If so, I would appreciate you sharing these pages with your friends. Have a great New Year and thanks for visiting!

See the Next 5 DIY New Year Projects Here


Looking for more great content? Visit our partner sites:

The Green Frugal

Running Across Texas


As Featured On Ezine Articles

I offer article and blog-writing services. Interested? Hire Me!


Did you find this article helpful? Thanks for supporting this free site with a small donation!


Visit Kelly’s profile on Pinterest.


How to Make Homemade Wood Putty

index sitemap advanced
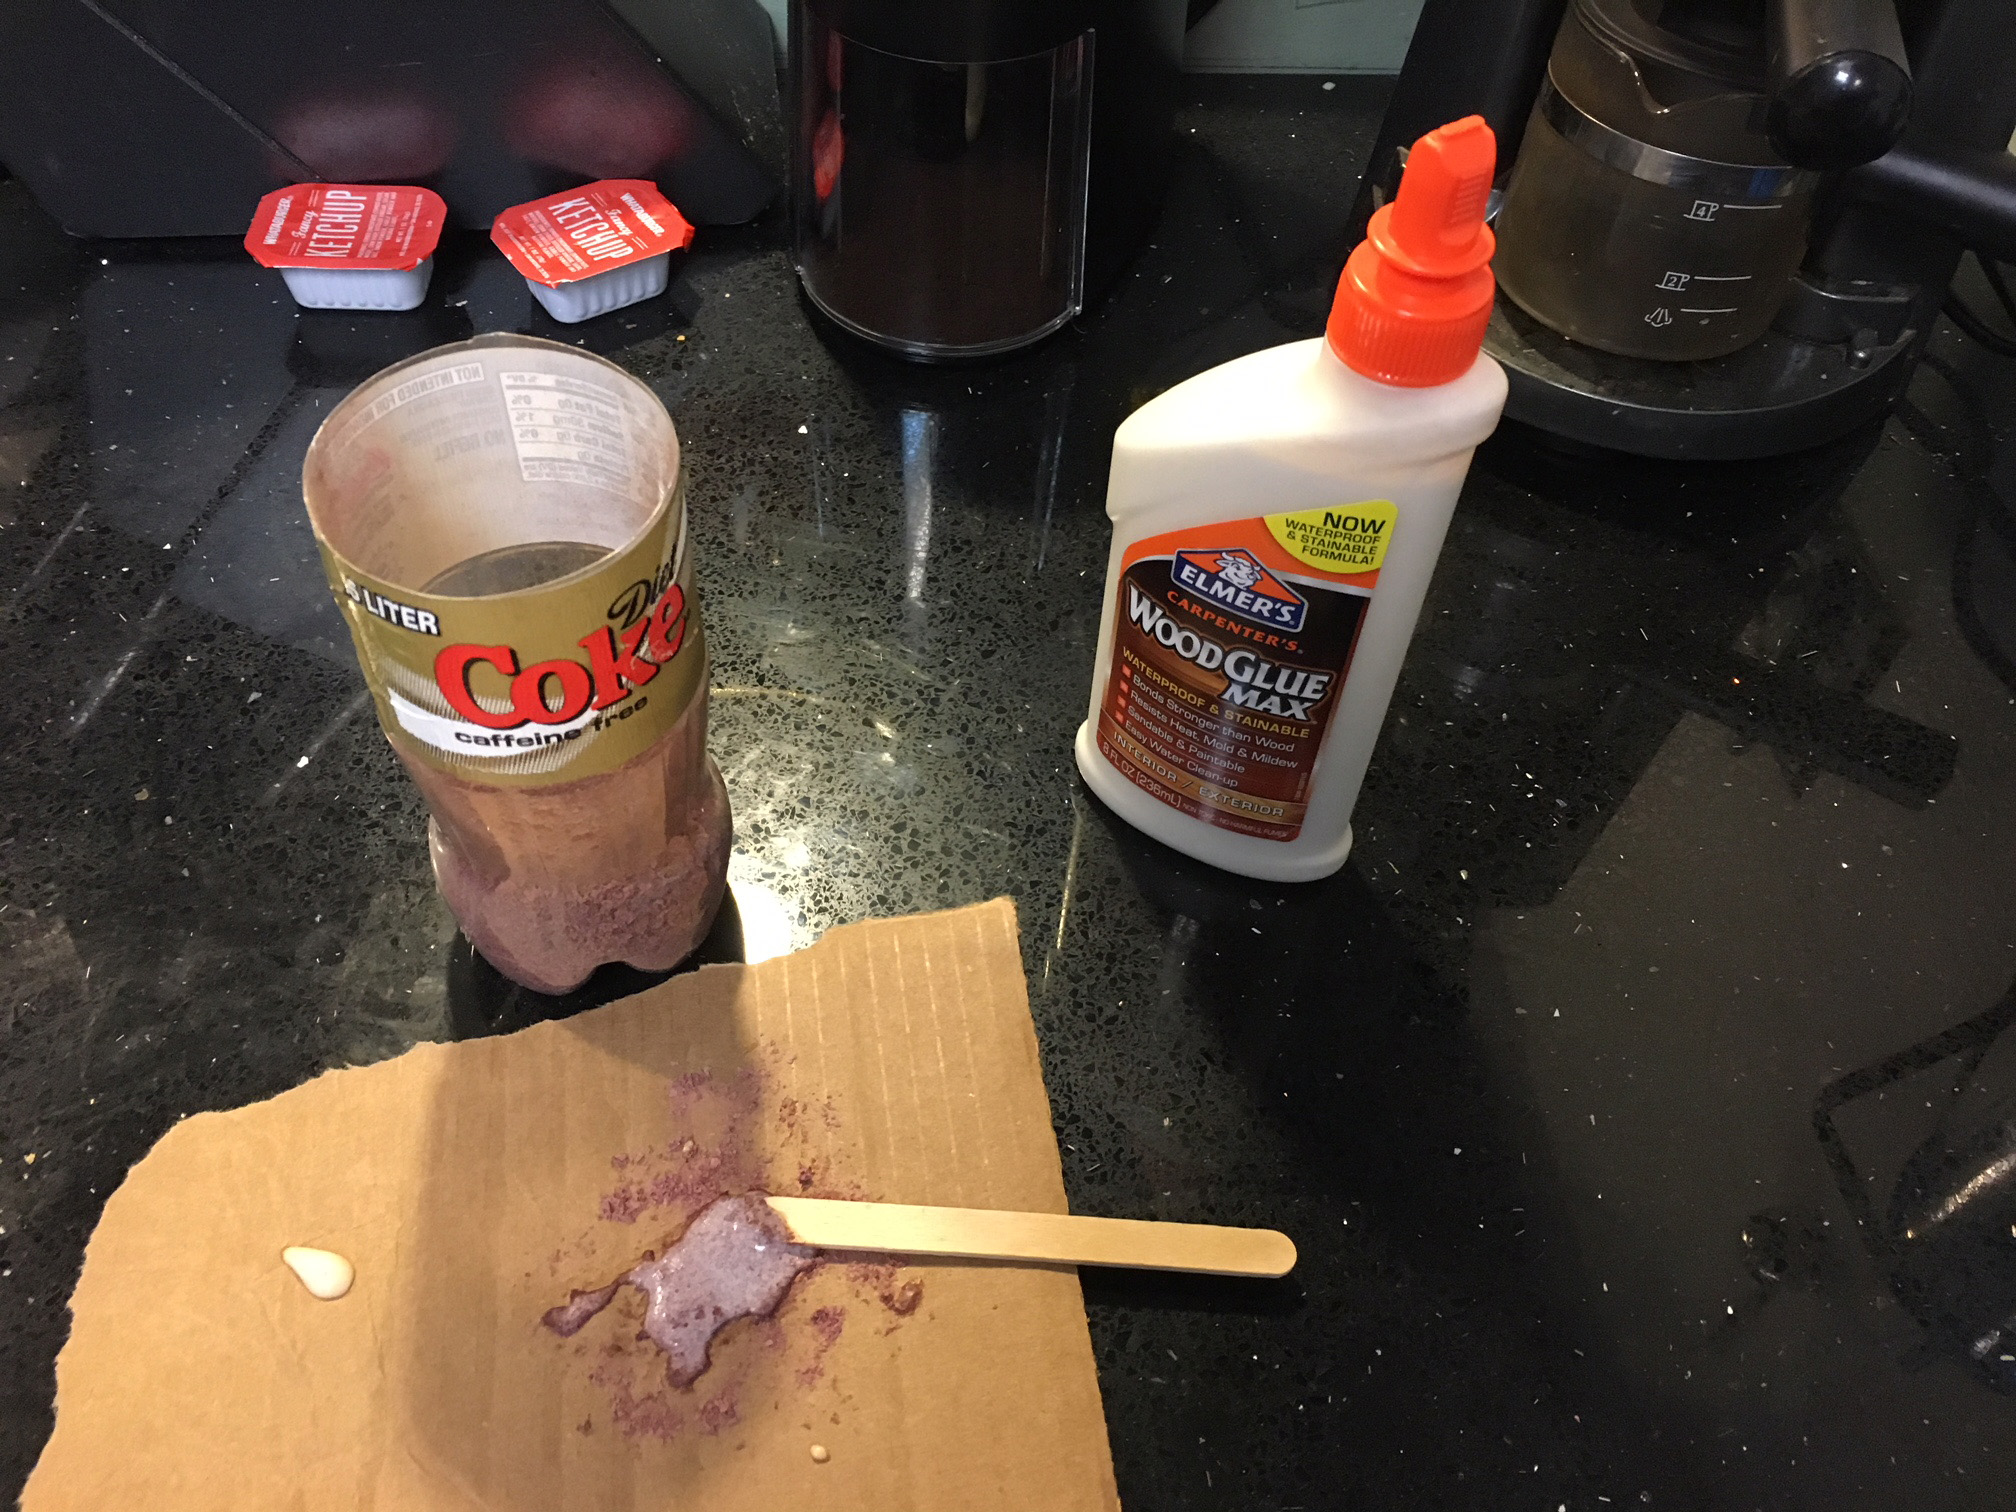
Homemade Wood Putty
How to make homemade wood putty

In a perfect world our woodworking projects wouldn’t require wood putty, filler, or grain filler. But wood is a natural product so some defects are inherent and as woodworkers we are prone to small mistakes. That’s where this homemade wood putty (and wood filler) comes in.

And if you are concerned, this is a small way to build green since you already have the sawdust and you are not paying for the production and shipping of little metal putty cans.

What You Need to Make Wood Putty

This is a simple procedure and the results are more accurate and less expensive than commercial putty and filler products. Here is what you will need.

  • Sawdust from your woodworking project
  • Elmer’s glue
  • Popsicle stick or something similar to mix with
  • A piece of scrap cardboard

The Process

This short video demonstrates the process; it’s not complicated and you just have to work the mixture until you achieve the desired consistency.

I hope this woodworking tip on homemade wood putty has helped you. Feel free to leave any comments that improve the process or just prove helpful.


Looking for more great content? Visit our partner sites:

The Green Frugal

Running Across Texas


As Featured On Ezine Articles

I offer article and blog-writing services. Interested? Hire Me!


Did you find this article helpful? Thanks for supporting this free site with a small donation!


Visit Kelly’s profile on Pinterest.


Rainwater Harvesting 101

index sitemap advanced
Rainwater harcesting or rainwater collection
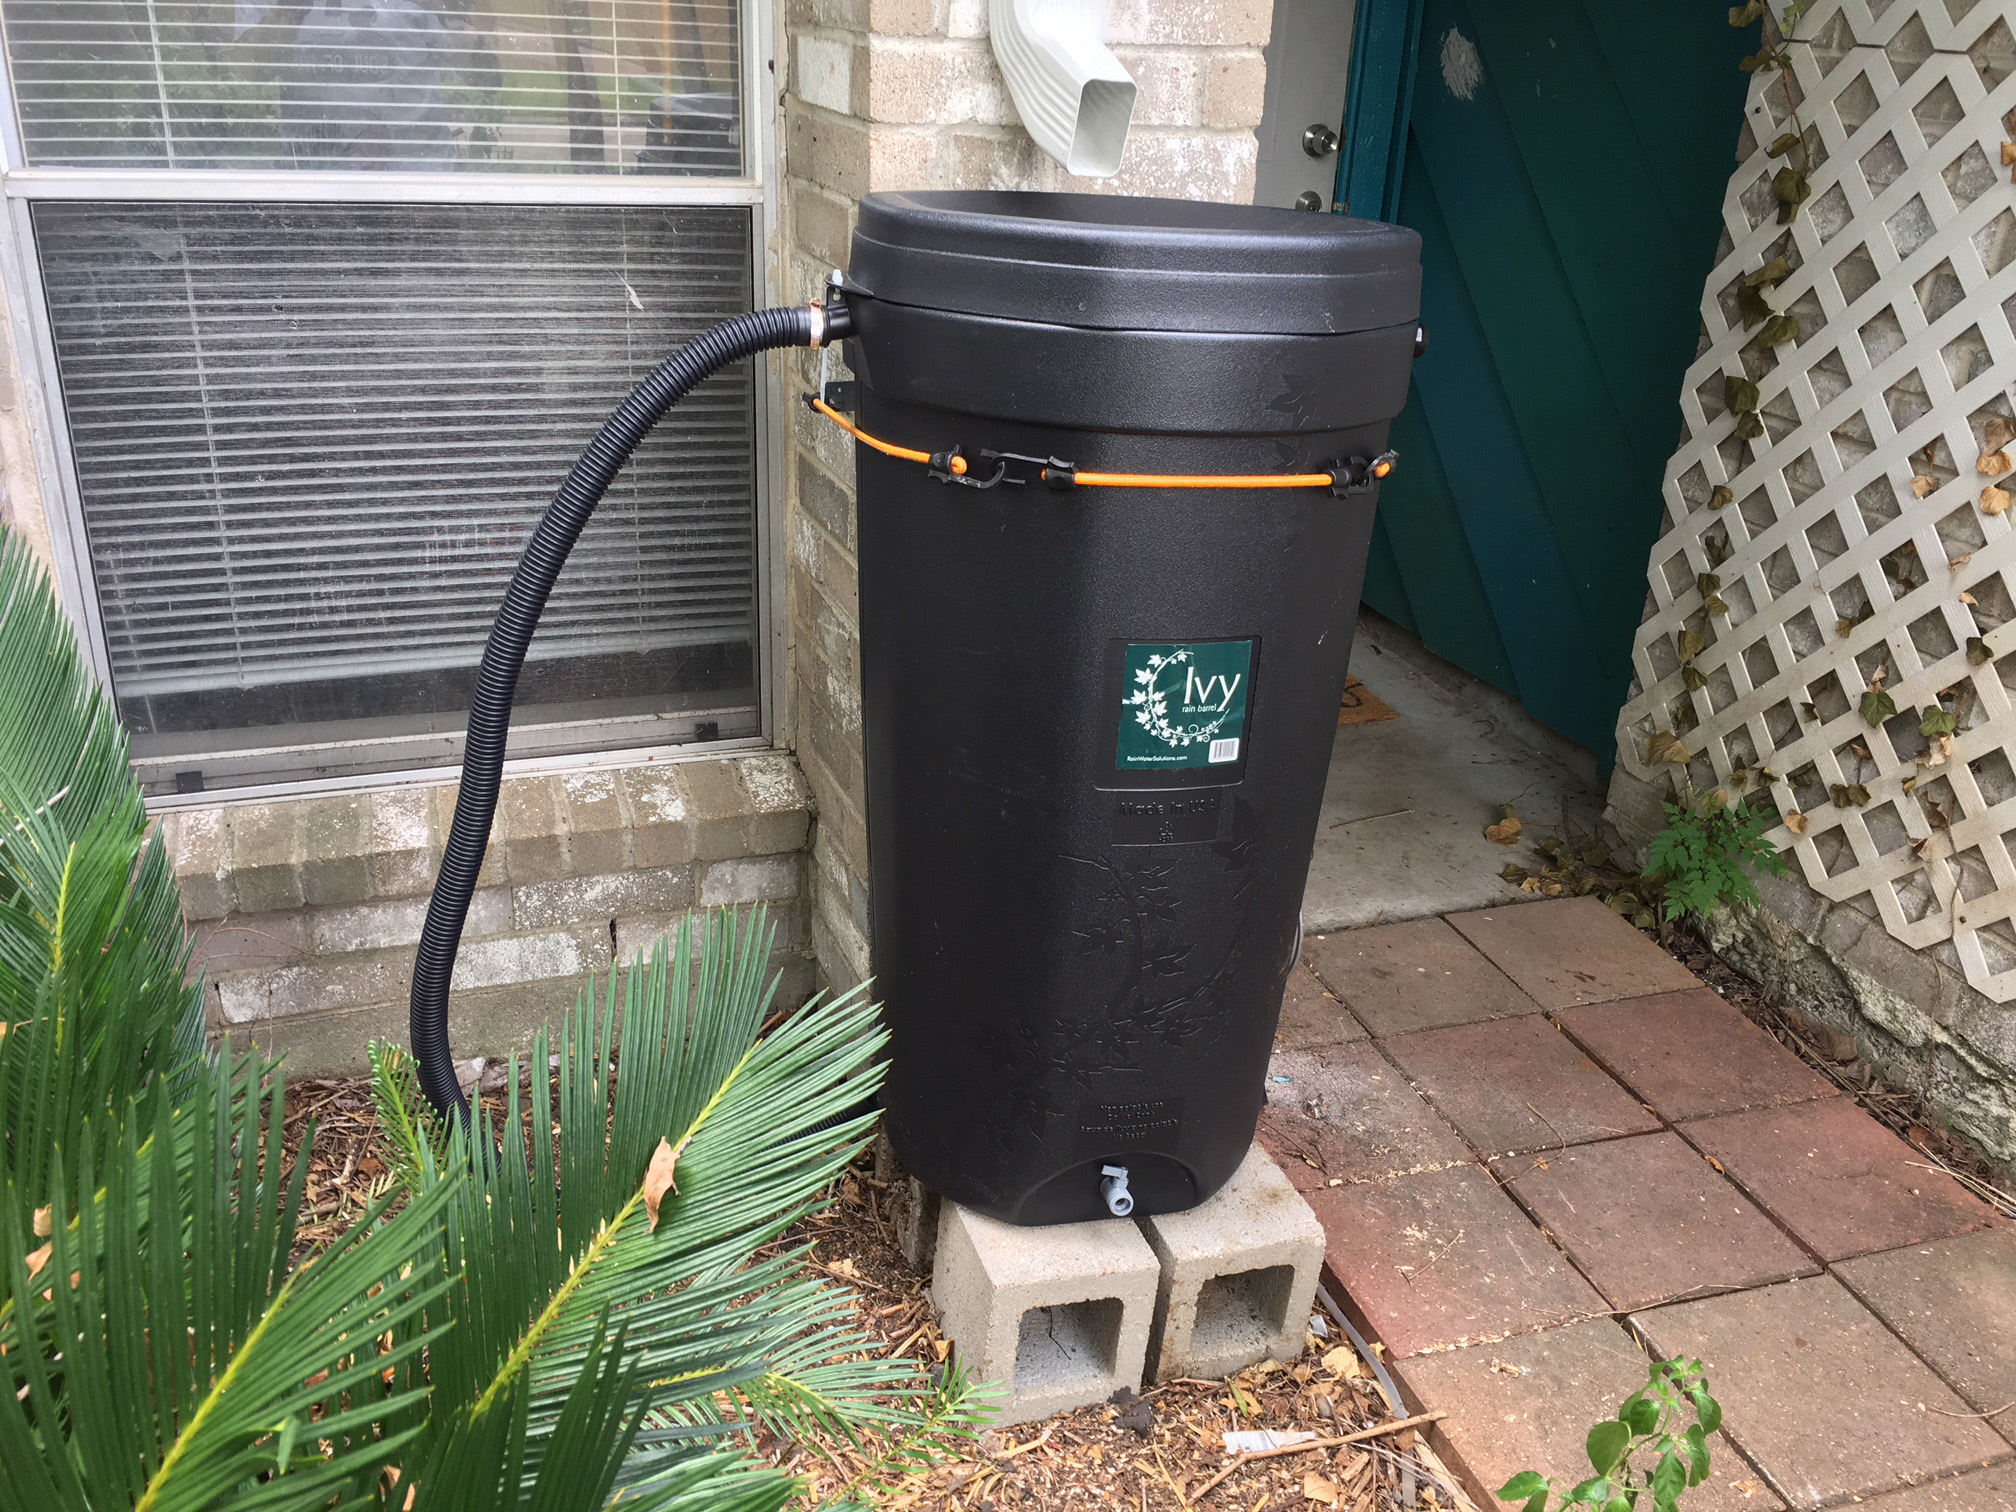
A typical rainwater harvesting barrel

This article was updated on 06/20/20.

Rainwater harvesting or rainwater collection as some call it has been gaining in popularity. There was a time when folks didn’t think much about using water. After all, it is inexpensive and flows from the tap; in our society hauling it home from a well or stream is the stuff of nostalgic folklore.

But that is not the case in many parts of the world. And since we now revel in global awareness, the availability of potable water has become a push-button issue among the green conscious folks among us.

In some parched parts of India men take on an additional spouse whose duty is to transport water from the source to the dwelling–it is a full time job. These “water wives” are often widows or single mothers wishing to “regain respect” in their communities. He notes that they usually do not share the marital bed and often live in separate apartments.

Minimizing Our Use of Potable Water

In our efforts to lower out consumption of tap water we have already trended towards the new normal; in the mid-’90s water conservation laws came into effect, creating the much-dreaded “low-flow” toilet. We also now have low-flow showers (dang it).

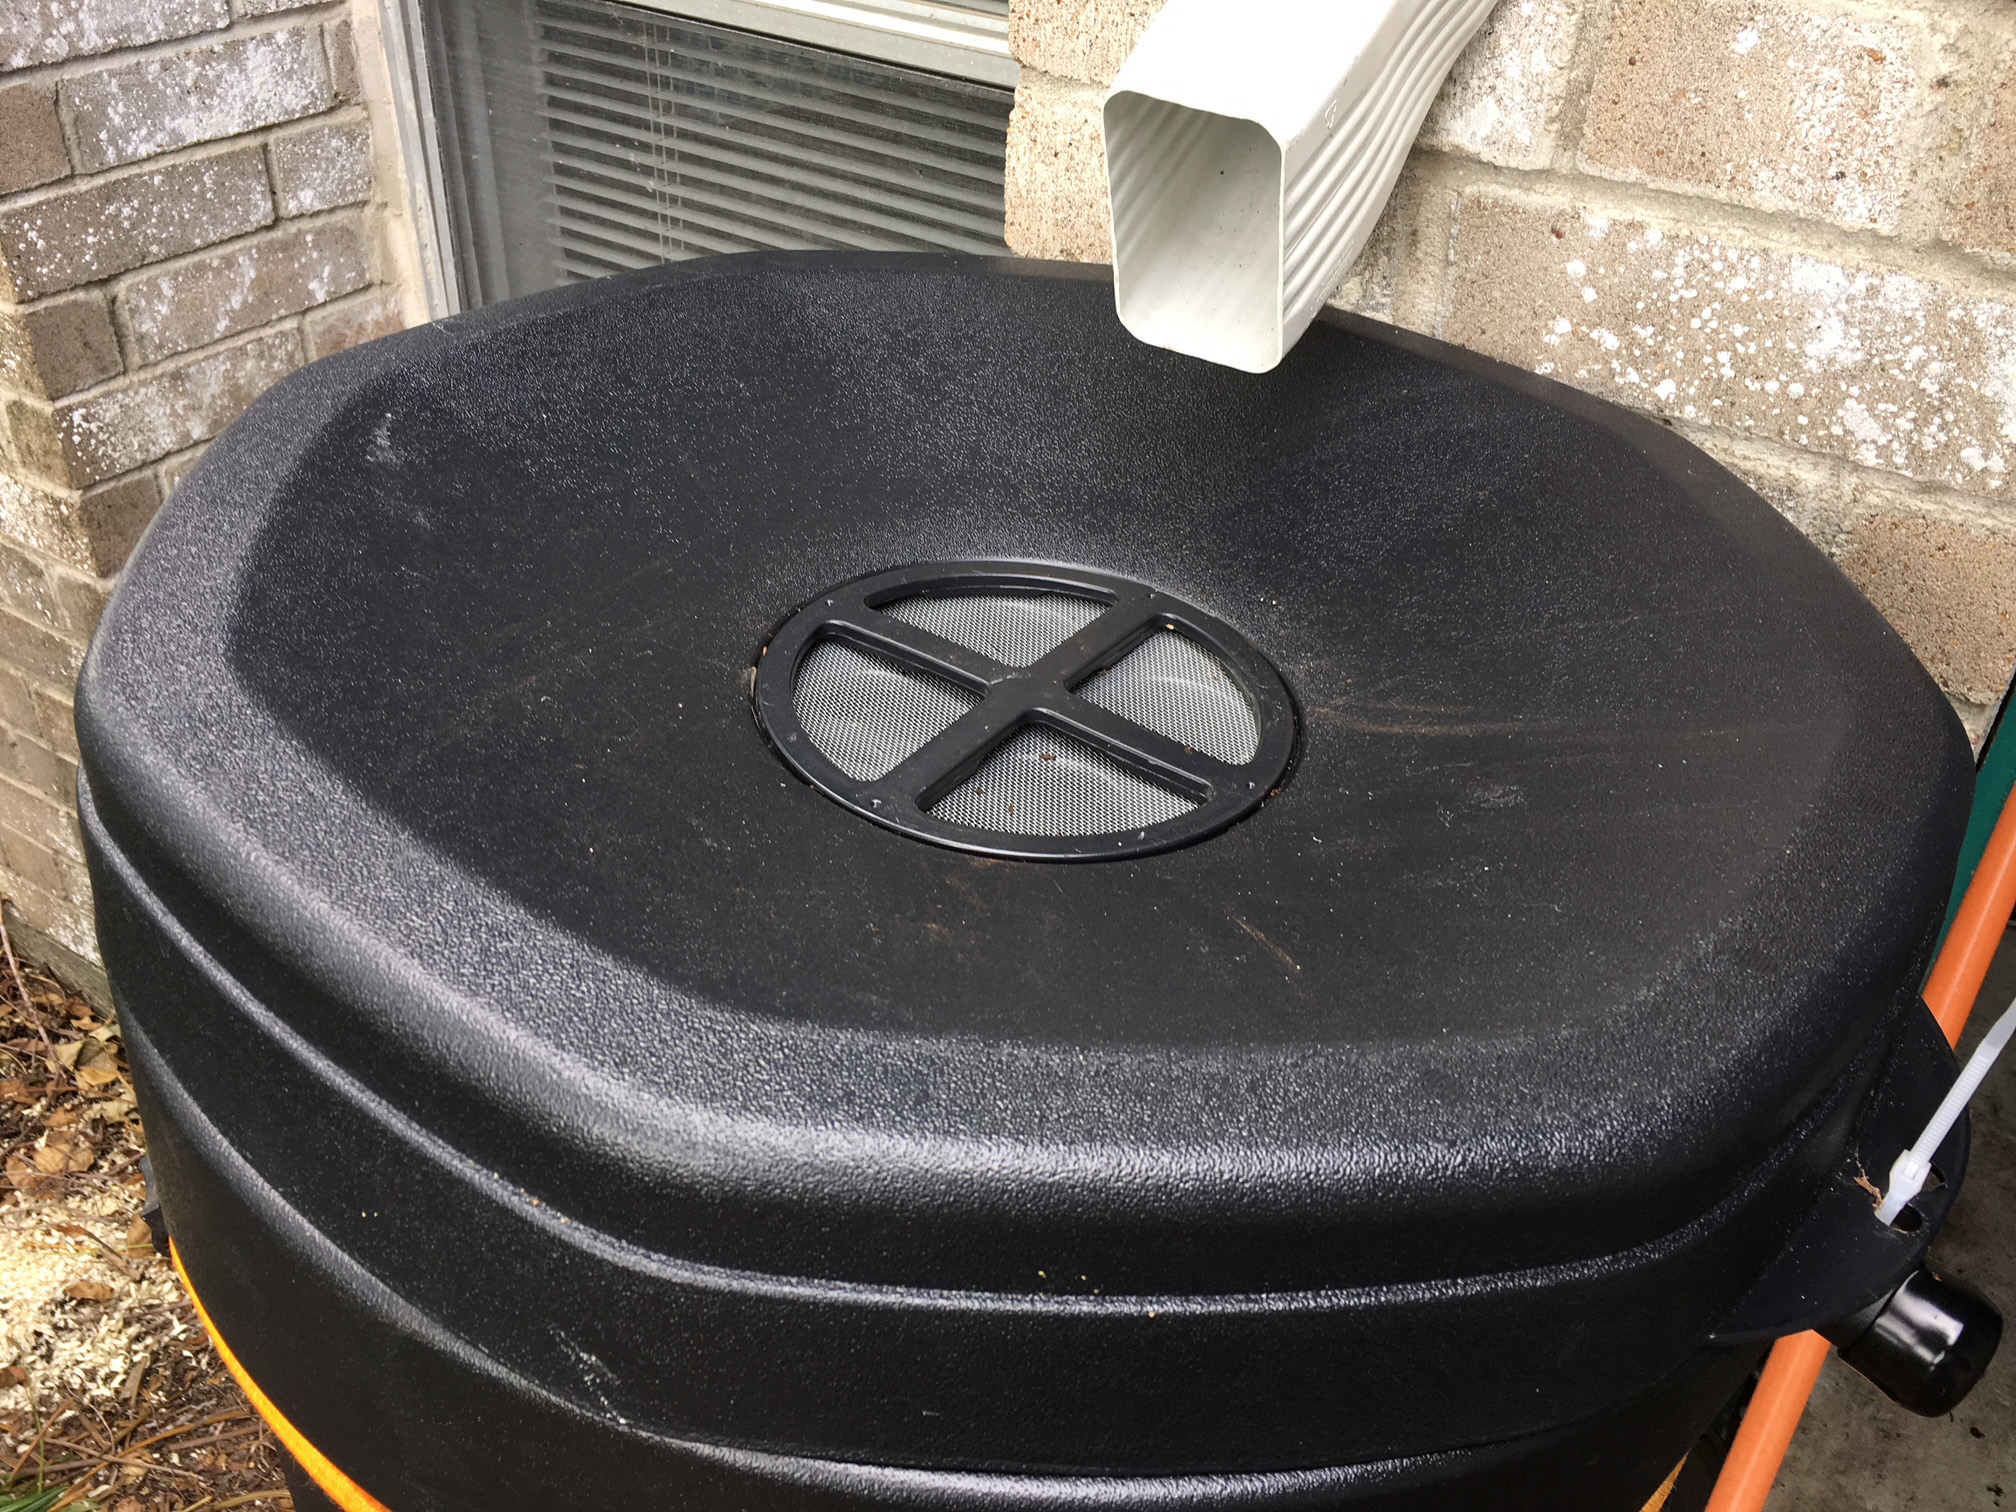
Still, it does seem wasteful to expend processed, fluoridated tap water to do things like water the lawn and flower beds. Besides, plants prefer the pH of rain over tap water. Win, win. That is where rainwater harvesting comes in. For residential use it is fairly straightforward. All you really need is a barrel with a screen on top. The water comes from the gutters on the roof line.

A rainwater collection barrel with a mesh filtering screen

How to Install a Water Harvesting Barrel

The good news for homeowner is that installing the system is simple and calls for few tools. The one pictured above is an Ivy 50 gallon barrel that I installed at my home this week. Online it lists for $89 but the small city that I live in teamed up with them for a bulk order for a deep discount.

The installation only took about 2 hours. The steps were as follows:

  1. Grade the ground level under the rain gutter downspout.
  2. Place 4 cinder blocks where the barrel will reside.
  3. Place the barrel on the blocks and measure up on the downspout approximately 8 inches from the lip of the barrel lid and use a square to mark a line on the front and sides of the downspout.
  4. Cut it off at this line. You can use a hacksaw but I used a small Dremel saw with a metal-cutting blade. It’s prettier and easier.
  5. Install the diverter (not included in the kit but just a few bucks at Home Depot) on the end of the now cut-off downspout. I used self-tapping screws and a cordless drill with a #2 Phillips bit.
  6. Place the barrel on the cinder blocks so that the diverter is over the lid of the barrel. Secure the lid to the barrel with zip-ties.
  7. Install the plastic cap on one side of the barrel and the overflow tube on the other side. These access ports are just under the lid sticking out from the barrel.
  8. Screw the tap into the bottom front of the barrel being careful not to cross thread it.
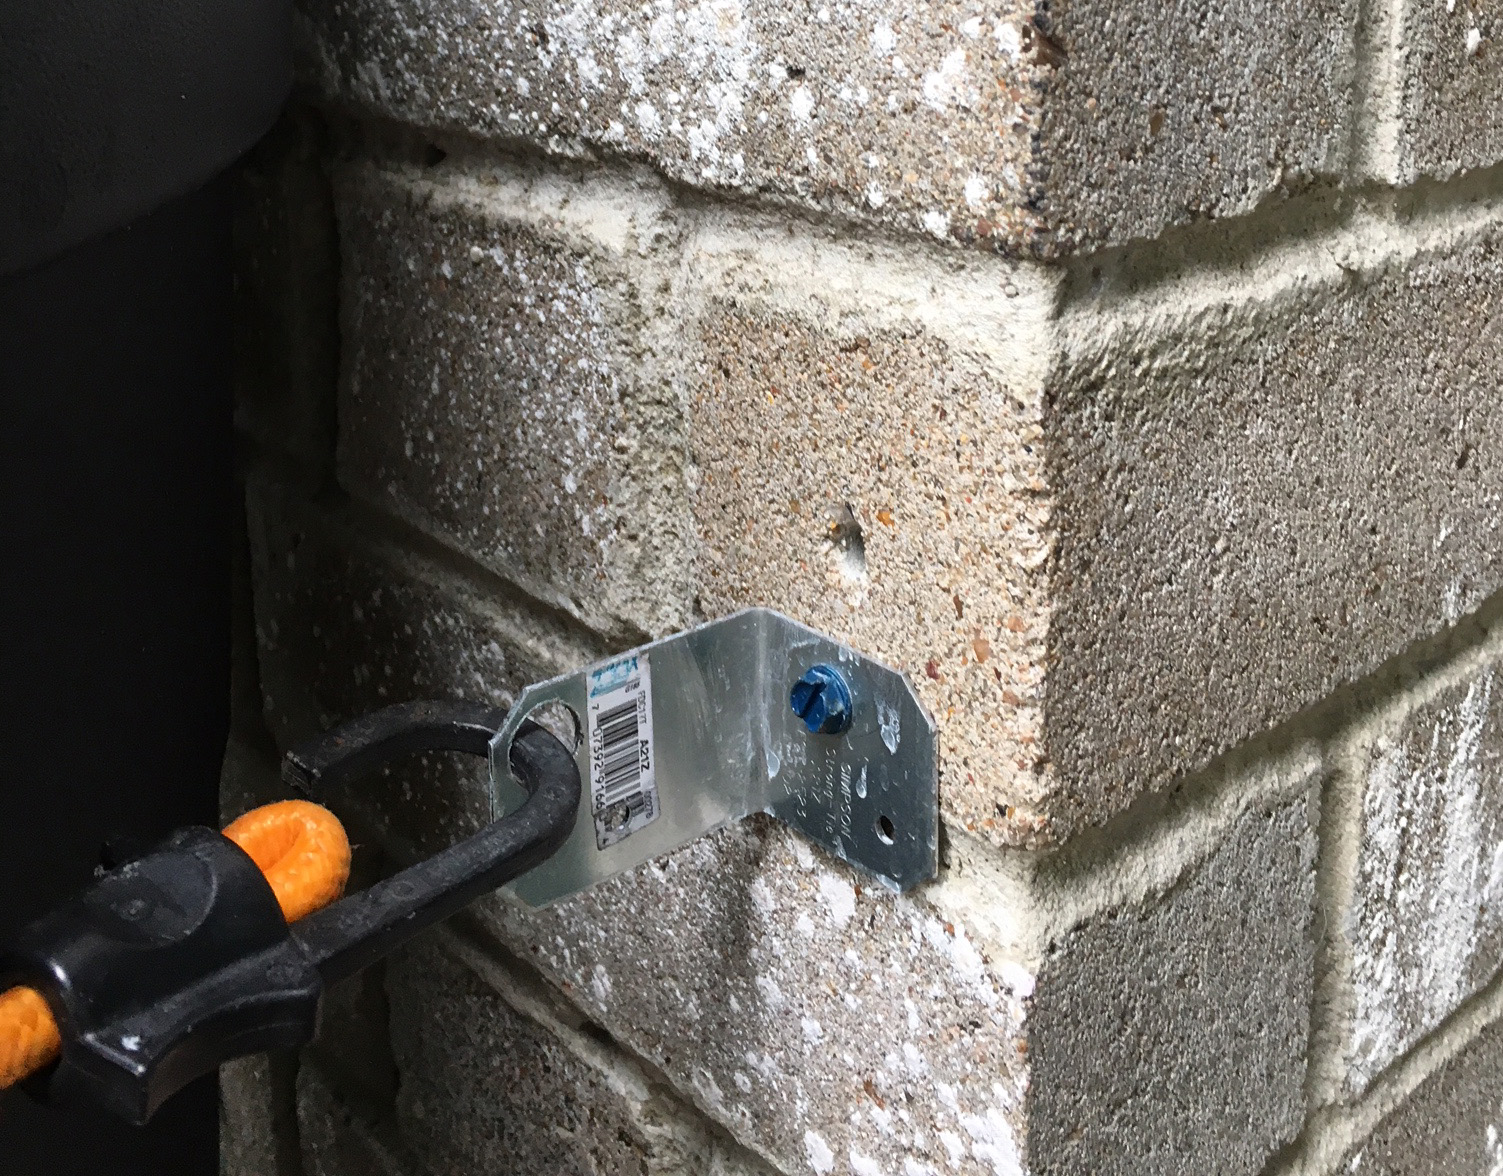
  9. The barrel must be secured to the exterior wall of your home or braced up somehow to prevent it from falling over. In the designer’s wisdom the barrel is wider at the top than it is at the bottom. In the image below you can see how I used Tapcon screws to secure a metal angle bracket to the brick. I had to drill the existing holes in the bracket bigger to accommodate the screw on one side and the bungee cord on the other. If we get some really bad weather (like a hurricane) I will add some heavy wire to back up the bungee cord.

Angle bracket with Tapcon screw and bungee cord

Where you live and how much collected water that you use makes a huge impact on how you set up your rainwater harvesting system. A 50 gallon barrel will do me just fine here in South Texas. But if you live in, say, the Pacific Northwest you can expand your system. Just add another barrel and connect it to the side where you placed the plastic cap on the port in step 7.


Looking for more great content? Visit our partner sites:

The Green Frugal

Running Across Texas


As Featured On Ezine Articles

I offer article and blog-writing services. Interested? Hire Me!


Did you find this article helpful? Thanks for supporting this free site with a small donation!


Visit Kelly’s profile on Pinterest.


Widget is loading comments…

About the Author:

Photo of Kelly R. SmithKelly R. Smith is an Air Force veteran and was a commercial carpenter for 20 years before returning to night school at the University of Houston where he earned a Bachelor’s Degree in Computer Science. After working at NASA for a few years, he went on to develop software for the transportation, financial, and energy-trading industries. He has been writing, in one capacity or another, since he could hold a pencil. As a freelance writer now, he specializes in producing articles and blog content for a variety of clients. His personal blog is at I Can Fix Up My Home Blog where he muses on many different topics.
Best Way to Install a Misaligned Sink Drain During Remodeling


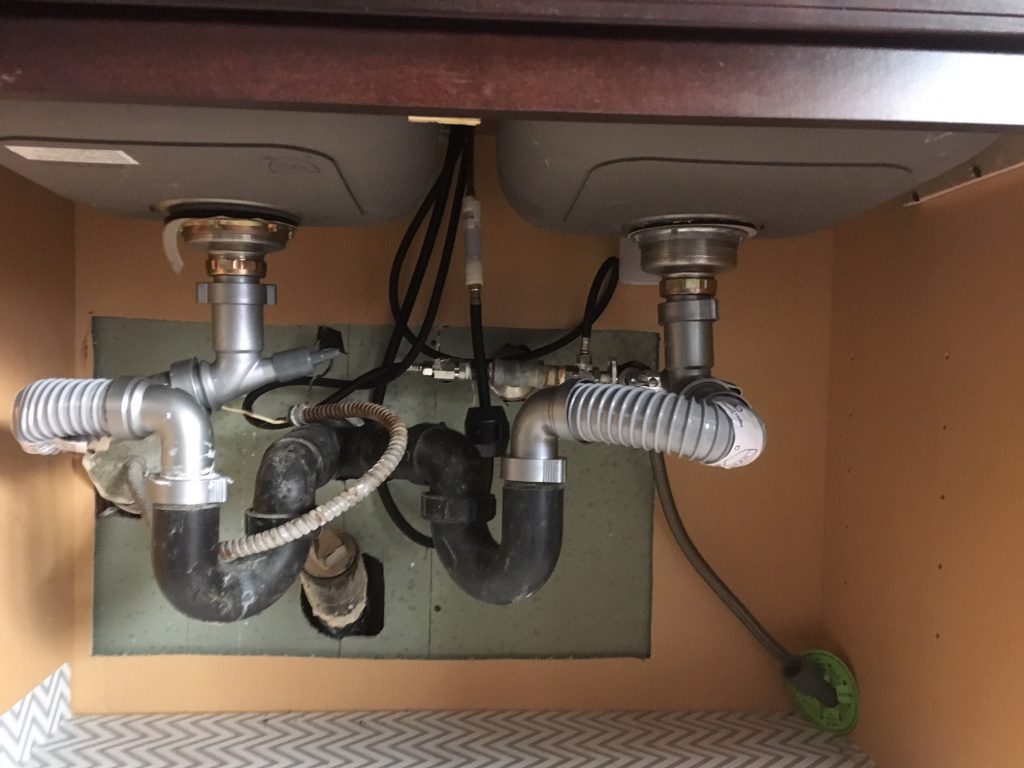
Snappy Trap sink drain

During new construction installing sink drains is easy-everything is configured to work together. During a kitchen or bathroom remodeling project it can be a completely different story. You can bet that things will not line up using new components.

Case in point: in the course of re-building in the aftermath of the flood due to Hurricane Harvey we’ve got new cabinets and sinks.  I needed to match up with the existing wall drainpipe. It came as no surprise that the hook-up was not the straight shot that the original was. I needed a solution.

A Flexible Solution for Connecting Drain Lines

After looking at a number of solutions I settled on the Snappy Trap. It seemed like the easiest to install and the price was right. It comes in several configurations-single sink, double-sink, etc.

In my case I used two single-sink kits since I have two drainpipe p-traps that converge into one drain. Of course, in a situation with a double-sink and one  drainpipe, the Snappy Trap 1 1/2″ all-in-one-drain kit for double bowl kitchen sinks will give the best results.

In any case, one of the important benefits over other systems is that with this product the flexible tube has a smooth interior. This prevents build-up and excessive odor.

The System is Dishwasher-Friendly

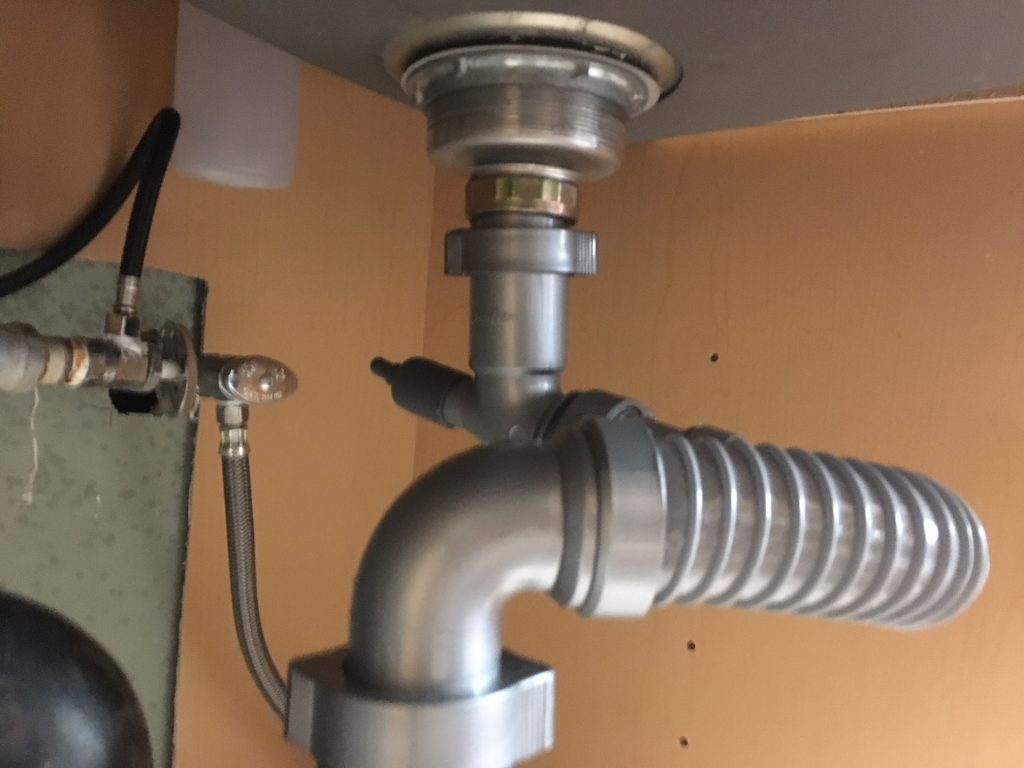
The elbow that connects to the sink strainer tailpipe has a dishwasher drain connection nipple that points up at an angle so that there will not be any back flow up into the sink (see the picture below).

Snappy Trap sink drain with dishwasher connector

This is a convenient option but if you don’t plan on connecting a dishwasher, simply leave the cap on and you’re good to go.

Installing a misaligned sink drain during remodeling without hiring an expensive plumber is a thing of the past. If you’ve got some basic tools and some DIY common sense, dive right in. The hardest part is crawling in the cabinet.


Looking for more great content? Visit our partner sites:

The Green Frugal

Running Across Texas


As Featured On Ezine Articles

I offer article and blog-writing services. Interested? Hire Me!


Did you find this article helpful? Thanks for supporting this free site with a small donation!


Visit Kelly’s profile on Pinterest.


Widget is loading comments…


Glass, Ceramic, and Porcelain Floor and Wall Tile

by Kelly R. Smith

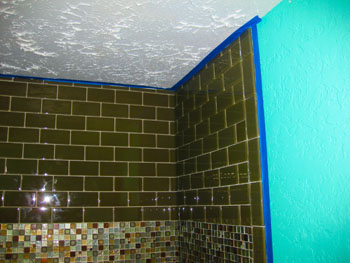
A glass tile wall with an accent strip

Article updated on 08/09/20

Tile is a very advantageous building material. It’s durable, inexpensive (usually), available in a huge range of styles, and easy to install with a few tools. Here are a few of the most common types of wall and floor tile that you are likely to encounter.

As with any new or remodeling construction project, it is important to approach it methodically and go in with a solid plan. Consider your construction budget, the living area and of course your style and tastes.

Glass Wall Tile

Glass tile is a great solution for shower walls and counter top  back splashes. The photo above is a bathroom shower glass tile installation that I recently did during a re-build following the Great Flood of ’18 (Hurricane Harvey).

This tile is clear glass with a colored paper backing which means it’s somewhat transparent at some angles and lighting conditions if the colors or marks on the underlying wall vary. Because of this it is important to apply a suitable white primer before applying the tile. Also, use white thinset as an adhesive.

Be aware that you will also need a special glass-cutting blade for your wet saw. Glass also chips easily so if you are making a narrow cut it is not only important to make a half cut and then flip it over and cut from the other direction but cut very slowly.

Ceramic and Porcelain Tile

Porcelain and ceramic tile is suitable for floor, kitchen back splash installation and wall applications. The difference between the two is susceptibility to water absorption due to content of materials and how they are fired and boiled.

The advantage of porcelain is that it resists moisture much better than ceramic so consider your application. It is also more costly in general.

Going Beyond the Ordinary; Tile Patterns

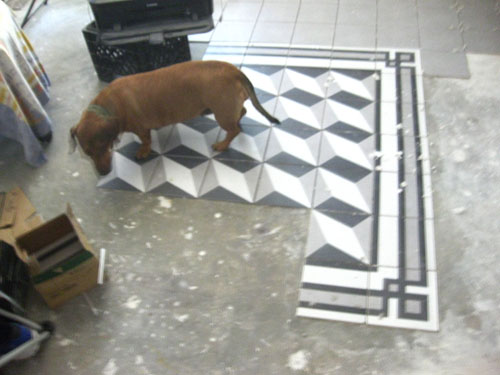
A 3D ceramic tile pattern

There is no reason that your tile installation project has to be bland. The photo above shows a 3D center area with a border tile pattern that I am currently working on. It is available through Home Depot and is the Twenties collection by Merola and the pieces are Diamond (for the 3D center), Corner, and Frame. And of course for the outside I’m using matching gray tile of the same size.

In my case they didn’t carry it at my local Home Depot store so I ordered online and picked it up there in a week or so. Free shipping!


Looking for more great content? Visit our partner sites:

The Green Frugal

Running Across Texas

As Featured On Ezine Articles


I offer article and blog-writing services. Interested? Hire Me!


Did you find this article helpful? Thanks for supporting this free site with a small donation!


Visit Kelly’s profile on Pinterest.


close

Enjoy this blog? Please spread the word :)

RSS
Follow by Email
Twitter
Follow Me
Tweet
Pinterest
Pinterest
Pinterest
Instagram
LinkedIn
Share