Tankless Water Heater Maintenance Tips

Routine Appliance Care Saves Money and Extends Service Life
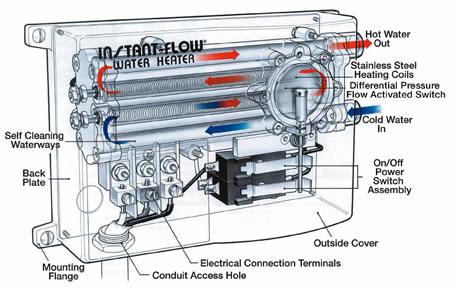
Photo of Kelly R. Smith   by Kelly R. Smith

Typical tankless water heater anatomy
index sitemap advanced

This article was updated on 04/15/21.

Ads we feature have been independently selected and reviewed. If you make a purchase using the links included, we may earn a commission, which helps support the site. Thank you for your support.

Tankless water heaters have long been a staple in Europe and Asia and are becoming more common in the US. There are many good reasons for this; the primary one is economic. Unlike a typical tank water heater, it only delivers hot water upon demand. Why store it in a bulky tank when you don’t have to? It’s one more way to increase your home’s energy efficiency.

It’s not a complete panacea though. Like any other appliance it requires periodic maintenance to operate effectively. Here are the top tankless water heater maintenance tips that the homeowner can do; make it a periodic DIY project. These generic instructions will work for most units but be sure to check your manual for any proprietary details.

Clean the Air Filter

  • Turn off and unplug the heater or isolate power by flipping the circuit breaker.
  • Find the air filter; remove it.
  • Inspect it carefully; a dirty filter will reduce performance.
  • Clean it with a soft-bristled brush using a mild solution of dish soap and warm water.
  • Rinse it well with clean water and dry it using a lint-free towel, and reinstall.

Clean the In-Line Water Filter

  • Find the in-line water filter at the cold-water inlet.
  • Close the cold-water supply valve to turn off the water supply to the unit.
  • Remove the filter.
  • Clean the filter by tapping it to dislodge sediment, run it under clean, clear water, and wipe it with a cotton swab.
  • Reinstall the filter.
  • Reopen the cold-water supply valve.
  • Check for leaks; tighten as needed.

Flush the Heater

  • Close the shutoff valves on both the hot and cold water lines.
  • Connect a hose from the outlet of a circulation pump to the cold-water service valve. Connect a drain hose to the hot-water service valve.
  • Pour 4 gallons of undiluted food-grade white vinegar into a clean 5-gallon bucket. Place both the drain hose from the hot water service valve and the pump supply hose (connected to the pump’s inlet) into the vinegar bucket.
  • Open the service valves on the hot and cold-water lines.
  • Turn on your pump allowing the vinegar to circulate throughout the heater at a rate of 4 gallons per minute.
  • Let it run an hour and then flush the system with clean, cold water to remove the vinegar and any loose minerals. To do this step, first remove the free end of your drain hose from your bucket, and then run it either to a convenient drain or to the outside. Next, close the cold-water service valve, open the cold-water supply valve, and then let the water flow through your heater for a minimum of five minutes. Next, close the cold-water supply valve, and clean the in-line water filter at the cold-water inlet on the heater to remove any loose deposits the filter picked up during the above process. Again, clean the filter by tapping it, running it under clean water and wiping it with a cotton swab. Finally, replace the filter.
  • Close your hot-water service valve, and then open both the cold and hot-water supply valves.
  • Disconnect all of the hoses, restore power to the heater, and turn it on.

These steps for tankless water heater maintenance should help you to keep your unit running efficiently and save you money by not having to hire a contractor. If you agree, please share with your friends and social media.


Looking for more great content? Visit our partner sites:

The Green Frugal

Running Across Texas


As Featured On Ezine Articles

I offer article and blog-writing services. Interested? Hire Me!


Did you find this article helpful? Thanks for supporting this free site with a small donation!


Visit Kelly’s profile on Pinterest.


About the Author:

Photo of Kelly R. SmithKelly R. Smith is an Air Force veteran and was a commercial carpenter for 20 years before returning to night school at the University of Houston where he earned a Bachelor’s Degree in Computer Science. After working at NASA for a few years, he went on to develop software for the transportation, financial, and energy-trading industries. He has been writing, in one capacity or another, since he could hold a pencil. As a freelance writer now, he specializes in producing articles and blog content for a variety of clients. His personal blog is at Considered Opinions Blog where he muses on many different topics.


How to Determine the Correct Size for a New HVAC System

index sitemap advanced
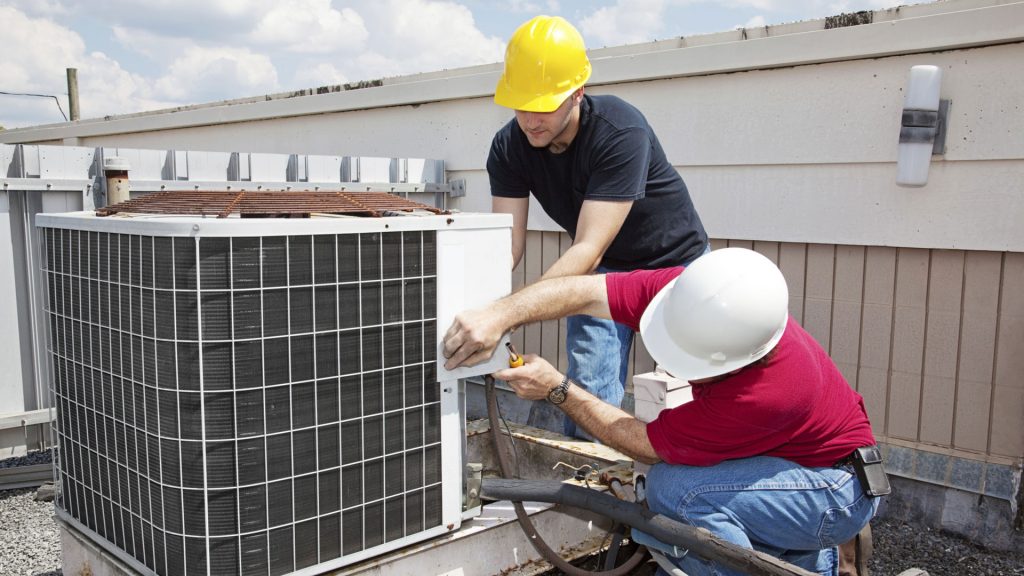
Servicing an HVAC Unit

Homeowners today have a good selection of different types of HVAC systems to consider. The best type is usually determined by your environment. Swamp coolers are made just for use in hot dry locations. Central air conditioner and heaters work well for most of the country. Heat pumps are very efficient but are expensive to install. The list goes on and on. The thing they all have in common is that they should be properly sized for the structure they will serve.

Furnaces that are too large tend to cycle off and on continuously. A central system that is too large may be less effective at dehumidification than a correctly sized AC unit. And it goes without saying that a larger unit costs more going in. A too-small system works too hard to keep up. But a properly sized system will do the right job for the environment at maximum efficiency.

Contractors Shouldn’t Rely on Rule of Thumb

Too many contractors rely on “experience” or an “educated guess. Bad idea. It’s much better to use worksheets designed by the Air Conditioning Contractors of America (ACCA). They are far more accurate because they take into account individual actual conditions. These include the amount and type of insulation, the size of the home, the size and glazing type of windows, air leakage, lighting, and home appliances.

To make these calculations, the International Residential Code, which is the dominant building code in the U.S. should be followed. It requires that heating and cooling equipment be sized with the help of Manual J, or a similar approved methodology. However, the rule is too often ignored. Studies have demonstrated that heating and cooling equipment is far too often over-sized, often by as much as 200%.

So before you hire a contractor, this is one thing you should quiz him about. Does he follow this protocol (even though your local code may not require it)? After all, a new HVAC system is a big investment and it’s your investment, not his.

Other Ways to Determine HVAC Size

If you really want to be sure that all the factors are being figured correctly, do it yourself and follow Manual J. You will need to determine the U-factors of building components such as windows, doors, insulated walls, determine the “outdoor design temperature” for your area, take an estimate about airtightness, and finally use a heat-loss formula to determine how much energy in Btu your home loses through the building exterior.

You can also hire a pro. This might be a certified HERS rater, a mechanical engineer, or an energy consultant. You may be spending a bit more time and money up front, but generally speaking, contracting a trained professional third party who has no vested interest in selling you a particular brand or size of unit is far preferable to trusting a seat-of-the-pants estimate that might be questionable.

In any event, always be sure that you and any contractor are on the same page before any work begins. Whenever this much money is involved it is always in your best interest.

I hope this information on determining the correct size for a new HVAC system has helped you. If so, pass the URL along to your friends. Thanks for visiting!


Looking for more great content? Visit our partner sites:

The Green Frugal

Running Across Texas


As Featured On Ezine Articles

I offer article and blog-writing services. Interested? Hire Me!


Did you find this article helpful? Thanks for supporting this free site with a small donation!


Visit Kelly’s profile on Pinterest.


About the author:

Photo of Kelly R. SmithKelly R. Smith is an Air Force veteran and was a commercial carpenter for 20 years before returning to night school at the University of Houston where he earned a Bachelor’s Degree in Computer Science. After working at NASA for a few years, he went on to develop software for the transportation and financial and energy trading industries. He has been writing, in one capacity or another, since he could hold a pencil. As a freelance writer now, he specializes in producing articles and blog content for a variety of clients. His personal blog is at I Can Fix Up My Home Blog where he muses on many different topics.

10 DIY New Year Projects to Tackle–Part 2

index sitemap advanced

See the Previous 5 DIY New Year Projects

Install a Pre-hung Door

An Exterior  Pre-hung Door
An Exterior Pre-hung Door

Some things in life just get easier. Hanging doors is one of those things thanks to the pre-hung doors available at home improvement stores. No mortising, no muss, no fuss. To make things even easier, hardware clips called The Quick Door Hanger are available to eliminate shimming the door jamb in the rough opening. Basically, all you need is a 4′ level or plumb bob, a measuring tape, a pencil, and a cordless drill with a Phillips bit. I’ve gotten to where I can hang a door in about 15 minutes. Life is good.

Frame Out Your Basement

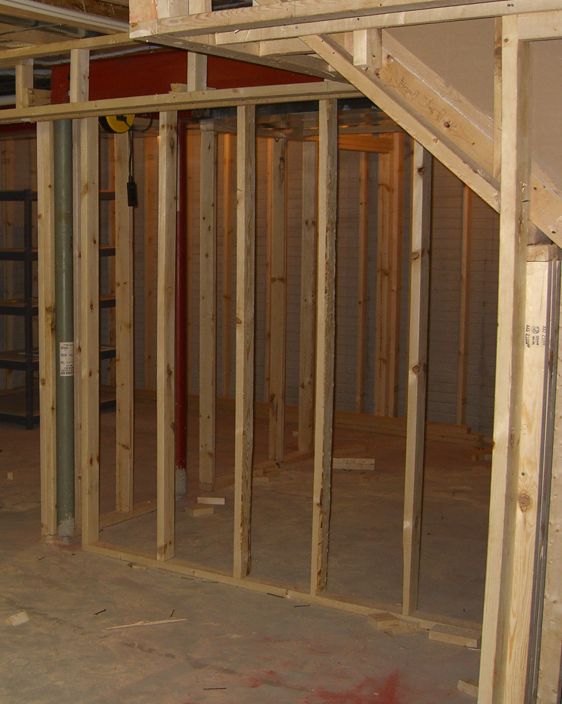
Wood framing in a basement

Basements are often basically unused, wasted spaces. This is really a shame because framing and finishing it out expands your living space and boosts your home equity. I mean, that space is included in your property taxes anyway, right? This is a great project that can be put on your schedule for any time of the year. Learn the basics of framing a basement and some of the options that are available to you. Yes, this is a DIY project but you might need to pull some building permits. Always check your local building code.

Dieting is One of the Most Popular New Years Resolutions

Healthy food for weight loss

Exercising, putting down the cigarettes, and going on a diet; these are the big 3 New Years resolutions. But there are a plethora of choices when choosing a diet. Which one is right for you? Which one can you realistically stick to? Inform yourself with these 10 most popular diets today.

Give Your Walls a Face Lift On a Budget

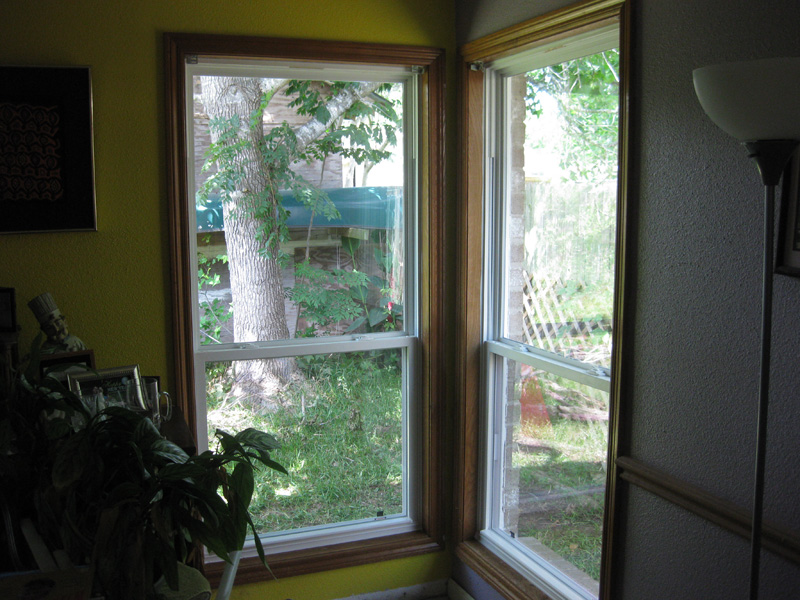
Colorful walls & energy efficient windows

Upgrading the look of your walls is a great way to give your living space a fresh look on a shoestring budget. You can add a bolder texture, hang wallpaper, or choose paint colors that give the illusion of more space or higher ceilings. You can even paint over that dark paneling that looked so cool back in the 60s. Which wall improvement is right for your home? Learn about wall options here. Some people hate painting but that’s the wrong way to look at it. It is one job where you can see the results of your labors in a very short time. Some BEHR paint has the primer built in which basically cuts your time in half.

Install Radiant Barrier Foil in Your Attic

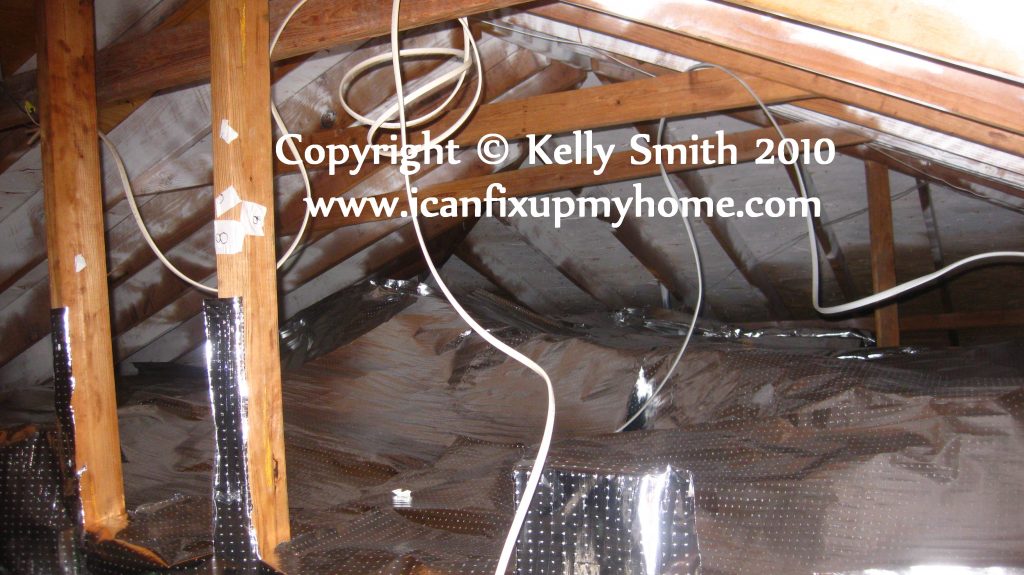
Energy Q Radiant Energy Barrier Foil In the Attic
Energy Q Radiant Energy barrier Foil In the Attic

Sure, everybody knows about maxing out the recommended amount of insulation in the attic (according to location) but that only represents about half the money you could be saving on energy costs. Why not install radiant barrier energy foil over the insulation? The savings are two-fold–it keeps the heat out in the summer but keeps it in during the winter. I can tell you from experience that the colder months are the perfect time for this project. I did mine in March a few years back and it more than paid for itself during the first summer. If you use your attic and it has flooring, there’s no reason you can’t tack it to the underside of the roof sheathing. Or conversely, use the radiant barrier paint.

I certainly hope these 10 DIY New Years projects (the first 5 are on this page) have inspired you. If so, I would appreciate you sharing these pages with your friends. Have a great New Year and thanks for visiting!


Looking for more great content? Visit our partner sites:

The Green Frugal

Running Across Texas


As Featured On Ezine Articles

I offer article and blog-writing services. Interested? Hire Me!


Did you find this article helpful? Thanks for supporting this free site with a small donation!


Visit Kelly’s profile on Pinterest.


Lower Electric Bills with an A/C Misting System


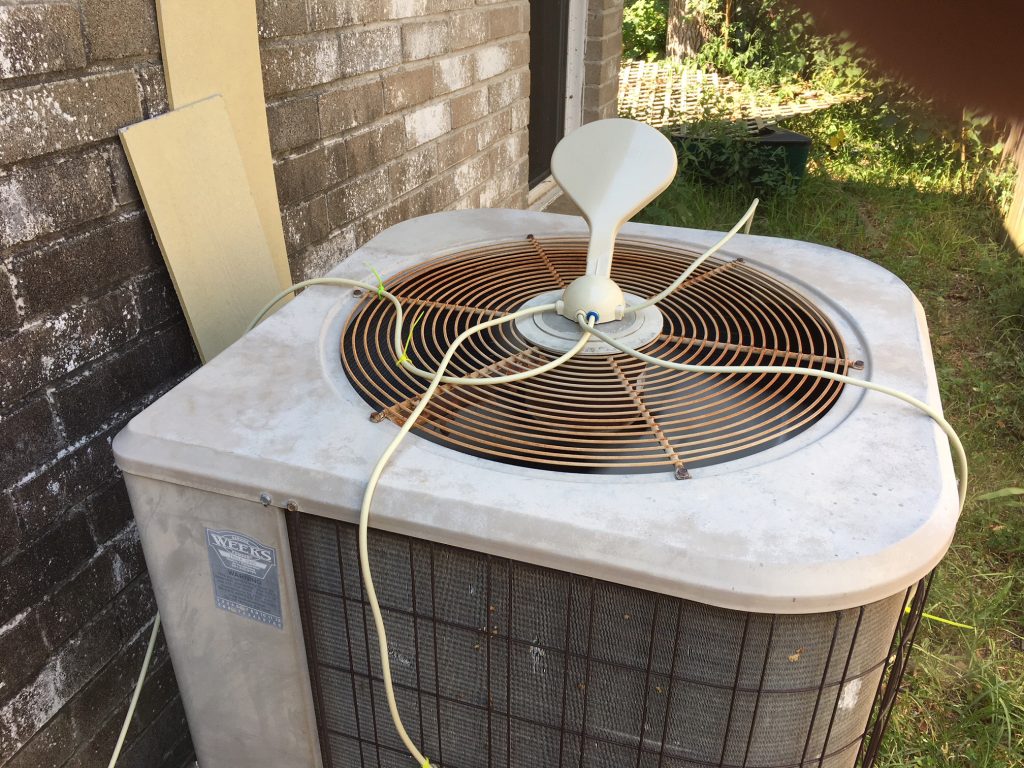
Cool-N-Save A/C condenser misting paddle

Summertime is here and the living is easy. Except perhaps for that high electricity bill from the incessant cycling of the air conditioner. Sure, you’ve beefed up the insulation, sealed leaks and perhaps installed radiant barrier foil in the attic. But there’s more you can do; you may be able to lower your electric bills with an A/C misting system.

Can a Condenser Coil Mister Save the Day?

I have been intrigued by this concept for a while now and with the South Texas temperatures flirting with triple digits and rising utility rates I decided this was the year to implement it. I already understood the cooling power of evaporating water, having worked with cooling towers and chilled water systems while working as an Engineering Supervisor for Marriott.


But this is a different application although the basic science is roughly the same. The one I installed at my home yesterday is the Cool-N-Save basic kit. Their claim is that the mist will lower the temperature of the air around the coils by as much as 30°F. This means that your HVAC system will not have to work as hard, consequently becoming more efficient and saving you money. Have I saved money yet? I don’t know! I just installed it yesterday. But I do have historic data and I’ll update this post when I have some hard numbers.

Curious about the science? Heat flux, thermal flux, heat flux density, or heat flow rate intensity is a flow of energy per unit of area per unit of time. Call it what you will, heat flux is at its most efficient whenever the outdoor ambient air temperature is lower than the refrigerant flowing through inside the A/C coils. So the evaporative effect of the misting lowers the ambient temperature in the area around the condenser coils and bingo! Efficiency prevails.

How the Cool-N-Save Coil Mister Works

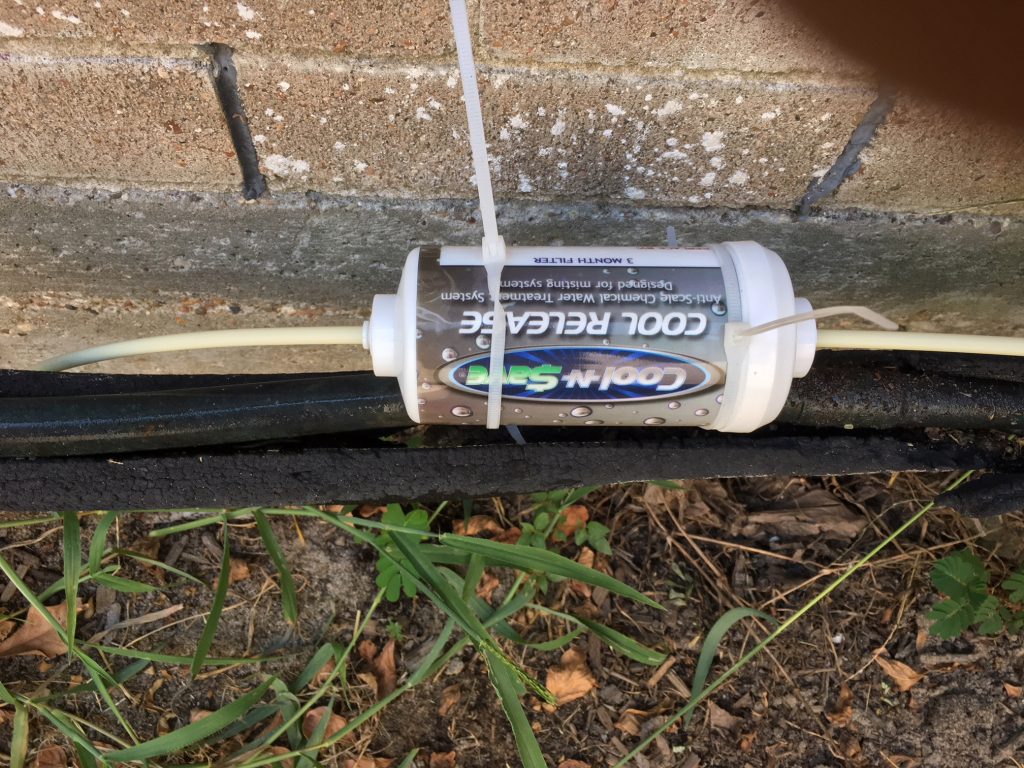
Cool-N-Save mister water filter

The basic kit comes with:

  • 1  Control valve and paddle
  • 3  2′ Misting arms (tubing from the control valve/paddle to the misting nozzles)
  • 3  Brass misting nozzles
  • 1  Cool Release water treatment filter (3 month life)
  • 1  20′ flexible water feed line
  • 1 Garden hose adapter

The only thing I added was a brass splitter with cut-off valves for my outdoor spigot so I can use the mister and garden hose concurrently.

A dedicated garden hose attaches to the supplied garden hose adapter whose tubing enters the filter. Another hose (cut from the 20′ line) connects the filter to the control valve on the paddle. The three misting arms connect to the control valve/paddle and dangle down three sides of the condenser respectively terminated by the misting nozzles. Use zip-ties in all the obvious places.

When the A/C cycles the fan in the condenser unit kicks off. This blows up the paddle and enables water flow to the misting nozzles. It’s that elementary, Watson. (Pardon the inevitable Sherlock Holmes reference.)

Regular readers of my energy efficiency  articles know that I stress incremental changes; it is generally many small to large changes, not just one huge one that will reap savings. An A/C misting system is my latest energy tweak. I’ll be back in touch with results.


Looking for more great content? Visit our partner sites:

The Green Frugal

Running Across Texas


As Featured On Ezine Articles

I offer article and blog-writing services. Interested? Hire Me!


Did you find this article helpful? Thanks for supporting this free site with a small donation!


Visit Kelly’s profile on Pinterest.


Widget is loading comments…


Top 10 Ways to Go Green

index sitemap advanced


Have a green home and lifestyle


Going green is as trendy as ever but did you know that it will save you money as well? You can do more than recycle; you can make small changes in all areas of your home and life that really add up. Here are the top 10 ways to go green on our list.

  1. Go Organic in your garden and lawn. First of all, stop it with all the pesticides. Monsanto’s Roundup is in trial right now for allegedly causing cancer. The active ingredient glyphosate is “probably carcinogenic to humans,” according to the World Health Organization. Stop it with the “weed and feed” products as well. Sure, the herbicide ingredient will kill some weeds but they can also kill shrubs and trees if applied in the drip zone. Just broadcast organic fertilizer and agricultural dried molasses in the spring and fall. This will encourage deep root growth of your lawn grass which means less watering, saving money. It is also recommended to apply beneficial nematodes to eliminate fleas in the larval stage.
  2. Green Your Kitchen. Back off with the chemical cleaning products. Instead, use non-toxic or plant-based cleaning products. They perform just as well as your chemicals but they are safer for your family, better for the environment, and save money. For example, baking soda is non-toxic and can be combined with a bit of water to clean tubs, sinks and other surfaces. Vinegar is great for cleaning glass. Got bugs? Use orange oil spray instead of pesticides.
  3. Improve Your Energy Efficiency. Anything you can do to lower your electricity bill is a good thing. Today’s homes are built with tighter exteriors than older homes so strive for that. Spring for an energy audit to identify problems if you want; otherwise just do common sense things like adding insulation and caulking windows. This will really save you money when utility costs spike.
  4. Go Green in the Bathroom. Wasting water is not only bad for the environment but is also costly. Switch to low flow toilets. Next eliminate the drips; a single dripping water faucet can waste 212 gallons of water a month. Ka-ching! And, there is no point in leaving the water running while you brush your teeth. On, off, on, off.
  5. Make Some Energy Tweaks Around the House. One of the easiest things to do is to contact the Direct Marketing Association to take yourself off many companies’ mass marketing mailing lists for up to five years. Unplugging things when not in use stops “phantom loads” with most appliances that use power such as VCRs, televisions, stereos, chargers, computers, and kitchen appliances.
  6. How to Save When Shopping. Most people don’t realize how they can save and go green when out and about. First, don’t load up on bottled water for drinking when you are out doing your chores. Instead, carry a reusable water bottle. You will save money and create less scrap plastic. For the grocery store take your own reusable bags. When the industry went from paper to plastic they didn’t do the environment any favors. Also consider buying things in bulk. This saves on both packaging and money.
  7. Focus on an Environmentally-Friendly Workplace. Being green isn’t only possible at home; the workplace is important as well. Encourage workers to have a plant or two in their space; they act as natural filters to improve indoor air quality. If your company ships products, use environmentally-friendly packaging materials and reuse boxes when possible. Set your office printers to print double-sided. This is an simple way to reduce paper consumption by up to half.
  8. Traveling the Green Way. If you are only going a short distance, consider walking or riding a bike. If you can run to work and shower there, even better. Compared to driving a car, this will save money and improve your health. Use public transportation or carpool when possible. Not only will you have a greener commute but you can catch up on some reading.
  9. Food can be Green too. We all have to eat so why not do it the green way? Buying locally grown food is a good start. Did you know that food generally travels between 1,500 to 2,500 miles from farm to your kitchen? Moving food that distance results in high energy consumption and less local agricultural investment. If you took our advice on going organic in tip #1 above, grow your own veggies, fruit, and herbs.
  10. Consider Passive Solar ConceptsPassive solar has been getting quite a bit of press lately but many people don’t really understand it. Basically it means considering the sun’s energy when building or modifying your home. With new home construction, it is important to position the structure so that you get the morning and afternoon sun where it benefits you the most. Thermal mass is also an important concept. In colder climates materials such as concrete and brick hold heat well and can be used in living areas to reduce heating costs. Solar collectors, both passive and active can be incorporated into a home’s design. Solar water heaters can vastly lower your energy bills and your impact on the environment.

These tips on ways to go green can greatly reduce your carbon footprint and save you money. It doesn’t matter whether you believe in global warming or climate change; who doesn’t enjoy extra cash?


Looking for more great content? Visit our partner sites:

The Green Frugal

Running Across Texas


As Featured On Ezine Articles

I offer article and blog-writing services. Interested? Hire Me!


Did you find this article helpful? Thanks for supporting this free site with a small donation!


Visit Kelly’s profile on Pinterest.


Widget is loading comments…


Puzzled by Your Home Electrical Issues?


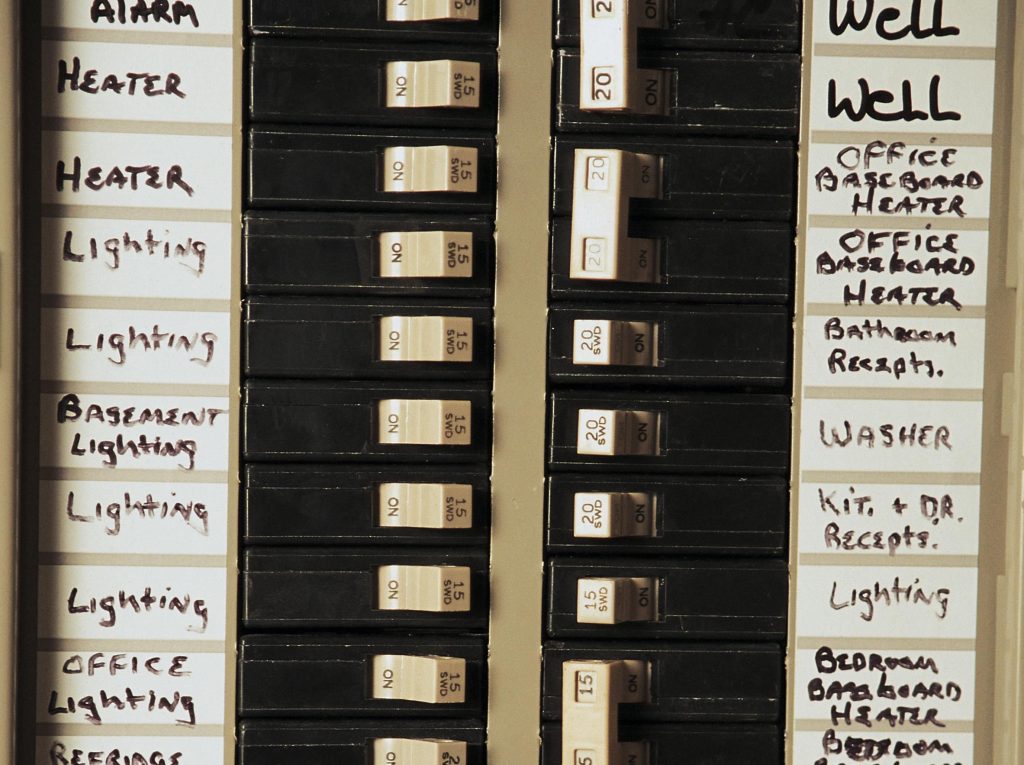
A properly-labeled circuit breaker panel

Almost everything we do in our homes and work-spaces involve electricity. From refrigerators to night-lights, electricity is involved at the most local level. Today, most of us take it for granted since it has always been there.

But it hasn’t always been there, which for most of us is a difficult concept to grasp. A political hot-potato has always been how power is generated. Coal, gas, solar energy, or nuclear? It is hard to get a consensus.

One of the only constants is the bleating from the NIMBY states (Not In My Back Yard). California comes to mind–send us our power but don’t make it here; it;s not “clean”. Hypocrites.

So, with all that in consideration, here are a few of my musings on the subject of power, power, power.

Electricity is Delivered Through Conduits

It doesn’t just show up like an expected relative. No, it enters your home through the main line into your circuit breaker box. From there it is routed where it needs to go depending on where it was designed to go.

Whenever you move into a home it is advisable to always map your electrical circuits before trouble transpires. When an issue arises you will need to know where things start and where they go, so to speak.

Depending on the age of your residence, your local electrical code, and the type of devices you install, the means of delivering that electrical power may vary.

How to Save Money on Your Power Bill

One of the big problems concerned with your home electricity is that the cost tends to be in flux. Unless you are a big fan of studying natural gas and coal futures it is hard to predict when the price will rise. The  best thing you can do is maximize your home’s energy efficiency in advance. Here are a few money saving tips to consider.

  • Keep your HVAC system in tip-top shape. Having it tuned up twice a year, when the seasons are changing is one way. Calibrate your thermostat; it might not be accurate. Change out your return air filter once a month or as recommended.
  • Consider your old tank water heater with a tankless water heater. There will be some up front costs but you will save money in the long run. Why pay too keep water heated in a tank when you are not using it?
  • Install blown insulation in exterior walls. This generally applies to older homes when insulation was not as big a home construction factor as it is today.
  • Install a radiant barrier in your attic. This is an excellent way to keep your home cooler in the summer and warmer in the winter.
  • Install ceiling fans. This is a great way to keep the conditioned air where you need it when you need it. It is easy to install ceiling fans and they are inexpensive. Just remember to have the air blowing down in the summer and up in the winter.
  • Check your doors and windows for leaks. This should be done at least annually and some caulk and door sealing strips is generally all you need.

Hopefully this article helped you to understand your home electrical issues and save some money on your utility bills. Got more tips to share? List them in the comment section below.


Looking for more great content? Visit our partner sites:

The Green Frugal

Running Across Texas


As Featured On Ezine Articles

I offer article and blog-writing services. Interested? Hire Me!


Did you find this article helpful? Thanks for supporting this free site with a small donation!


Visit Kelly’s profile on Pinterest.


Comment Box is loading comments…

Maximize Your Home’s Energy Efficiency

by Kelly R. Smith

index sitemap advanced
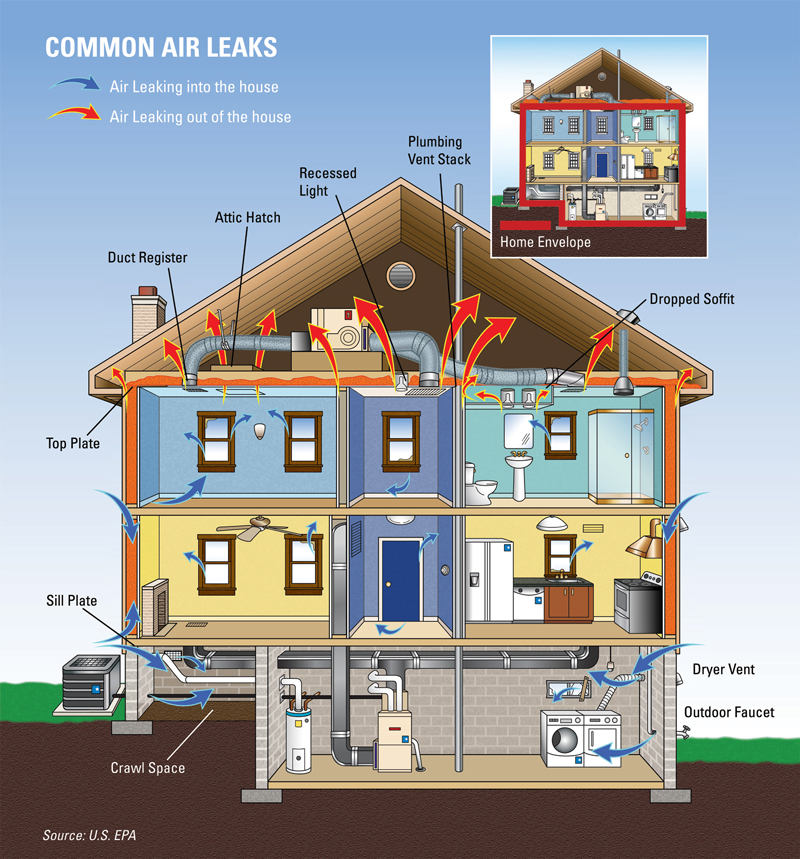
These air leaks in your home also leak money.

This article was updated on 10/16/20.

One thing nobody likes to do is throw away money. But if your home is a perpetual slacker on its attempts to restrict energy usage, that is exactly what you are doing. As a general rule of thumb, the older a home is the less energy efficient it is. There are many reasons for this but the two main ones are:

  1. In days gone by, utility expenses were not what they are today. For one thing homeowners didn’t have all those confounded contraptions that we just can’t live without today. And why does everything have to have a clock?
  2. The building technology wasn’t what it is today. Our forebears knew nothing about tight envelopes, radiant barrier foil and passive solar concepts.

Keep in mind that in the long run it is not necessarily one big thing that will reduce your bills, but the sum total of a lot of smaller home improvements. Let’s look at a few, shall we?

Insulation is a Bargain

In most cases insulation is a good place to start, especially if you are a frequent rider on the climate change bandwagon. It gives you the most bang for the buck. Your attic should have the recommended number of inches for your location. Even if your home started with the suggested amount, remember that the fiberglass settles over time. If you want to take your savings a step further, roll out some radiant barrier foil over it.

Exterior walls are also a concern. This involves a bit more expense and hassle because obviously these walls are closed on both sides. The best solution is to hire someone to install blown insulation between the studs. Can you do it yourself? Yes, but a pro has the right equipment and knows how to make it look like there never was an intrusion.

Use Thermal Mass to Your Advantage

OK, the term thermal mass doesn’t mean what you might think it does; let’s not go there. Thermal mass simply refers to an object that absorbs and retains heat. Some examples are brick, concrete, ceramic tiles, and eco-friendly cork flooring.

In the wintertime of course, we want those objects to absorb heat during the day and release it at night; this will save tons of money in utility bills and wear and tear on your HVAC equipment.. This can be accomplished by the sun coming through the windows or from areas where the home’s heating system affects the objects.

In the summertime the opposite is true; we want to shield these objects as much as possible. For all seasons, homes should be built or remodeled with the concept of passive solar building in mind.

Seal All Air Leaks

Checking for and sealing all air leaks in your home’s exterior is an easy, inexpensive DIY project that can and should be done twice a year. Just pick days before the weather transitions from cold to hot and visa versa.

Possible leak culprits include windows, doors, even things like recessed light fixtures on your ceiling and behind cover plates for your switches and outlets. Special wall plate insulation gaskets are available and you can complete the job in just a few hours with a screwdriver. The materials to put all things air-leakable right are inexpensive and readily available. Most likely things like caulk and floor sweeps will do the trick.

Keep in mind that the tighter your home’s envelope becomes, the greater the danger of radon is. What is radon? Radon gas is a radioactive, invisible toxic vapor that results from a natural process which is the radioactive breakdown of the uranium isotope. It pays to test for it.

Consider Installing Energy Efficient Windows or Window Film

Today’s higher-end windows are head and shoulders above those flimsy contractor-grade windows. Yes they will cost you more money but isn’t it worth it to be able to see outside and save on utility bills?

If your bank account isn’t flush don’t despair. Solar window film is an acceptable alternative. It won’t perform as well as the new super-windows but they will still make a huge difference. If you have tinted windows on your car you know what we are talking about.

Finally, if your electricity company allows it, get on one of those plans that averages your bill so you don’t get slammed on those peak months. Follow these tips and you will maximize your home’s energy efficiency in no time.

Shop Where It Matters!

Looking for more great content? Visit our partner sites:

The Green Frugal

Running Across Texas

As Featured On Ezine Articles


I offer article and blog-writing services. Interested? Contact me for a quote!


Did you find this article helpful? Thanks for supporting this free site with a small donation!


Visit Kelly’s profile on Pinterest.

About the Author:

Photo of Kelly R. SmithKelly R. Smith is an Air Force veteran and was a commercial carpenter for 20 years before returning to night school at the University of Houston where he earned a Bachelor’s Degree in Computer Science. After working at NASA for a few years, he went on to develop software for the transportation, financial, and energy-trading industries. He has been writing, in one capacity or another, since he could hold a pencil. As a freelance writer now, he specializes in producing articles and blog content for a variety of clients. His personal blog is at I Can Fix Up My Home Blog where he muses on many different topics.

Al Gore– The P.T. Barnum of Climate Change

by Kelly R. Smith

index sitemap advanced
Al Gore expounding on global warming

This post was last updated on 11/03/20.

It used to be “global warming.” When that catchphrase came under question the buzzword shifted to “climate change.” The idea was to make the term so vague that if the temperature in any given area got cooler or warmer, the True Believers from the Church  of Carbon Defiance (CCD) could wag their warm/cool fingers at skeptics and mutter, “I told you so.”

But the political correctness and the search for a more palatable phrase continues. www.the guardian.com says, “Staff at the US Department of Agriculture (USDA) have been told to avoid using the term ‘climate change’ in their work, with the officials instructed to reference ‘weather extremes’ instead.”

A couple more examples of rhetorical manipulation include substituting “resilience to weather extremes” for “climate change adaption” and “build soil organic matter” for “sequester carbon”.

I earlier mentioned the CCD because climate change really is a faith in the sense that any other religion is. The so-called global “real science” climate change that backs it up is nebulous science and conjecture at best.

When did Meaningful Weather Records Begin to be Collected?

Older weather records are only as accurate as the instruments used. In the US, Thomas Jefferson made regular observations at his home Monticello from 1772 to 1778, and participated in taking the first known simultaneous weather observations in America. But that is one solitary location and hardly gives us the “big picture.”

That didn’t begin to happen until the invention of the telegraph so that weather observations from distant points made by volunteers could be collected in a reasonable period of time, plotted, and then analyzed at one location. In 1849 this location was the Smithsonian.

Weather Projections from Past, Present, and Onward

There are three time frames in weather analysis. First, the past as outlined above up until today. While the early technology was primitive, the resulting data can at least demonstrate trends and patterns that can be loosely correlated with advances in industry and manufacturing (e.g., the increase in carbon emissions).

The second frame is a snapshot of today. At any given moment we have an accurate comprehensive view of what is happening worldwide. Finally, we are left with the third frame, computer projections of the future which is where we really begin to get into trouble.

Anybody on the gulf coast biting their nails while watching the dozen or so computer-generated hurricane path possibilities during each and every hurricane season knows how accurate that can be. Given that dose of reality, can we bank on what is going to happen 50 or 100 years from now? Which brings us to…

Al Gore, Alarmist and Profiteer

As an analogy, if Jesse Jackson can be described as a poverty pimp, Gore can certainly be described as a climate change pimp. It boils down to taking a popular issue and using it for personal gain rather than making a meaningful difference. After a lackluster performance as Vice-President and failed Presidential candidate, he had to cast about for something new to do.

After working as a visiting professor at various universities he drifted off into the global warming movement. He was no stranger to this world; he had been involved with environmental issues beginning in 1976, when as a freshman congressman, he held the first congressional hearings on the climate change, and co-sponsored hearings on toxic waste and global warming.

Carbon credit: any tradable certificate or permit representing the right to emit one ton of carbon dioxide or the mass of another greenhouse gas with a carbon dioxide equivalent (tCO2e) equivalent to one ton of carbon dioxide.

Seeing an opportunity, he jumped into the carbon credit business, founding Generation Investment Management (GIM) along with David Blood. The firm’s focus is on a research agenda including global sustainability and renewable energy issues.

GIM took a big position in the Chicago Climate Exchange (CCX) for carbon trading and Gore used an alarmist position to attract investors.

According to forbes.com, “Between May of 2008 and October of 2009 the CCX market value for one metric ton of carbon plummeted from $7 per metric ton to $0.10 along with the shareholders’ investment values. Losers included the Ford Motor Company, Amtrak, DuPont, Dow Corning, American Electric Power, International Paper, and Waste Management, along with the states of Illinois and New Mexico, seven cities, and a number of universities. But GIM was in a winning position.

“Never give a sucker an even break” – P.T. Barnum

Arctic ice to be gone by 2012
Guess we dodged the bullet on this “real science” prediction.

Al Gore, Hypocrite

The face that Gore presents to the world is that of a planet-saving messiah. The truth is far from that. It’s a case of do as I say, not as I do. Case in point—his home in Nashville, Tennessee.

Al Gore's energy-guzzling home
Al Gore’s energy-guzzling home

According to Drew Johnson, National Center for Public Policy Research (NCPPR) Senior Fellow, “The past year, Gore’s home energy use averaged 19,241 kilowatt hours (kWh) every month, compared to the U.S. household average of 901 kWh per month. During the last 12 months, Gore devoured 66,159 kWh of electricity just heating his pool. That is enough energy to power six average U.S. households for a year.”

“There’s a sucker born every minute” – P.T. Barnum


Looking for more great content? Visit our main site I Can Fix Up My Home or our partner sites:

The Green Frugal

Running Across Texas


I offer article and blog-writing services. Interested? Contact me for a quote!


Did you find this article helpful? Millions of readers rely on information on this blog and our main site to stay informed and find meaningful solutions. Please chip in as little as $3 to keep this site free for all.


About the Author:

Photo of Kelly R. SmithKelly R. Smith is an Air Force veteran and was a commercial carpenter for 20 years before returning to night school at the University of Houston where he earned a Bachelor’s Degree in Computer Science. After working at NASA for a few years, he went on to develop software for the transportation, financial, and energy-trading industries. He has been writing, in one capacity or another, since he could hold a pencil. As a freelance writer now, he specializes in producing articles and blog content for a variety of clients. His personal blog is at I Can Fix Up My Home Blog where he muses on many different topics.
Does Your Home Have Enough Fiberglass Insulation?

Winter or Summer, You Probably Need More Thermal Mass

by Kelly R. Smith

index sitemap advanced
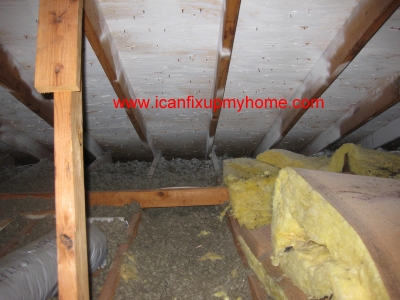
Loose fill attic insulation and fiberglass batts

Of course, fiberglass insulation is the most common insulation in existing homes and new construction. It doesn’t require any special equipment to install and it’s more economical than spray foam. In fact, it is one of the easiest (although itchy) DIY projects to increase your home’s energy-efficiency.

What’s up with Soy Spray Foam Insulation?

Nope, not a joke. If you’re familiar with the fact that soy beans are an easy to grow crop and do well in many climates, you’ll understand why it makes such a green and sustainable building material.

Soy spray foam insulation is sprayed on as a liquid which quickly expands and fills all voids, making a very air-tight building. You might hear it called a tight envelope. And it’s water-based so there’s no questionable chemicals.

Now is the Time To Beef Up Attic Insulation

If your home is already built and occupied, insulating walls can be problematic to do yourself, but installing attic insulation is a snap. And it’s not always so hot up there to make it a miserable job if you do it in the spring or fall.

But that stuff is itchy! That’s because the tiny fiberglass fibers stick into the pores on your skin. There are ways to handle it, though. You can wipe your arms down with fingernail polish remover. The active ingredient is acetone. Save big bucks by buying a can of it at the home improvement store.

I used to install a lot of the stuff in the summer when I was installing suspended acoustical ceilings and framing walls and hanging drywall. I lived in an apartment at the time. After work I’d just slip into my swimming suit and hop in the pool.

That took care of it. I suspect that it just washed off, although logically, it seems like the cool water would tighten up the pores. Whatever. It worked

Rockwool: the Insulation From Hell

Rockwool is the worst, no doubt about it. It’s also a fiber kind of construction material. It also has some glass-like chunks of stuff I can’t even speculate about. I just know they would dull the blade of a utility knife quicker than anything I’ve ever seen.

How Much is Enough?

Good question. It’s tempting to say as much as you can stuff up there, but there is a point of diminishing returns. Owens-Corning (the pink panther people) tell us “The amount of insulation to add depends on two factors – the amount and type of insulation already in place and the recommended R-value for your location.” Well, duh.

The minimum in the US depends of where you live but the average maximum that the government recommends is R-60. In the south, the minimum is R-30. It increases as you go north, finally getting to a minimum of R-48 if you live in, say, Nebraska or Minnesota.

Looking for more great content? Visit our partner sites:

Do you need an article written and featured on one of our sites or yours to promote your business? I specialize in blog-writing. Hire Me!


Looking for more great content? Visit our main site I Can Fix Up My Home or our partner sites:

The Green Frugal

Running Across Texas


As Featured On Ezine Articles

I offer article and blog-writing services. Interested? Contact me for a quote!

About the Author:

Photo of Kelly R. SmithKelly R. Smith is an Air Force veteran and was a commercial carpenter for 20 years before returning to night school at the University of Houston where he earned a Bachelor’s Degree in Computer Science. After working at NASA for a few years, he went on to develop software for the transportation, financial, and energy-trading industries. He has been writing, in one capacity or another, since he could hold a pencil. As a freelance writer now, he specializes in producing articles and blog content for a variety of clients. His personal blog is at I Can Fix Up My Home Blog where he muses on many different topics.

close

Enjoy this blog? Please spread the word :)

RSS
Follow by Email
Twitter
Follow Me
Tweet
Pinterest
Pinterest
Pinterest
Instagram
LinkedIn
Share