September is National Preparedness Month

Be Prepared for Natural Disasters Like Hurricanes, Fires, Floods, Tornados, and More

Photo of Kelly R. Smith   by Kelly R. Smith

Street flooding leads to disaster
index sitemap advanced

This article was updated on 07/16/21.

Ads we feature have been independently selected and reviewed. If you make a purchase using the links included, we may earn a commission, which helps support the site. Thank you for your support.

Ready.gov (owned by the Department of Homeland Security) says, “Disasters Don’t Wait. Make Your Plan Today.” Good point. We never thought our neighborhood would flood, but it did. While we had flood insurance, others did not and had to rely on FEMA. The city has been ignoring drainage issues for years, all the while issuing building permits willy-nilly. Concrete surfaces don’t absorb rain water. At some point, we will all experience fire, earthquake, or a hurricane. This is how Ready.gov suggests that we prepare.

Week 1: Make a Plan

Make your plan now. You and your family may not be together if a disaster happens, so it is key to understand which types of disasters could affect your area. You should all know how you’ll contact each other and reconnect if you become separated. Establish a family meeting place that’s familiar and easy to find. For example, a neighborhood park or a local school that might be serving as an emergency shelter.

Week 2: Build a Kit

Following an emergency, you might need to survive on your own for days. Being prepared means having your own stock of food, water and other supplies to last for several days. A disaster supplies kit is a collection of basic items your household may need in the event of an emergency. You don’t have to be an all-out prepper but having the essentials on hand is, well, essential.
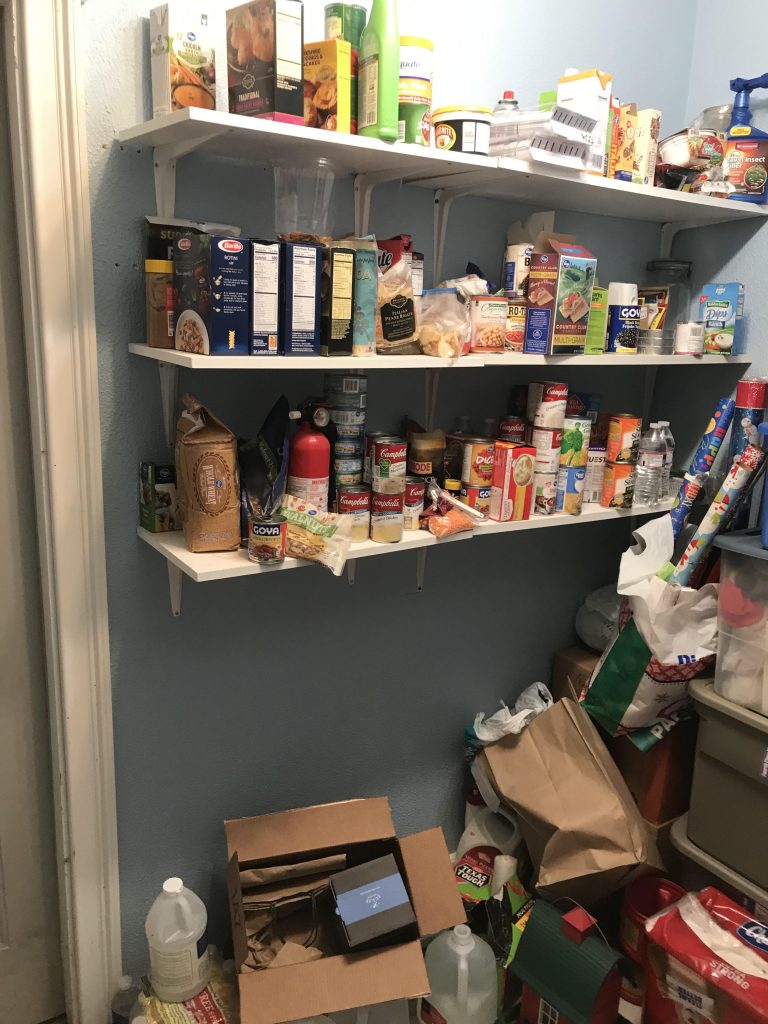
Walk-in food survival pantry

In my own home, I built a pantry off the kitchen. We keep it stocked with food, water, prescription medicine, and a camp stove. Basically, the room is our kit. And we even keep a stock of toilet paper. We all remember the empty shelves when the COVID-19 pandemic broke out!

Week 3: Prepare for Disaster

Hurricanes are dangerous and can cause major damage because of storm surge, wind damage, and flooding. Don’t wait to do things like removing old dead tree limbs and securing things that have the potential to become projectiles. It’s a good idea to have a firearm or two and a stock of ammo. Just look at what Antifa and BLM are doing in our streets and society hasn’t broken down yet! No one is going to respond to your 911 call after a certain point.

Know what disasters and/or hazards might affect your area, how to get emergency alerts (an emergency crank-operated radio), and where you would go if you and your family need to evacuate.  Make sure your family has a plan and practices it often.

Don’t wait until the day before to try to find plywood, batteries, and other items.

Week 4: Teach Your Kids About Disasters

Talk to your children about being prepared for emergencies. They need to understand what to do in case you are separated. Make them feel at ease by providing information about how they can get involved. Work out scenarios and the proper responses.

National Preparedness Month is easy when it is broken down like this. The process of divide and conquer works well and gives you time to consider things you have not anticipated.

Got a blog or website? Want more revenue? Monetize it!

References and Further Information


Looking for more great content? Visit our partner sites:

The Green Frugal

Running Across Texas


As Featured On Ezine Articles

I offer article and blog-writing services. Interested? Hire Me!


Did you find this article helpful? Thanks for supporting this free site with a small donation!


Visit Kelly’s profile on Pinterest.


About the Author:

Photo of Kelly R. SmithKelly R. Smith is an Air Force veteran and was a commercial carpenter for 20 years before returning to night school at the University of Houston where he earned a Bachelor’s Degree in Computer Science. After working at NASA for a few years, he went on to develop software for the transportation, financial, and energy-trading industries. He has been writing, in one capacity or another, since he could hold a pencil. As a freelance writer now, he specializes in producing articles and blog content for a variety of clients. His personal blog is at I Can Fix Up My Home Blog where he muses on many different topics.

Biscuit Joiner; Why You Need One for Woodworking

by Kelly R. Smith

index sitemap advanced
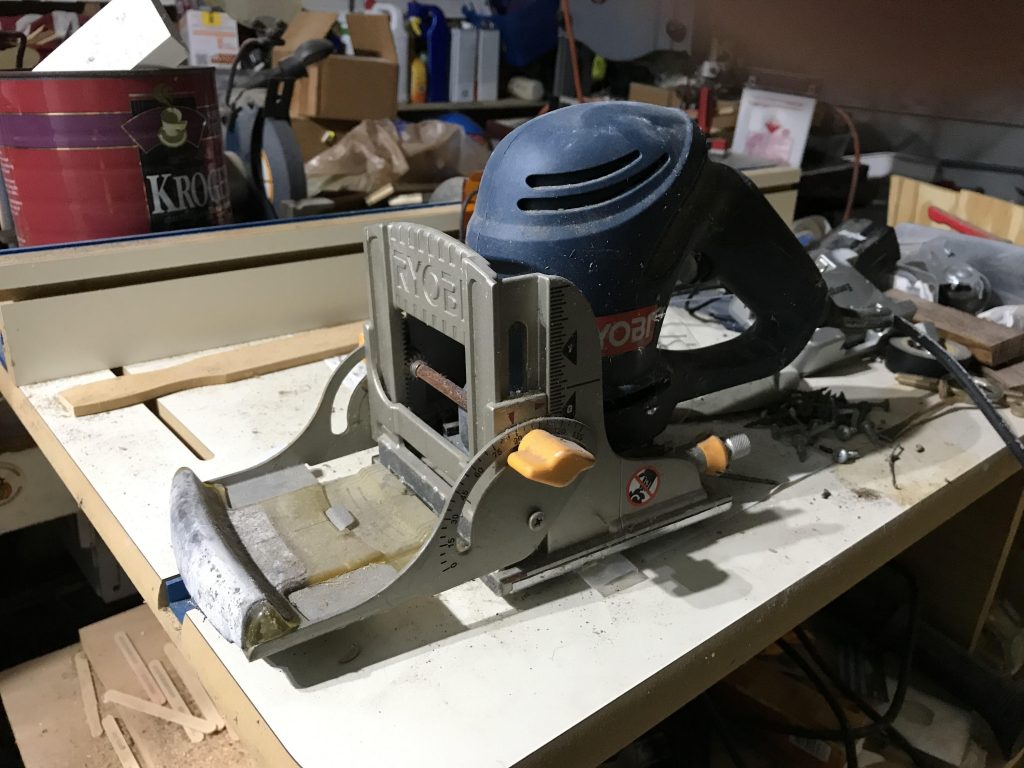
A Ryobi biscuit joiner on a router table

Granted that the biscuit joiner is not a power tool that you use everyday on your woodworking projects. It falls into the category of go-to tools when nothing else will do the job so well. On projects that require mating planks, this tool is invaluable. On some projects, just gluing them up and clamping them is sufficient but on others a stronger bond is required. And why not err on the side of caution? The right tool is just as important as adequate shop lighting.

For years I relied on dowels to do the job. That worked, but getting that precision can be difficult. Drilling the holes at the exact angle and in the exact location can be dicey, especially when using a hand-held drill rather than your drill press. This is where the biscuit joiner comes into its own.

Using Your Biscuit Joiner

For the sake of argument, let us assume that we are joining several boards to make up a table top.

  • Biscuits can “telegraph.” This means that as the glue dries, it can warp the surface plank wood down towards the biscuit. To avoid this minor imperfection in the end product (you’re the only one who will notice, but still), don’t cut your biscuit slot in the exact center of the planks, rather, a bit lower towards the bottom of the finished product.
  • Biscuits don’t add a lot of strength. So the argument goes. Some carpenters use biscuits simply to assure themselves that the planks will stay aligned as the glue dries. I’m from the other camp that believes that they do add a lot of strength, especially when the end product comes under stress because the length of the biscuit distributes the load better than a cylindrical dowel..
  • You can add biscuits for additional strength after the glue-up on 45 degree corners. Use your joiner as a plunge tool after the glue has dried. For example, you might do this on the underside of a picture frame after you remove your 45 degree clamps or spring clamps. Plunge the slot, glue-up and add the biscuit, and use your belt sander to level it up later.
  • Bring the motor up to full-speed before engaging the joiner. Easy, cowboy.

So, do you really need a biscuit joiner for your woodworking projects? The short answer is “no,” but the long answer is, “yes, because it will make your life so much better and your range of carpentry skills broader.”

Related Articles


Looking for more great content? Visit our partner sites:

The Green Frugal

Running Across Texas


As Featured On Ezine Articles

I offer article and blog-writing services. Interested? Hire Me!


Did you find this article helpful? Thanks for supporting this free site with a small donation!


Visit Kelly’s profile on Pinterest.


About the Author:

Photo of Kelly R. SmithKelly R. Smith is an Air Force veteran and was a commercial carpenter for 20 years before returning to night school at the University of Houston where he earned a Bachelor’s Degree in Computer Science. After working at NASA for a few years, he went on to develop software for the transportation, financial, and energy-trading industries. He has been writing, in one capacity or another, since he could hold a pencil. As a freelance writer now, he specializes in producing articles and blog content for a variety of clients. His personal blog is at I Can Fix Up My Home Blog where he muses on many different topics.

What is Covered by Standard Homeowners Insurance?

by Kelly R. Smith

index sitemap advanced
Home damage from Hurricane Harvey in Seabrook, Texas

Homeowners insurance is essential for all homeowners. It doesn’t matter if you own outright or still hold a mortgage. Dictionary.com gives the origen of the word mortgage as, “Old French mortgage, equivalent to mort ‘dead’ (from Latin mortuus ) + gage ‘pledge.’” That’s about as morbid as it gets. It’s certainly not a witty phrase, is it? But I digress; what is covered by standard homeowners insurance?

Coverage for Your Personal Belongings

Your personal belongings include things such as sports equipment, clothing, furniture, appliances, ect. You get the idea. They are covered in the event that they are stolen or destroyed by insured disasters such as fire, hurricane, and others. Generally, the coverage is going to be 50% to 70% of the insurance you carry on the structure of your home, depending on the company that carries your policy.

The preferred way to determine if this is enough coverage is to conduct a home inventory. Take pictures, make entries in a database, etc. The more detailed, the better. Your belongings coverage includes items that you store away from your residence; this means that you have coverage anywhere in the world. There are some companies that limit the amount to 10% of the amount of insurance you have for your possessions. You may also have up coverage for unauthorized use of any credit cards.

Items on the higher end such as jewelry, furs, art, collectibles, and silverware are covered, but usually there is a monetary limit if they are stolen. There is a way to insure these items for their full value; buy a special personal property endorsement (or floater) and insure the items for their officially-appraised value.

Coverage for Your Home’s Structure

Your homeowners policy will pay to renovate or rebuild your home in the case that it is damaged or destroyed by incidences of fire, hurricane, hail, lightning, or other disasters that are enumerated in your policy. Most policies cover detached structures as well, such as your tool shed, garage, or a gazebo. In most cases, for about 10% of the amount of insurance you have on the structure of your home. A good rule of thumb is this–buy enough coverage to rebuild your home. Revise this yearly.

Liability protection

What does liability cover? It protects you from lawsuits citing bodily injury or property damage that you or family members cause to others. Additionally, it covers damage caused by your pets.

In many cases, limits begin at around $100,000. That being said, it’s prudent to palaver with your agent whether you should purchase a higher level of protection. You may have significant assets and therefore need more coverage than is available under your policy. If this is the case, consider purchasing an umbrella or excess liability policy, which provides broader coverage and higher liability limits.

Your policy also provides no-fault medical coverage. If one of your friends or a neighbor is injured in your home, he or she can submit the medical bills to your insurance company. So, expenses can be paid bypassing a liability claim being filed against you. Note that it doesn’t pay any of these bills for you or your family.

Additional living expenses (ALE)

This is for the the additional expenses of residing away from your home if you can’t live there because of the damage from a disaster that is insured. It covers restaurant meals, hotel tabs, and other miscellaneous costs that are over and above your normal living expenses. These are paid while your house is being restored. ALE is not open-ended; it has time and cost limits.

Other Circumstances

Your standard homeowners insurance policy will not pay for damage caused by an earthquake, flood, or routine wear and tear. These all require separate policies. Let me use myself as an example. During Hurricane Harvey, we flooded due to the city mismanaging drainage issues. We got about 2 feet of water inside the house.

Flood water rising in the street

Luckily, we have always carried flood insurance ever though the mortgage company did not require it since we are not in the flood plain (or zone if you will). But, as I tell my wife, “God doesn’t care about those maps.” So we ended up getting 100% on personal belongings and what the insurance adjuster estimated for structure. That only paid for material, not labor. That’s like getting 50 cents on the dollar. So, the majority of the reconstruction became a DIY project for me.

Neighbors without flood insurance just got the bare minimum from FEMA, and let me tell you, that ain’t much. Let that be a lesson–invest in appropriate insurance policies.

References:


Looking for more great content? Visit our partner sites:

The Green Frugal

Running Across Texas


As Featured On Ezine Articles

I offer article and blog-writing services. Interested? Hire Me!


Did you find this article helpful? Thanks for supporting this free site with a small donation! We depend on our readers rather than a bothersome paywall to keep the lights on here in the shop.


Visit Kelly’s profile on Pinterest.


About the Author:

Photo of Kelly R. SmithKelly R. Smith is an Air Force veteran and was a commercial carpenter for 20 years before returning to night school at the University of Houston where he earned a Bachelor’s Degree in Computer Science. After working at NASA for a few years, he went on to develop software for the transportation, financial, and energy-trading industries. He has been writing, in one capacity or another, since he could hold a pencil. As a freelance writer now, he specializes in producing articles and blog content for a variety of clients. His personal blog is at I Can Fix Up My Home Blog where he muses on many different topics.

Tips for Woodworking Glue-Up

Most DIY Carpentry Requires an Adhesive − Essential Techniques

Photo of Kelly R. Smith   by Kelly R. Smith

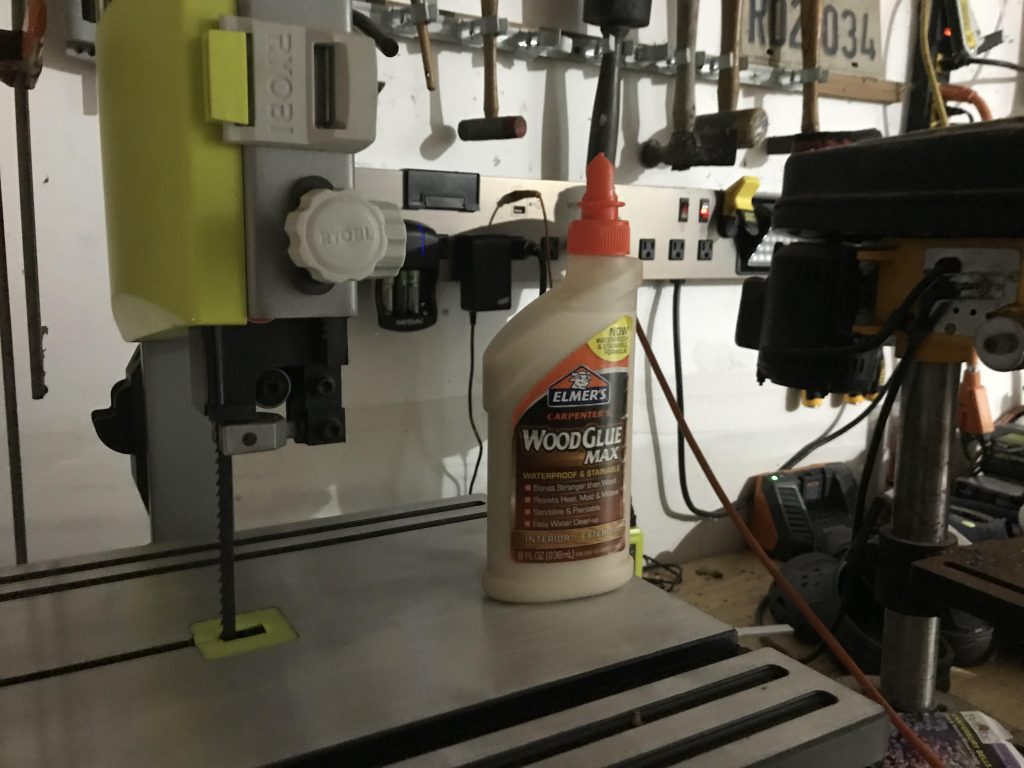
Wood glue, band saw, and drill press
index sitemap advanced

Ads we feature have been independently selected and reviewed. If you make a purchase using the links included, we may earn a commission, which helps support the site. Thank you for your support.

No woodshop is complete without at least one type of woodworking glue and a variety of clamps. Can’t have too many clamps, I always say. There are many varieties and brand names of glue on the market today. We all have our favorites. Some are better suited to some purposes than others. For example, you need rice glue to work with washi bamboo paper. Let’s look at some woodworking tips.

Glue Tips

  • Always dry-fit your pieces and plan where your clamps will be going before even thinking of dragging out your glue bottle.
  • Squeeze-out is almost always inevitable. I like to protect work surfaces with wax paper.
  • Clamp your work well and securely, but usually there’s no need to overdo it. You want the joints to be tight but you don’t any warping. I like Irwin clamps.
  • Use cauls made with softer wood than the workpiece. Cauls prevent indentations that you only notice after removing the clamps, resulting in a self-inflicted slap to the forehead moment.
  • Take your time during the glue-up. This should be obvious but I suspect we’ve all rushed a job or two. After all, most of us have more time on our hands in the midst of the COVID-19 pandemic.
  • Flux brushes are available in the plumbing department of hardware stores and home centers and they are are just right for applying and spreading glue on smaller surfaces like dovetail joints. On large surfaces, an inexpensive notched plastic trowel is great.
  • The sooner you apply glue after the wood is cut, the better. This makes for a stronger joint.
  • After the squeezed-out glue has been removed, there’s always a chance that some is hiding. Find it now or you’ll see it later when you apply stain or finish. Spraying some warm water near glue joints will make any hidden glue more visible.
  • Allowing the glue to set up a half to a full hour makes it easier to scrape off squeeze out with a sharp chisel.
  • A synthetic abrasive pad, dampened with water, works perfectly to remove the remaining glue. Much better than a paper towel or a rag.
  • After applying glue and beginning to set your clamps, some pieces slip and slide. One solution is to use your finish nailer with a couple of brads to hold things together.

Use Glue to Make a Color-Perfect Wood Putty

Types of Woodworking Glue

  • Elmer’s glue, as pictured above, is the old standby. It is priced right and comes in a variety of formulations. There is white and yellow glue is for interior use but the some yellow can be used for exterior applications. It will be labeled as such.
  • Exterior yellow glue is labeled water resistant or exterior. Titebond II is one brand that I like.
  • Polyurethane glue is a completely waterproof glue. It can also be used on metal and some plastics.
  • Contact cement has its uses such as applying plastic laminate (Formica) to plywood.
  • Hide glue was around long before woodworkers had so many choices. When refinishing antiques it should be used to maintain the historical value. It’s still used in making certain musical instruments because it is easy to take apart for repairs.
  • Epoxy is used to fill gaps and and offers great strength. Gorilla is a good brand.

I hope these tips for glue-up on woodworking projects have made your craft more inspired. If you have any tips of your own, share them with our readers in the comment section. You might also be interested in reading about the benefits of a woodshop dust-collector.


Related Content

Looking for more great content? Visit our main page or partner sites:

I Can Fix Up My Home

The Green Frugal

Running Across Texas


As Featured On Ezine Articles

I offer article and blog-writing services. Interested? Contact me for a quote!


Did you find this article helpful? Millions of readers rely on information on this blog and our main site to stay informed and find meaningful solutions. Please chip in as little as $3 to keep this site free for all.


Visit Kelly’s profile on Pinterest.

About the Author:

Photo of Kelly R. SmithKelly R. Smith is an Air Force veteran and was a commercial carpenter for 20 years before returning to night school at the University of Houston where he earned a Bachelor’s Degree in Computer Science. After working at NASA for a few years, he went on to develop software for the transportation, financial, and energy-trading industries. He has been writing, in one capacity or another, since he could hold a pencil. As a freelance writer now, he specializes in producing articles and blog content for a variety of clients. His personal blog is at Considered Opinions Blog where he muses on many different topics.

Ryobi 18V ONE+ Power Tools Review

by Kelly R. Smith

index sitemap advanced
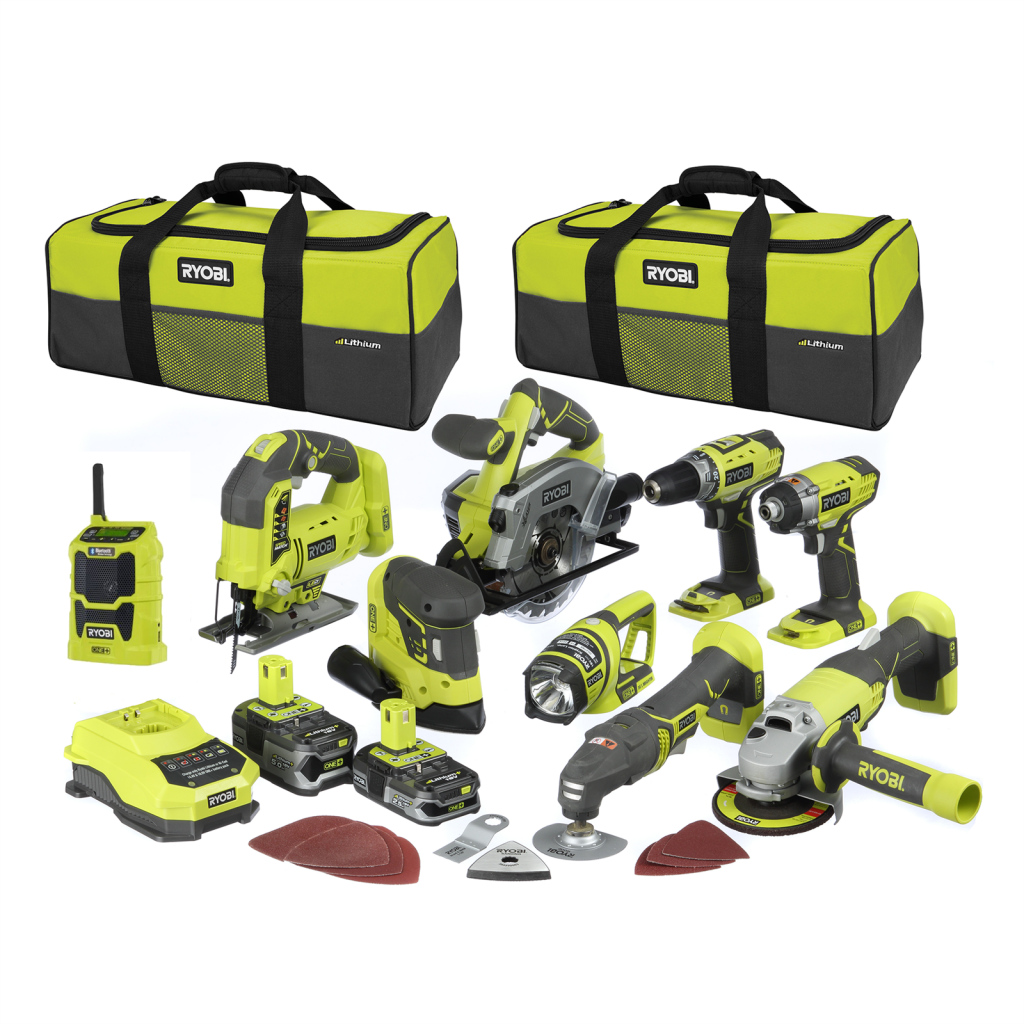
A selection of Ryobi 18V ONE+HP power tools

There are many tool companies that offer a selection of battery-operated power tools. You can choose between Ryobi, Milwaukee, Porter Cable, Makita, and many others. Now that the battery technology has improved so much (lithium), these tools are more practical. Let’s look at some of the Ryobi 18V ONE+ power tools in their lineup. Their site tells us they offer over 175 different tools in this family. I’ve been using 10 on a regular basis so I’ll focus on them. As an aside, I also use their 40V lawnmower. I also have one of their AM/FM radios that uses the same battery, but that’s not technically a tool, is it?

Ryobi 18V Power Tools

Note that some of these tools come with batteries and chargers and with some it’s just the tool, so the prices reflect that fact.

  • The AirStrike brad nailer. I use this nailer for various woodworking projects and trim installation. Reliable and easy to adjust.
  • 1/2″ drill/driver Kit. Lightweight and features a two-speed gearbox and a 24-position clutch for maximum control. No chuck key required.
  • Reciprocating saw. Their version of the famous Sawzall. For larger jobs I drag out my Makita corded version but this one is ideal for things like tree limbs up to 3″ in diameter.
  • 1/4″ impact driver or 3/8″ impact wrench. It’s handy for those tight jobs. The wrench has an auto mode to prevent over-tightening.
  • Compact brushless cut-off tool. Cuts metal, plastic, drywall, tile, and wire shelving. The base fits flat to the work surface for inhanced cutting accuracy. That’s a nice engineering touch. Cuts at up to 19,500 RPM.
  • 3/8” right angle drill. Ryobi claims this is the industry’s most compact model. It’s also good for those tight situations.
  • Hand-held belt sander. The front pommel handle adjusts to 5 different positions for individual comfort. The tool-free belt-tracking feature makes adjustment on the fly easy.
  • Variable speed jig saw. Very lightweight and portable.
  • Circular saw. Another reason for battery operation. When I was installing baseboards not long ago, I took rough measurements before going to Home Depot. I took my saw with me and dealt with those super long pieces right there in the parking lot (the Tacoma bed doesn’t like 15′ floppy stock.
  • Hand-held router. While I love my router table in the shop, it’s not very convenient to lug around.

Those are the Ryobi 18V ONE+ power tools that I have personal experience with. Overall I’m extremely satisfied. I’ve found them dependable, price-competitive, and offering some innovative features. I like the fact that they have brushless motors. The battery chargers run at a reasonable rate. The batteries are non-fade, meaning that they don’t begin to lag when they are running out of juice.


Looking for more great content? Visit our partner sites:

The Green Frugal

Running Across Texas


As Featured On Ezine Articles

I offer article and blog-writing services. Interested? Hire Me!


Did you find this article helpful? Thanks for supporting this free site with a small donation!


Visit Kelly’s profile on Pinterest.


About the Author:

Photo of Kelly R. SmithKelly R. Smith is an Air Force veteran and was a commercial carpenter for 20 years before returning to night school at the University of Houston where he earned a Bachelor’s Degree in Computer Science. After working at NASA for a few years, he went on to develop software for the transportation, financial, and energy-trading industries. He has been writing, in one capacity or another, since he could hold a pencil. As a freelance writer now, he specializes in producing articles and blog content for a variety of clients. His personal blog is at I Can Fix Up My Home Blog where he muses on many different topics.
4 Types of Sink Faucets

by Kelly R. Smith

index sitemap advanced
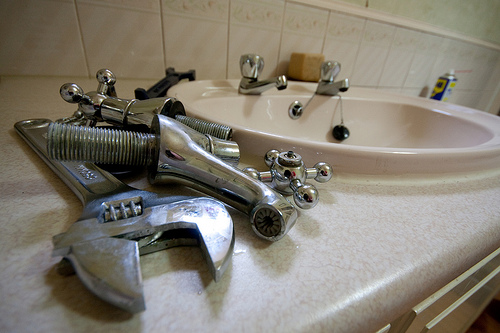
Disassembling a sink faucet for repair

Sink faucets — are they functional or decorative? A bit of both actually. But keep in mind that when purchasing a new one, don’t scrimp on the price. For one thing, if you want real long-lasting brass components, you are going to have to pay for it. Secondly, you want a big name brand so that replacement parts are easily accessible. There are 4 types of sink faucets to consider. If you are also installing a new sink/s, the drain may not match up with the sewage pipe. Here’s how I fixed a misaligned sink.

4 Types of Faucets to Consider

  • Ball faucets. This is considered a washerless faucet because of the absence of rubber or neoprene washers in its construction. It has a single handle that moves over a rounded ball-shaped cap that is right above the base of the faucet’s spout. The faucet has a single handle that controls a special plastic or metal ball inside the body of the faucet. The ball has chambers or slots in it, as well as rubber O-rings and spring-loaded rubber seals. Depending upon the ball’s position, the ball/lever assembly controls the flow and mixing temperature of the water coming out of the faucet. Because of the number of parts which make up this type of faucet, ball faucets tend to leak more than other washerless faucets such as the cartridge faucet or disc faucet. See my faucet repair article.
  • Disc (or disk, if you prefer) faucets. Another washerless type, ceramic disk faucets are the most recent development in emerging faucet technology. They are known by their single lever lording over a wide cylindrical body. This faucet mixes hot and cold water inside a mixing chamber that is referred to as a pressure balance cartridge. 2 ceramic disks located at the bottom of the chamber are engineered to raise and lower to control the volume of the water flow. The temperature is controlled by a side-to-side rotation of the handle. These faucets are known to be high-quality, very reliable, and do not need to be repaired often. That’s a good thing.
  • Cartridge faucet with 2 handles. Yet another washerless faucet, this one looks quite like a compression washer faucet. But, you can tell the difference by how the handles feel when they are operated. The compression faucet requires tightening down (or compress) the washer in order to staunch the water flow. With a cartridge faucet, the action is very smooth and consistent. With just a half turn, the handle goes from the off to the on position. It turns off without added pressure being required as with a compression faucet.
  • Compression washer faucet. This type has been with us since the beginning of on-demand indoor plumbing. You will find them in older properties, and updated versions are still found installed in utility sinks in newer homes to this very day. They are typically the cheapest to purchase but are the most prone to leaks and maintenance. Compression washer faucets are identified by their separate hot and cold water handles (H and C) and their action requiring you to tighten the handles down to close off the water flow. They work using a compression stem. This is a type of glorified screw with a washer at the end of it pressing against a valve seat.

So those are your choices of the 4 types of sink faucets. This article has described their functionality; it is up to you to choose the wow factor of the style. For the kitchen, I prefer a gooseneck style with a spray attachment, but hey, that’s just me.


Looking for more great content? Visit our partner sites:

The Green Frugal

Running Across Texas


As Featured On Ezine Articles

I offer article and blog-writing services. Interested? Hire Me!


Did you find this article helpful? Thanks for supporting this free site with a small donation! We depend on our readers rather than a bothersome paywall to keep the lights on here in the shop.


Visit Kelly’s profile on Pinterest.


About the Author:

Photo of Kelly R. SmithKelly R. Smith is an Air Force veteran and was a commercial carpenter for 20 years before returning to night school at the University of Houston where he earned a Bachelor’s Degree in Computer Science. After working at NASA for a few years, he went on to develop software for the transportation, financial, and energy-trading industries. He has been writing, in one capacity or another, since he could hold a pencil. As a freelance writer now, he specializes in producing articles and blog content for a variety of clients. His personal blog is at I Can Fix Up My Home Blog where he muses on many different topics.

Top 10 Table Saw Safety Tips

by Kelly R. Smith

index sitemap advanced
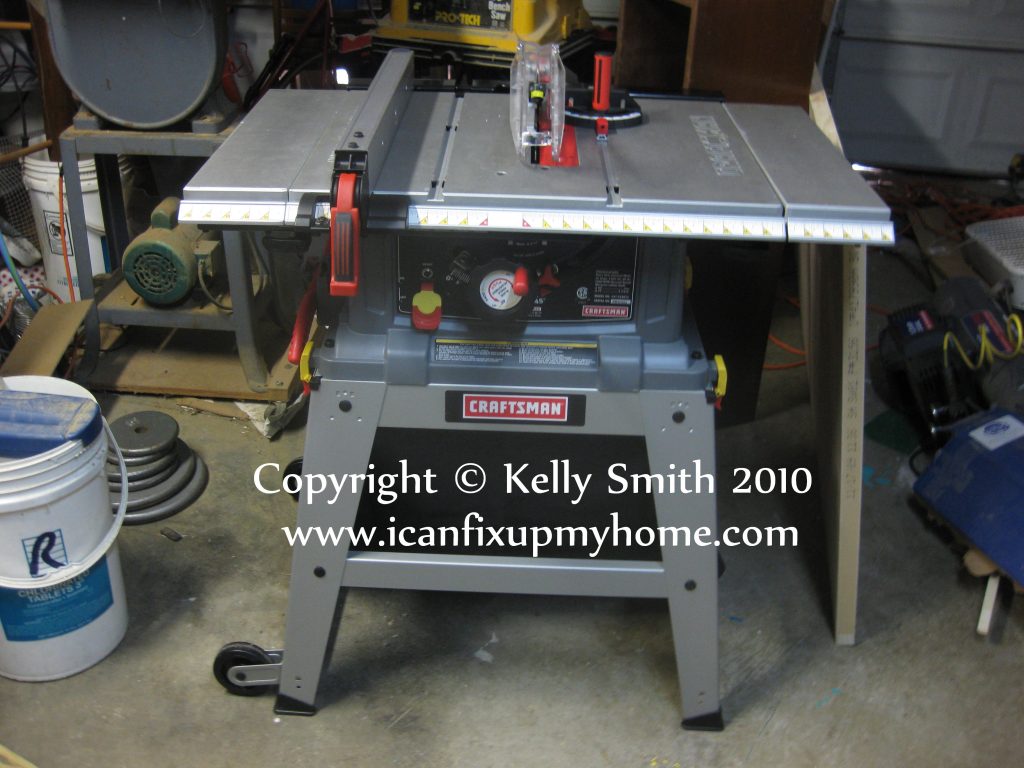
Craftsman woodworking table saw

This article was updated on 10/14/20.

By its very nature, woodworking is a dangerous hobby and profession. There are 720,000 injuries each year associated with woodworking projects and about 42% of these occur on the table saw. No surprise here; almost every project needs stock ripped or crosscut. How can we do better? Let’s look at these top 10 table saw safety tips.

  • Using your blade guard. Yes, they come from the factory installed and recommended but who actually uses them? Ahem, yeah, I thought so. I use a push stick or another woodworking jig to get the job done. Should I use the guard? Yeah, but usually… no. Still, I recommend it.
  • Table saw blade selection. It is tempting to use the same table saw blade for every job, but should you? No. You need a separate blade for cross-cutting and one for ripping Why? A crosscut blade makes the rip cut much more difficult. It can burn and bind.
  • Use a zero-clearance insert. Yes, there are two schools of thought on this one. Safety says a supported piece is a safer piece.
  • Woodworking dust collection. If your table saw offers a port, use it. You will guard your health, keep your wood shop clean, and lower fire risks. Wood dust not only irritates your throat and nose, but some species can be poisonous. Keeping a clean and clutter-free work area is important.
  • Use your PPE (Personal Protective Equipment). Yeah this stuff is front and center because of the Covidid-19 Pandemic but truth be told, it was always a big deal. Use safety glasses and ear protection. Gloves? Personal decision.
  • Keep your hands out of harm’s way. Use push sticks, push blocks and other safety devices to help guide and control work pieces.
  • Don’t stand directly in front of or in back of the blade. Always stand to one side or the other. Even with the guard in place, the odd chunk of wood might kick back.
  • Make adjustments before powering up. Make all adjustments with your blade stopped, with the single exception of changing the speed. Never try to change the configuration of the table or the power plant before the machine has stopped.
  • Keep your hands safe. Do not reach under the table to make adjustments, remove scrap, or make adjustments while the blade is turning.
  • Use your accessories. Make use of your miter gauge or rip fence to guide your work. Free-hand cuts are very dangerous, inaccurate and not recommended. For larger pieces, such as plywood, use table saw extensions or rollers. Ideally, you should have a helper, but realistically that’s not always going to happen.

Keep these 10 table saw safety tips in mind each and every time you enter your shop. It is easy to become complacent with this and other tools. None of us came with spare body parts.


Looking for more great content? Visit our partner sites:

The Green Frugal

Running Across Texas


As Featured On Ezine Articles

I offer article and blog-writing services. Interested? Hire Me!


Did you find this article helpful? Thanks for supporting this free site with a small donation! We depend on our readers rather than a bothersome paywall to keep the lights on here in the shop.


Visit Kelly’s profile on Pinterest.


About the Author:

Photo of Kelly R. SmithKelly R. Smith is an Air Force veteran and was a commercial carpenter for 20 years before returning to night school at the University of Houston where he earned a Bachelor’s Degree in Computer Science. After working at NASA for a few years, he went on to develop software for the transportation, financial, and energy-trading industries. He has been writing, in one capacity or another, since he could hold a pencil. As a freelance writer now, he specializes in producing articles and blog content for a variety of clients. His personal blog is at I Can Fix Up My Home Blog where he muses on many different topics.

Can Climate Change Be Minimized Using Air Conditioners?

by Kelly R. Smith

index sitemap advanced
Air conditioner farm on a rooftop

This article was edited on 10/21/20.

What a question; it’s the proverbial killing of two birds with one stone. On the one hand, we could enjoy all the interior comfort we want and on the other hand, we could save the planet. Of course that would mean Al Gore would experience a loss of income as the Reigning King of climate change.

The Concept Of Generating Liquid Hydrocarbon Fuel From Air

Roland Dittmeyer, a chemical engineer at the Karlsruhe Institute of Technology in Germany posited this theory, recognizing that HVAC systems (Heating, Ventilation, and Air Conditioning) move a huge quantity of air. Consider this — they can recycle the entire air volume in an office building 5 or 10 times each hour (when the system is properly configured and maintained). Besides obviously cooling the air, the system also removes carbon dioxide and humidity from the air. It’s the carbon dioxide, the reputed villain of climate change, that we are concerned with from the global warming point of view.

The moisture is important as well. When both of these things are captured, the idea is to convert them first into hydrogen, and then perform a multi-step chemical process to convert the hydrogen into liquid hydrocarbon fuels. Dittmeter’s team calls this, “Personalized, localized and distributed, synthetic oil wells” in buildings or neighborhoods.

Although the science is promising, the team’s tone strikes me as somewhat utopian and Marxist as they go on to say this will enable people, “to take control and collectively manage global warming and climate change, rather than depending on the fossil power industrial behemoths.” That sounds like Bolshevik Bernie or AOC.

Problems With A/C to Hydrocarbon Models

  • The cost. A chemical engineer at Worcester Institute of Technology, Jennifer Wilcox, says, “The dominant capital cost is the solid adsorbent materials.” These are substances which carbon dioxide adheres to. In addition to the capital cost (equipment purchases), the primary energy cost is the heat necessary to recover the carbon dioxide from these materials post-capture.
  • The process is dangerous. Carbon monoxide and hydrogen are toxic and explosive. It could potentially be like docking the Hindenburg on the roof. Producing and holding quantities of the resulting petrochemicals in business and/or residential areas poses its own problems. There is a reason why petroleum and natural gas is stored in tank farms behind fences.

Is this promising technology? Certainly. But presently, it’s in the pie-in-the-sky development phase. The problems listed above will have to be solved before the process of using air conditioners to minimize climate change is feasible. In the meantime, we should keep forging away with new technology.


Looking for more great content? Visit our partner sites:

The Green Frugal

Running Across Texas


As Featured On Ezine Articles

I offer article and blog-writing services. Interested? Hire Me!


Did you find this article helpful? Thanks for supporting this free site with a small donation! We rely on our readers rather than a paywall to keep the lights on.


Visit Kelly’s profile on Pinterest.


About the Author:

Photo of Kelly R. SmithKelly R. Smith is an Air Force veteran and was a commercial carpenter for 20 years before returning to night school at the University of Houston where he earned a Bachelor’s Degree in Computer Science. After working at NASA for a few years, he went on to develop software for the transportation, financial, and energy-trading industries. He has been writing, in one capacity or another, since he could hold a pencil. As a freelance writer now, he specializes in producing articles and blog content for a variety of clients. His personal blog is at I Can Fix Up My Home Blog where he muses on many different topics.

Make a Round and Cylindrical Object Drilling Jig

index sitemap advanced
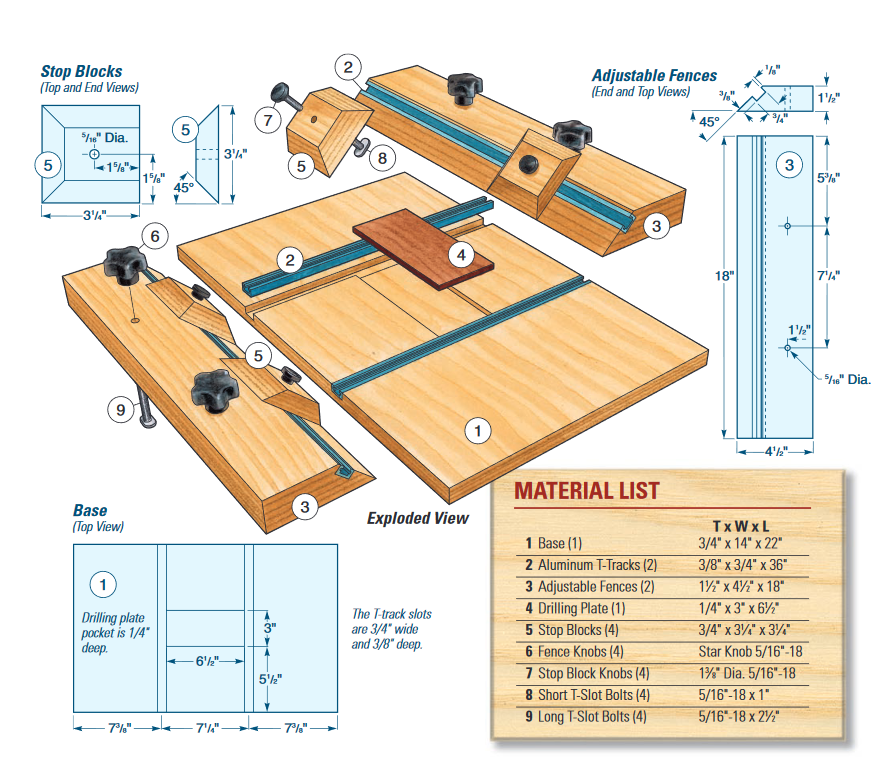
Woodworking jig to secure round, cylindrical while drilling

Holding round objects stable while drilling or otherwise working with them can be a sticky wicket. Holding them with your hand can lead to losing some skin and clamping them can mar the surface. One solution is to make this round and cylindrical object drilling jig. And who couldn’t use yet another woodworking jig?

Using the Jig

Once built, using the jig is straightforward. The adjustable fences slide in from the long sides and the stop blocks slide in the other direction. All movement and clamping of these components is done with the t-tracks, fence knobs, and t-slot bolts. The drilling plate serves to drill through, preventing splintering of the bottom of the object as the drill bit exits. You’ll find yourself using this woodworking jig over and over, with your drill press or independently.

Related Articles


Looking for more great content? Visit our partner sites:

The Green Frugal

Running Across Texas


As Featured On Ezine Articles

I offer article and blog-writing services. Interested? Hire Me!


Did you find this article helpful? Thanks for supporting this free site with a small donation!


Visit Kelly’s profile on Pinterest.


About the Author:

Photo of Kelly R. SmithKelly R. Smith is an Air Force veteran and was a commercial carpenter for 20 years before returning to night school at the University of Houston where he earned a Bachelor’s Degree in Computer Science. After working at NASA for a few years, he went on to develop software for the transportation, financial, and energy-trading industries. He has been writing, in one capacity or another, since he could hold a pencil. As a freelance writer now, he specializes in producing articles and blog content for a variety of clients. His personal blog is at I Can Fix Up My Home Blog where he muses on many different topics.
Paint Like a Pro with These 10 Tips

by Kelly R. Smith

search tips advanced search
Prepping a home for painting.
Prepping a home for painting

This article was updated on 09/27/20.

Nothing enhances the exterior of a home like a fresh coat of paint. Although the job seems straightforward enough, there are things you can do to make the job easier, faster, and more efficient. One thing you should know at the outset — older homes might have lead-based paint. Have yours tested before embarking on this job. That being said, read on for 10 tips to paint like a pro.

  • Scrape and sand all surfaces prior to washing. Although some painters like to wash first and then sand and scrape, this can leave behind dust that prevents the new paint from sticking as well as it should.
  • When power washing, keep the setting on low. High pressure from a power washer will force water into the wood. Even when the outer surface seems dry, it may have moisture trapped inside. What should you wash with? I like to use a tablespoon of dish soap with a mixture of TSP (trisodium phosphate) and bleach. The dish soap helps the solution to cling to the siding and trim rather than running off the house. This is the same principle as using a bit of soap as a surfactant when spraying garden plants.
  • Cover plants, cars, exterior lighting, and anything else that might be affected. Like most situations, an ounce of prevention is worth a pound of cure. Use breathable drop cloths for plants so they can breath. Protect lights, doors, and windows, with Cling Cover plastic.
  • Use a high-quality primer. Always prime bare spots before painting. If the home has oil-based paint that is peeling and cracking and complete removal is not a good option, use a product such as XIM Peel Bond primer.
  • Use the right tools. This should be obvious but many beginning painters and weekend warriors just try to “get by” with what they have on hand. You get what you pay for. Go for the pricier brushes, rollers, and sprayers. They might set you back a bit in the beginning but the finished job will be more professional.
  • Wear knee pads when working on a ladder. There’s always a rung where your knees are, right? Without knee pads to cushion your kneecaps, they will be squealing at you by the end of the day and tomorrow won’t be any better.
  • Plan to spend more time to paint window trim. Painting in the field might be a breeze, but window trim is confoundingly time-confusing. The devil is in the details and the time to apply painter’s tape and sanding really adds up.
  • Don’t paint into the evening. The main issue in the evening is that condensation forms on the surface of the paint when the sun goes down, particularly during the spring and summer. On wet paint, this causes the water-soluble components to break down and rise to the surface. This is called surfactant leaching. After the water evaporates, you’re left with a waxy-looking area. It may go away but there’s no need to take a chance to begin with. In the late afternoon, stop painting and do prep work for the next day.
  • Prevent sticky windows and doors. Where two dry surfaces painted with latex meet, they want to stick to each other. You have most likely noticed it yourself, even on drawers and garage doors. It is completely normal and is called blocking. You can prevent it with a thin coat of furniture wax.
  • Finally, don’t forget on-going maintenance. You might think you’re done, but that is just an illusion. Things like repairing caulking and touching-up paint should be done on a regular basis. Always write down all the details of the kind of paint, sheen, and color of paint that you used.

I hope these 10 tips to paint like a pro will make your painting adventure the best it can be. Doing it yourself can save you a lot of money if you have the time and inclination. Any specialized equipment like a spray rig might be available for renting.


Looking for more great content? Visit our main site I Can Fix Up My Home or our partner sites:

The Green Frugal

Running Across Texas


As Featured On Ezine Articles

I offer article and blog-writing services. Interested? Hire Me!


Did you find this article helpful? Objective journalism is becoming harder to find all the time. Please help with a small donation of $3 or more to keep this site free for all. Thank you!


Visit Kelly’s profile on Pinterest.


About the Author:

Photo of Kelly R. SmithKelly R. Smith is an Air Force veteran and was a commercial carpenter for 20 years before returning to night school at the University of Houston where he earned a Bachelor’s Degree in Computer Science. After working at NASA for a few years, he went on to develop software for the transportation, financial, and energy-trading industries. He has been writing, in one capacity or another, since he could hold a pencil. As a freelance writer now, he specializes in producing articles and blog content for a variety of clients. His personal blog is at I Can Fix Up My Home Blog where he muses on many different topics.
close

Enjoy this blog? Please spread the word :)

RSS
Follow by Email
Twitter
Follow Me
Tweet
Pinterest
Pinterest
Pinterest
Instagram
LinkedIn
Share