|
Troubleshoot and Repair a Doorbell
Doorbells, also Called Door Chimes, are Simple to Fix; Check the Button, Transformer, and Buzzer
© 2010 by Kelly R. Smith all rights reserved; content may not be copied, rewritten, or republished without author’s written permission

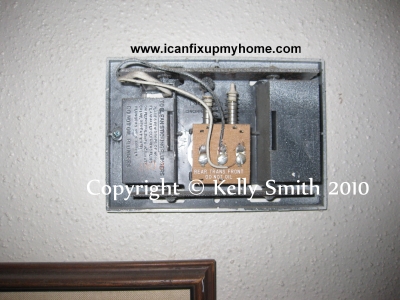
The body of a residential doorbell showing the chime
This article was updated on 05/03/21.
Ads we feature have been independently selected and reviewed. If you make a purchase using the links included, we may earn a meager commission, which helps support the site. We thank you in advance.
Troubleshooting and repairing a doorbell is rather simple but it’s far from intuitive. You’ll need to follow a few basic steps and have a few basic tools handy. Although models vary, this article explains how to work on a basic, generic model; fancier ones like the Ring Video Doorbell Pro are beyond the scope of this tutorial. Here are the tools you’ll need:
- Rubbing alcohol
- Analog or digital multimeter (how to use a multimeter)
- Screwdrivers
- Rubber grommets
- Sandpaper
- Q-Tips
Begin by Checking the Doorbell Button
The button is the component that sees the most human action, so it’s logical that it’s most likely to be the part to fail. It is remarkably resilient given its tireless service. It’s also somewhat exposed to the heat, cold, and elements, and in some neighborhoods far too many door-to-door salesmen hungry for a sale.
Begin your diagnosis by opening the button assembly; you’ll have to snap off or unscrew a protective cover in some cases. Next, disconnect the wiring. Simply touch the ends of the wires together to complete the circuit. If the bell rings, clean the button contacts off using sandpaper, reattach the wiring, press the button, and listen. If it doesn’t chime now, the button is defective; replace it out with a new one.
If it turns out that your problem isn’t the button, your next step is to check the step-down transformer. It steps your 120V down to 10V-18V. As before, check the wiring to be sure you have good connectivity. For this step, it’s a good idea to cut the power. If wiring is secure, you’ll need to troubleshoot the transformer.
- Restore the power.
- Set your multimeter on the AC V scale in the 50-volt range.
- Contact the multimeter leads to the low voltage terminals on the transformer.
- No voltage signal? The transformer is defective. Replace it.
- Try the button again.
- If it doesn’t work now with a new transformer, it’s time to move on to the buzzer or bell unit.
Buzzer Unit Maintenance and Cleaning
The conventional buzzer, doorbell chime, or bell unit is usually a plunger/clapper and tone bar system. It must be be clean, dust, and dirt-free to operate properly as designed. It shouldn’t be lubricated. Common mistake; don't do that. Instead, clean the assembly very carefully with cotton Q-Tips and rubbing alcohol.
Look closely; the tone bar has rubber grommets installed on it. These must be in good shape for the bell to sing out with the melodious sound it was designed for. Unfortunately, as time marches resolutely on, the rubber materials dries out and eventually becomes brittle; not surprising, given its sometimes harsh environment. As you might expect, this causes the sound to be muted.
Since you’re there already, take the opportunity to change these out no matter what shape they’re in. You can find the correct size at your local electrical supply store or Home Depot. An ounce of prevention and all that jazz.
Problems with the Chime Volume?
Sometimes homeowners just aren’t happy with the volume when a guest presses the button. This can happen for a variety of reasons. It might be that the electrical contractor installed a model inappropriately sized for your home (common), perhaps the homeowners have are hearing-impaired, or the chimes simply can't penetrate multiple closed doors.
There are solutions that don’t entail installing complete new units. One such solution is marketed under the name Extend-a-Chime. It consists of a transmitter which connects to the low voltage terminals and the unit, and plugs into any receptacle.
Did you find this article helpful? Share it!
Visit Kelly's profile on Pinterest.
Related Wiring and Electrical Articles
Did you find this article helpful? Millions of readers rely on information on this site and our blog to stay informed and find meaningful solutions. Please chip in as little as $3 to keep this site free for all.
About the Author:
 Kelly R. Smith is an Air Force veteran and was a commercial carpenter for 20 years before returning to night school at the University of Houston where he earned a Bachelor’s Degree in Computer Science. After working at NASA for a few years, he went on to develop software for the transportation, financial, and energy-trading industries. He has been writing, in one capacity or another, since he could hold a pencil. As a freelance writer now, he specializes in producing articles and blog content for a variety of clients. His personal blog is at Considered Opinions Blog where he muses on many different topics. Kelly R. Smith is an Air Force veteran and was a commercial carpenter for 20 years before returning to night school at the University of Houston where he earned a Bachelor’s Degree in Computer Science. After working at NASA for a few years, he went on to develop software for the transportation, financial, and energy-trading industries. He has been writing, in one capacity or another, since he could hold a pencil. As a freelance writer now, he specializes in producing articles and blog content for a variety of clients. His personal blog is at Considered Opinions Blog where he muses on many different topics.
|
Looking for more great content? Visit our partner sites:
The Green Frugal
Running Across Texas

Do you need an article or blog post written? I offer these services at reasonable rates. Contact me for a quote!

|