Ads we feature have been independently selected and reviewed. If you make a purchase using the links included, we may earn a commission, which helps support the site. Thank you for your support.
This DIY guide will teach you how to repair drywall holes. Drywall repairs involve using Sheetrock®,
drywall compound, joint tape, and drywall tools. But if you want to hire a contractor or handyman, be sure to check their references, insurance, and BBB status.
So there’s a hole in your drywall. It happens. Whether the wall took a fist shot or it had a head on
collision with a tricycle matters not.
It’s got to be fixed at some point. Luckily, any DIY type person can tackle this job. Read on and learn all there is
to know about repairing drywall holes. The process is just a bit more involved than
repairing drywall seams.
DIY Trivia: Some people mix the terms but drywall is gypsum board and Sheetrock®, on the other
hand, is a brand of drywall. Confused? Don’t be!
Tools and Materials for Fixing Drywall Damage
You probably already have these tools in your home tool box. If not, don’t worry. These are all
inexpensive.
Mesh drywall tape; it's much easier to work with than old-style paper tape
Taping knife
Drywall (same thickness as the existing; 1/2" for residential, 5/8" for commercial)
Drywall compound (mud)
Mud pan
Sander with sanding screen or sandpaper
Coarse thread drywall screws
Wood scrap
Prepare the Wall or Ceiling for the Drywall Repair
First, gather your drywall tools. Use your square and pencil to draw a square or rectangle
around the hole. The size of the drywall damage will determine whether to use the tri-square
or framing square.
Using the drywall saw, cut out the square.
Sand off any texture surrounding the square.
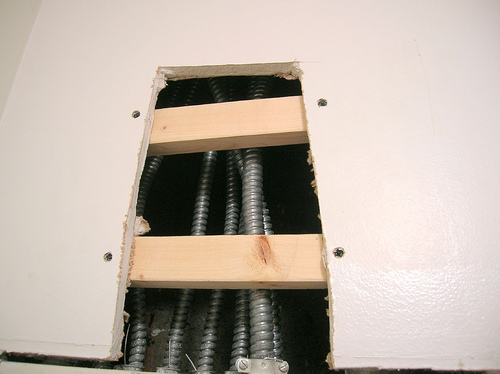
Cut the scrap of wood to size; it should be four inches longer than the height of the square
just cut out. Insert the scrap of wood into the hole and center it. A piece of 1” X 4” works well
for this. any wood grade will do.
Hold the wood against the inside of the wall and secure it with three sheetrock screws at the top and three in the bottom. Be sure that the screw heads are slightly lower than the wall surface.
DIY Tip: If the wood is hard to hold, drill a hole through it, stick a piece of string through it,
and tie a nail to it. Now it can be held tight to the wall by the string. When done, just push the string
through the hole into the wall! You can also put it through the patch when you are screwing it to the wood.
Apply the Drywall Patch
This part is easy; just cut the sheetrock to fit into the hole and carefully screw it into the wood
scrap. But don’t push hard, let the screw threads do the work. You don't want to push the wood scrap
out of the drywall it’s secured to.
Tip: If this all seems like a lot of trouble, you can just buy a drywall patch kit.
Taping and Floating a Sheetrock Patch
Drywall finishing
is an interesting proposition. It takes time and practice just like any other art form. Like wall
texturing methods, practice makes perfect.
Apply drywall tape around the edges of your patch.
Put some drywall compound in your mud pan and use the taping knife to thin the mud just a tiny
bit with water. Not everyone does this but I find full-strength a bit of a pain to work with.
Now use the taping knife to spread mud on the tape and on the screw indentations. Use the knife to
smooth it out but don’t leave a thick coat. This step is just to fill the joints and secure the tape.
Let the mud dry.
Sand any ridges on the dry drywall mud.
Now comes the floating step. Once again, get some mud in the pan and apply it to the patch and a
few inches beyond the tape. The goal here is to have the wall surface flush and even.
Let the mud dry and sand it lightly, feathering the outside edges to blend in with the surface.
Admire the patch! Is it good? Satisfactory? If not, float, dry, and sand again.
Did you find this article helpful? Millions of readers rely on information on this site and our blog to stay informed and find meaningful solutions. Please chip in as little as $3 to keep this site free for all.
About the Author:
Kelly R. Smith is an Air Force veteran and was a commercial carpenter for 20 years before returning to night school at the University of Houston where he earned a Bachelor’s Degree in Computer Science. After working at NASA for a few years, he went on to develop software for the transportation, financial, and energy-trading industries. He has been writing, in one capacity or another, since he could hold a pencil. As a freelance writer now, he specializes in producing articles and blog content for a variety of clients. His personal blog is at Considered Opinions Blog where he muses on many different topics.
Do you need an article or blog post written? I offer these services at reasonable rates. Contact me for a quote!


 Hold the wood against the inside of the wall and secure it with three sheetrock screws at the top and three in the bottom. Be sure that the screw heads are slightly lower than the wall surface.

