Learning how to paint a new sheetrock wall isn’t hard; it is one of the best ways to refresh your walls on a budget, but in order to achieve a truly high-quality
result, it’s important to start with a high-quality new wall. To quote a wise old painter who has seen
it all and done it all, “If you want to make a silk purse out of a sow’s ear, you have to start with a
silk sow.“ Are you ready to be your own paint contractor?
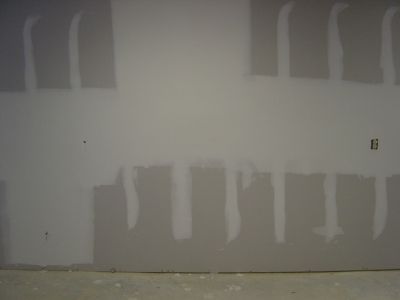
Is the Drywall Taping and Floating (Finishing) Up to Snuff?
Make sure that all the drywall joints, corners, and nail or screw indentations
have been taped, floated, and sanded. Look at the surface carefully from all angles, first just an
overview and then with a flashlight held at an angle. Any problem spots will show up in the end result.
The shinier (glossy sheen) the paint you use, the more prominent sheetrock finishing imperfections will
be.
Do any needed skimming with drywall compound and then sand it out.
Use a Drywall Texture Sprayer or a Manual Method
When you’re satisfied with your sheetrock finishing job, texture the wall now if you intend to.
(It’s highly recommended!) Either use a drywall texture sprayer or go for an
easy drywall texturing method.
It can dry while you shop for painting tools you might need. Calculate the square footage of the area
you intend to paint. Generally speaking, depending one grade and quality, one gallon of paint will cover 400 square feet.
Buy Your Painting Tools
First, inventory the painting tools you already own. Tools for
exterior painting projects
will work well indoors.
When shopping for tools, don’t pinch pennies on brushes and rollers. Poor quality paint brushes
won’t give you good flow and that makes your sheetrock painting difficult and frustrating. You need
brushes labeled for water-based latex paint. On high quality brushes, such as Purdy brushes, the bristles
taper from the base to the tips.
For cutting-in painting work (inside corners, at the ceiling, etc.), use a brush where the bristle
tips are also tapered from left to right at about a thirty degree angle. A 2 1/2“ to 3“ wide
brush is perfect for this.
Painting Tools for Larger Areas
When painting large, open areas, you’ll need a roller handle, disposable rollers, and a roller pole.
For higher walls you’ll need a telescoping pole instead of the fixed length one. You’ll also need
painter’s tape. This is for masking off intersections with door jambs, window casings, etc. The narrow
tape will be easier on your budget.
Buy a pan and some inexpensive plastic throw-away roller pan liners.
Finally, you’ll need drop cloths. Plastic ones are cheaper but canvas ones are easier to work with. Your choice. Myself, I like to use canvas and fold them and store them in the garage for the next project when done but if I used plastic for one-time use I would likely dispose of them.
Use a Latex Paint Primer and Then Paint
Begin your cutting-in work with your small brush where you have applied painter’s tape. Also
cut in any inside corners. You may do one section of your project at a time depending upon the size of
the project.
When that’s done, roll the paint on the wall over the open areas. First roll a wide
letter “W“ on the wall, and then roll over it up and down until the area defined by
the ’W’ is all filled in and even. With a heavy texture you may need to add diagonal strokes. Repeat this process until you’re done.
I hope this article on being your own painting contractor has helped; DIY will save you money. Keep in mind that if you are doing a really big job, depending on your local rules, you may be able to file for a DBA so that you can secure contractor pricing at a paint store.
Kelly R. Smith is an Air Force veteran and was a commercial carpenter for 20 years before returning to night school at the University of Houston where he earned a Bachelor’s Degree in Computer Science. After working at NASA for a few years, he went on to develop software for the transportation, financial, and energy-trading industries. He has been writing, in one capacity or another, since he could hold a pencil. As a freelance writer now, he specializes in producing articles and blog content for a variety of clients. His personal blog is at I Can Fix Up My Home Blog where he muses on many different topics.


 Kelly R. Smith is an Air Force veteran and was a commercial carpenter for 20 years before returning to night school at the University of Houston where he earned a Bachelor’s Degree in Computer Science. After working at NASA for a few years, he went on to develop software for the transportation, financial, and energy-trading industries. He has been writing, in one capacity or another, since he could hold a pencil. As a freelance writer now, he specializes in producing articles and blog content for a variety of clients. His personal blog is at
